Help! First Acrylic Acetate Pen Blank

Signed-In Members Don't See This Ad

64Stang

Member
Joined
Apr 20, 2012
Messages
35
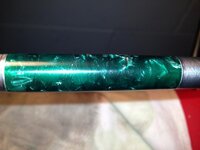
I am new to turning and this is my first Acrylic Acetate Pen blank. I have sanded through all the grits to 600 (dry) and then mirco meshed to 12000 (wet). I wiped the blank down between grits and this was my result after using Novus 2 polish. I am wondering where I went wrong. Be kind, I am new to Acrylic. :)

Maybe lathe speed?

See attached photo.

Thank you in advance.
 

Attachments

  • IMG_4219.jpg
    IMG_4219.jpg
    36.9 KB · Views: 1,075
Signed-In Members Don't See This Ad
That does not look like acrylic acetate.

It looks more like acrylester or another resin mix.

That makes a difference as to what contributed to the problems you are showing.

IF my vision is correct you have scratching and small white spots?? Is there also a "pit" on the left?

Was the material coming off in "ribbons" or was it more like pebbles of salt hitting you?
 
Just a suggestion, ease up on the pressure especially with the lower grits. Also be sure you have your lathe turned down relatively slow so it doesn't build up heat. If your turning is relatively smooth, start with 400 and gently get it to the point where after you wipe it off it leaves a dull blank with no obvious deep scratches. THEN move to 600 and repeat.

If you see any deep scratches, you've either used too much pressure, let the blank get too hot or had something clog up the paper. These are the typical problems I've seen. Don't move to the next grit until you are sure you have a surface that is ready for it.
 
Thanks for the suggestions. I thought it would be easier then a CA finish on wood....I have had good results so far doing that. :)
 
It typically is easier than a CA finish, but some resins are much softer than others. The softer the material, the less pressure you can use.
 
I have a feeling that you are right and used too much pressure at the lower grits. Should I just turn it a tad more and then start over?
 
OK, that is AA!!

So, the problem is, likely, you started sanding with too coarse sandpaper.

Acrylic will get deep scratches if you use anything under about 240 grit. Once you have the deep scratches, getting them out is a bear!!!

Emphasize the look of the blank, when you are sanding at about 400 grit (which is where I start, but that does not have to be the case). You should see thin, shallow scratches on the surface. IF you have any deep scratches, you have to sand them out with the 400 or 360 or so, when you get to 600, it will start getting shiny, but it won't remove deep scratches.

Sand with the lathe turning about 1000 RPM, but be aware of heat. If your fingers are getting hot, either go to wet sanding or stop and let it cool off, then continue.

Most of all, avoid making the deep scratches and you won't have to work nearly as hard.

Good luck--it only took me about a year and a couple dozen blanks to figure this out---the internet makes it much easier!!!

Welcome to IAP!!!!
 
Thanks, I will work on it tomorrow and see what I can do. I guess softer is easier to turn and harder to finish...makes sense :)

I will post a new pic if I get it correct... Thanks for the advice.
 
Light pressure and slower speed. Stop the lathe and sand side it side. Make sure all circular scratches are gone before moving to the next grit. I start at 220 and if the circular scratches don't come out, I move down to 180 side to side, then back to 220 side to side. I keep doing that thru all the grits, even the micro mesh.

Another thing, is to use Abranet instead of the turners sandpaper strips. The Abranet is an open mesh with consistent grit. The sandpaper stripsI have used had clumps in the grit which caused deep scratches which were a bear to get out.

Sent from my iPad using Forum Runner
 
Last edited:
AKBeaver said:
Light pressure and slower speed. Stop the lathe and sand side it side. Make sure all circular scratches are gone before moving to the next grit. I start at 220 and if the circular scratches don't come out, I move down to 180 side to side, then back to 220 side to side. I keep doing that thru all the grits, even the micro mesh.

Another thing, is to use Abranet instead of the turners sandpaper strips. The Abranet is an open mesh with consistent grit. The sandpaper strips I have used had clumps in the grit which caused deep scratches which were a bear to get out.

Sent from my iPad using Forum Runner

Sent from my iPad using Forum Runner
 
I agree with some of the other comments that it appears you're using too rough a grit to start with and leaving deep sanding marks that haven't been removed.

I also had a tough time getting my first acrylics to look good. Seems I spent way too much time working on a finish with micromesh and such to get that glossy look.

I now turn the item to rough shape with my bowl gouge. I often get pitting because it comes off in chips and not ribbons. I switch to a skew before the final diameter to control the pitting and get a cleaner final pass.

I then pull out the wet/dry sandpaper and water. I've switched to wet sanding for my acylics and noticed that finishing time is reduced.

I first go through 220, 320, 400, and 600 wet/dry sandpaper. Just dip the sandpaper in water and gently move across the surface. You'll build up a slurry that wipes off easily. Be sure to put something on the lathe ways beneath the turning to keep the water/slurry from gettng on the metal parts of the lathe.

I then take the acrylic to the buffing wheel where I use the first 2 wheels. I usually take the mandrel off the lathe to the buffing station and buff the item while still on the mandrel. It just helps holding the pen body towhile applying it to the rotating wheels. Be careful if hand holding the item as the wheels will grab it and sling it across the room.

If I see pitting on the turning even after the skew, I may stop well before the final diameter and use 100 grit sandpaper gently to get rid of the pitting. This would be for some of the more problematic acrylics.
 
Ahh Sanding marks, my nemesis. First, and I know you are new, learn to make a finer final cut w/ your skew so you can start sanding at 400 or 600, I don't even use my 150-320 one pens anymore. When I grab a strip of paper I rub it on itself to "dull" the paper slightly in case there is a rouge piece of silica that wants to gouge my work. Next, I don't dry sand Acrylics/Resins at all, always wet, but that's just me. Wet sanding keeps the paper clean and it lasts longer. I would go back to 600 Wet and run through the MM again. Be prepared to build this one back up w/ CA when all is said and done.
 
Last edited:
I agree with the others, you probably started with too low a grit of sand paper and put deep scratches in it.

When I do a new material I often turn the blank round and finish it as I would a fully turned down blank. I pay attension to how much material sanding removes as this will be important when getting to the final size.

I start sanding with 220 only if I have to and continue with 320, 400 and 600 wet. Ideally starting with 400.

With every grit you should eliminate all the 'larger' scratches from the previous grit. You shouldn't move on until all the 'scratches' match the current grit. By looking at your pen you moved up in grits too soon. 12000 MM will eventually get it smooth but it might take you a year or so!
 
Last edited:
yep too much pressure...look at your bushings, your scratching metal

light pressure is key, let the sandpaper do the work

another problem with a lot of pressure will be heat buildup
 
In addition to all of the great sanding advise posted, I would also suggest rubbing compounds as well. After the sanding (like the good folks here have noted), I use two levels (aka grits) of automotive rubbing compounds to take out the fine scratches; then move to plastic cleaner and then polish & buffing. I had a blank not unlike yours, that I was about to trash; that is now my wife's carry pen.
 
I use only wet/dry paper, start at 220/320/400/600/800 then MM. stop the lathe between each grade and sand along the blank.

I never dry sand any acrylic blank - only wet sand it.

and I leave the lathe running at full speed for sanding.
 
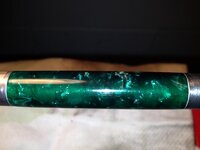
Okay, I appreciate all the suggestions. I went at it again and here are the results, I think it was a good learning experience. Thanks again.
 

Attachments

  • photo.jpg
    photo.jpg
    33 KB · Views: 244
Okay, I appreciate all the suggestions. I went at it again and here are the results, I think it was a good learning experience. Thanks again.

Very good... that is a big improvement. Next if you want to take it to the next level - look into a buffing setup. That will make that blank look even better from where it is!
 
So far I only used Novus 2. I have a buffing wheels but just haven't used it that much yet. I am going to turn some more tomorrow, I plan on giving that a try.
Thanks
 
I then take the acrylic to the buffing wheel where I use the first 2 wheels. I usually take the mandrel off the lathe to the buffing station and buff the item while still on the mandrel. It just helps holding the pen body towhile applying it to the rotating wheels. Be careful if hand holding the item as the wheels will grab it and sling it across the room.

I learned this trick after having my buffer throw 2 nearly perfect pens across the room and shatter them. Such a life saver.
 
Agree on the buffer sending blanks across the room. But I don't use my mandrel as I don't want my buffing wheel contaminated with metal bits. I made a tapered mandrel from a dowel (credit to Ed from exoticblanks.com on this one, his buffing video was very helpful. If you haven't been to his site, I recommend checking out the videos he has on there.) Also buff along the axis of the pen, it will leave much better results.
 
Hardnes Gauge

Carl mentioned that some resins are softer than others. Just curious if this is a batch thing, a process thing, or a raw material thing. Do batches from the same vendor using the same process vary in hardness? Could a vendor be using different processes affecting the hardness? Do different suppliers' resins, hardeners, or both affect the hardness of the final product regardless of the process used? Big 'OR' here: is it all of the above singly or in combinations? (I have a suspicion that this is the correct answer!) Finally, is there a way for the turner to know the softness/hardness of the blank before turning? Just some questions that came to mind while reading this thread?
 
There is certainly differences between the materials (PR, alumilite, AA, etc, etc.)

There (from what I have read) can also be differences within the same resin depending on how much hardener is used and the amout of colourant used ... too much of either can results in them being more brittle.
 
Back
Top Bottom