Spydouble07
Member
Hi,
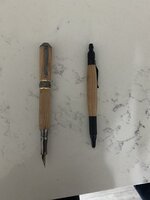
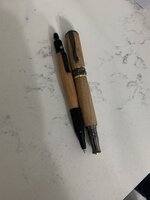
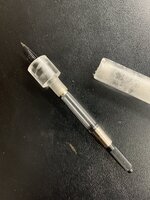
Around three weeks ago my 10 year old son wanted to make pens so I purchased a few kits (and a lathe, drill bits, bushings, sandpaper, polish, epoxy, pen mill, turning chisels, etc.) and dove right into it. Turned a sample in pine, then in maple, and finally, after two hours, finished a $49 fountain pen kit and a $15 mechanical pencil (attached) in cherry. As much as I enjoyed turning, for the first time ever, I quickly realized three things:
1) kits are expensive (you ALWAYS overpay for a kit compared to the same quality pen that can be purchased as a final product.
2) the quality of the parts are just... not. Plated parts made of zinc alloy, and if you're lucky, plated steel, are not really what I would consider quality. I've yet to find parts made of stainless steel (brushed or polished) and to my knowledge, it doesn't exist. As far as the mechanism goes, my Pental Graphgear 1000, which now sells on Amazon.com for $10.80 is by far of much better quality than the $15 kit with the Schmitt mechanism.
3) kits are limited to someone else's design.
As much as this may sound like a rant, it is just my opinion, and I do understand the appeal of kits for some or most people, just not for me. So I immediately started researching how to make pens without a kit and learned that I would need the following:
1) lathe (preferably a metal lather)
2) taps and dies of varies sizes (preferably triple lead or triple start for the cap)
3) collet set
4) a die and tap holder, and a Jacobs chuck
5) material
6) mechanism, nib, etc.
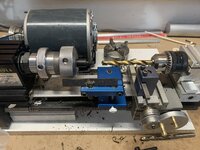
1) I have a Taig metal lathe
2) I purchased a bunch of different sizes of taps and dies (skipped the triple lead for now), including some extremely hard to find hand chasers
3) My ER16 headstock accepts collets only to size 3/8" so I had to purchase a new headstock that has a 3/4" 16 thread spindle and would accept the PSI collet set with their included adapter.
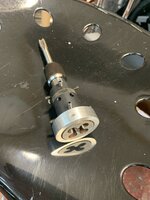
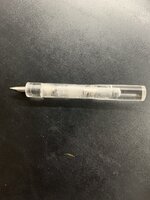
4) The holder I have only accepts a 13/16" and 1" die holder, so I had to make an adapter (my first metal lathe part - took around 8 hours) that would accept a 1-1/2" die (photo attached). The other side of the holder accepts an Irwin tap holder. My Jacobs chuck accepts only to 1/4" so I had to purchase a larger one that would accept to 1/2".
5) I have a bunch of cherry, and purchased clear acrylic rods (for prototyping, but it may also be cool to make transparent pens) and ebonite in various sizes.
6) Purchased a Jowo #5 nib and converter for fountain pen.
I would love to be able to make every single part, including the mechanism, nib, feed, clip, etc. from scratch. Wish me luck, better yet, please share advice and how to.
Thank you,
Charles
Around three weeks ago my 10 year old son wanted to make pens so I purchased a few kits (and a lathe, drill bits, bushings, sandpaper, polish, epoxy, pen mill, turning chisels, etc.) and dove right into it. Turned a sample in pine, then in maple, and finally, after two hours, finished a $49 fountain pen kit and a $15 mechanical pencil (attached) in cherry. As much as I enjoyed turning, for the first time ever, I quickly realized three things:
1) kits are expensive (you ALWAYS overpay for a kit compared to the same quality pen that can be purchased as a final product.
2) the quality of the parts are just... not. Plated parts made of zinc alloy, and if you're lucky, plated steel, are not really what I would consider quality. I've yet to find parts made of stainless steel (brushed or polished) and to my knowledge, it doesn't exist. As far as the mechanism goes, my Pental Graphgear 1000, which now sells on Amazon.com for $10.80 is by far of much better quality than the $15 kit with the Schmitt mechanism.
3) kits are limited to someone else's design.
As much as this may sound like a rant, it is just my opinion, and I do understand the appeal of kits for some or most people, just not for me. So I immediately started researching how to make pens without a kit and learned that I would need the following:
1) lathe (preferably a metal lather)
2) taps and dies of varies sizes (preferably triple lead or triple start for the cap)
3) collet set
4) a die and tap holder, and a Jacobs chuck
5) material
6) mechanism, nib, etc.
1) I have a Taig metal lathe
2) I purchased a bunch of different sizes of taps and dies (skipped the triple lead for now), including some extremely hard to find hand chasers
3) My ER16 headstock accepts collets only to size 3/8" so I had to purchase a new headstock that has a 3/4" 16 thread spindle and would accept the PSI collet set with their included adapter.
4) The holder I have only accepts a 13/16" and 1" die holder, so I had to make an adapter (my first metal lathe part - took around 8 hours) that would accept a 1-1/2" die (photo attached). The other side of the holder accepts an Irwin tap holder. My Jacobs chuck accepts only to 1/4" so I had to purchase a larger one that would accept to 1/2".
5) I have a bunch of cherry, and purchased clear acrylic rods (for prototyping, but it may also be cool to make transparent pens) and ebonite in various sizes.
6) Purchased a Jowo #5 nib and converter for fountain pen.
I would love to be able to make every single part, including the mechanism, nib, feed, clip, etc. from scratch. Wish me luck, better yet, please share advice and how to.
Thank you,
Charles
Attachments
Last edited:
 ).
). ") ) and a $5 nicely stitched, yet thin belt that could barely holster a key fab, and yet people buy it. I don't know if it's because of a lack of knowledge or something else. For me, I made my own belt buckle out of stainless steel, and belt out of thick English bridle leather. It also looks great. As far as making pens goes, I find it similar to art. You can paint by number (pen kit) or from scratch (kitless). If I design a pen that I like and want to sell, I would most likely find a manufacturer that can produce it and I will continue to tinker and prototype, and maybe try bowl turning next.
) and a $5 nicely stitched, yet thin belt that could barely holster a key fab, and yet people buy it. I don't know if it's because of a lack of knowledge or something else. For me, I made my own belt buckle out of stainless steel, and belt out of thick English bridle leather. It also looks great. As far as making pens goes, I find it similar to art. You can paint by number (pen kit) or from scratch (kitless). If I design a pen that I like and want to sell, I would most likely find a manufacturer that can produce it and I will continue to tinker and prototype, and maybe try bowl turning next.

 I can help you get rid of it.