Hammer

Signed-In Members Don't See This Ad
See more from monophoto

monophoto

Member
Joined
Mar 13, 2010
Messages
2,542
Location
Saratoga Springs, NY
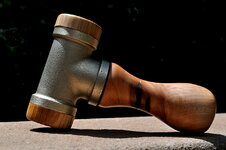
Inspired by a video I saw some time ago, I recently decided to make a hammer.

The body of the hammer started out as a 3/4" brass plumbing 'T'. The handle was turned from a scrap of very hard and very dry firewood - I believe it was black locust but can't be totally sure. The faces are white oak. All of the wood is finished with boiled linseed oil.

The head is filled with bb's so that the hammer is a 'dead blow' design. Because the handle is so short (less than 6"), it's intended for applications that call for tapping rather than hard pounding.
 

Attachments

  • Hammer.- small.JPG
    Hammer.- small.JPG
    356.9 KB · Views: 304
Signed-In Members Don't See This Ad

D.Oliver

Member
Joined
May 10, 2011
Messages
3,531
Location
Faith SD
Years ago, I seen the plans for these in ShopNotes Magazine. I've been meaning to make one every since, but have never got it done. Every time I see someone on YouTube make one, I'm reminded I still need to get mine built. I like the stubby version you created.
 

monophoto

Member
Joined
Mar 13, 2010
Messages
2,542
Location
Saratoga Springs, NY
How did you manage the threading?

Used a galvanized steel coupling - filed a groove in the threads. Crude, but much less expensive than buying a 3/4" NIP die.

By the way - that raises a good point. These are not cheap to make. Brass "T's" are pretty pricey. But I wanted to do it, and brass looks better than galvanized steel.

The threads aren't deep, but they don't have to be because the faces don't get a lot of stress. When using the hammer, the downstroke tends to force the face on the working end into the T, while the bb's inside the T put a slight outward pressure on the other face. The threads only need to be able to resist the force from the bb's

And eventually the faces could have to be replaced, so it will be necessary to unscrew them. Not an application where simply gluing them in would be a good solution.

As a starting point, measured the inside diameter of the threaded fitting, and turned the tenon on the ends to be about 1/8" larger. With the hard wood I was using, that was still too large to thread, so I carefully trimmed off enough material until I was able to get the tenon to screw into the coupler/die.

The faces are end-grain. I suspect it would have been easier to cut threads in the faces if I had made them from face grain. I'm still debating with myself if the additional wearability of face grain justifies the additional work.

Maybe I'll make a face grain face so that I can compare the two options.
 
Last edited:

Rockytime

Member
Joined
Jun 3, 2014
Messages
1,074
Location
Arvada, CO 80003
How did you manage the threading?

Used a galvanized steel coupling - filed a groove in the threads. Crude, but much less expensive than buying a 3/4" NIP die.

By the way - that raises a good point. These are not cheap to make. Brass "T's" are pretty pricey. But I wanted to do it, and brass looks better than galvanized steel.

The threads aren't deep, but they don't have to be because the faces don't get a lot of stress. When using the hammer, the downstroke tends to force the face on the working end into the T, while the bb's inside the T put a slight outward pressure on the other face. The threads only need to be able to resist the force from the bb's

And eventually the faces could have to be replaced, so it will be necessary to unscrew them. Not an application where simply gluing them in would be a good solution.

As a starting point, measured the inside diameter of the threaded fitting, and turned the tenon on the ends to be about 1/8" larger. With the hard wood I was using, that was still too large to thread, so I carefully trimmed off enough material until I was able to get the tenon to screw into the coupler/die.

The faces are end-grain. I suspect it would have been easier to cut threads in the faces if I had made them from face grain. I'm still debating with myself if the additional wearability of face grain justifies the additional work.

Maybe I'll make a face grain face so that I can compare the two options.

Thanks for the explanation. Very clever and very nice.
 
Top Bottom