Fountain Pen Construction

Signed-In Members Don't See This Ad

workinforwood

Member
Joined
Mar 1, 2007
Messages
8,173
Location
Eaton Rapids, Michigan, USA.
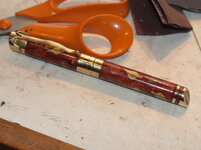
There's always lots of people wanting or thinking of making custom pens and there's a million ways to go about it. For those currently thinking about it and the few that have PM'd me about threading and what not..well here you can watch me make a pen. Can't necessarily show you every single step, but should help guide you and show you just how much work and thought is involved.

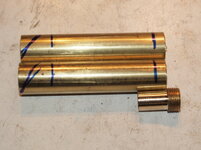
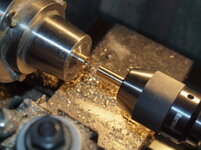
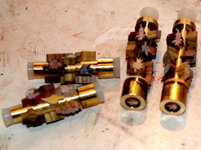
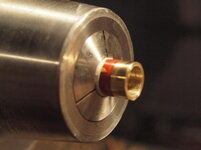
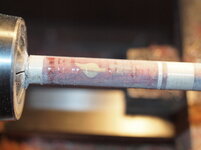
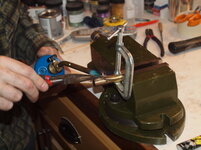
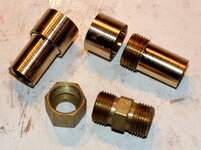
I have a bucket of brass plumbing couplers I bought years ago at an auction for a dollar and in my opinion they make the beginnings of a great little custom pen. They are 1/2" couplers with compression fittings. I know what the end result needs to be, but how I get there is just a matter of measuring whatever I'm working with..I like working off the cuff with no real plans.

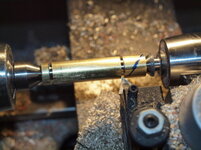
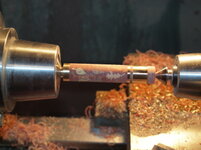
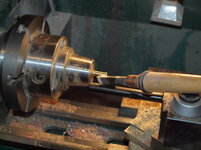
I tossed out the compression rings and screwed one nut on the end. I mounted the unit between centers and spun the nut until it was round and then spun off the fixed nut with threads on the back end of the coupler.

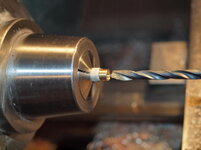
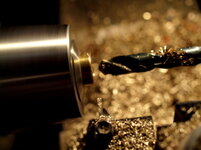
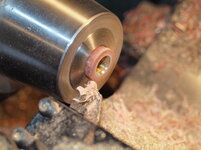
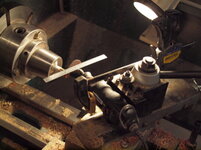
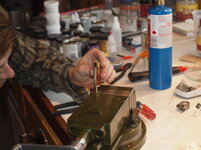
The inside of the coupler needs to be threaded to receive a grip section. I simply grab a bunch of drill bits and stick them in the hole of the coupler and whichever drill bit fits snug will determine what tap I use. I found that an 8mm drill bit fits real nice in the hole. So I pulled out a 9x1 tap. You take the first number and that is 9mm and subract the second number which is 1 and you get 8mm. So 8 mm is the hole size for a 9x1 tap. I love metric, it's so easy.

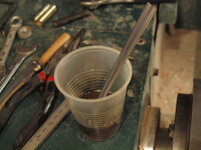
I like to use some oil for tapping and when drilling. Just a little dixie cup with some motor oil..whatever is laying around, and an acid brush to apply the oil and clean off debris.

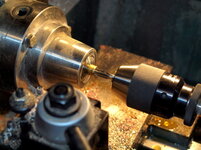
The coupler simply goes into a collet. The tap goes into a drill chuck. You brush some oil on the tap. You push the drill chuck into the part and you manually turn the collet chuck. For Brass..a couple turns and then a 3/4 back turn to clean the cut works great for me. You keep going until the tap goes all the way through. That's a piece of cake.

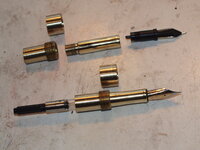
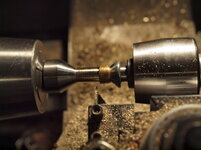
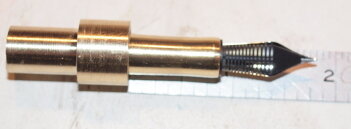
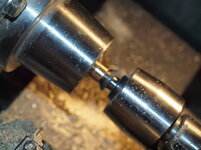
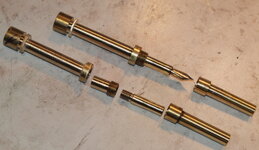
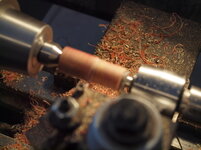
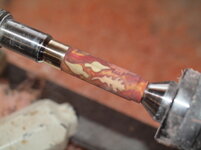
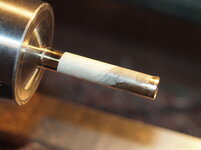
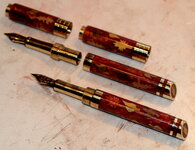
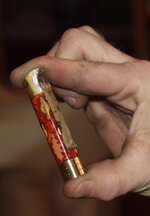
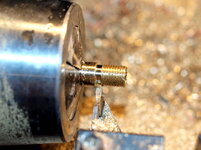
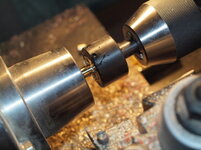
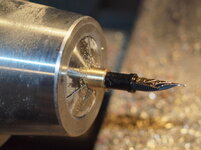
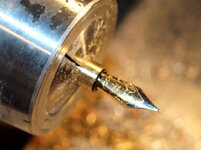
Now you need a grip section. I used solid 3/8 brass rod. You need to know how long you want your grip. I like 1" ..easy number. With some calipers, you need to measure down into the hole of the coupler because there is a shoulder in there before you get to the threads and the threads themselves add to the length...in my case, the total rod needs be 1 5/8 long in order to screw in and still have an inch hanging out the end. So I chucked up the rod and parted it clean. I am using a meister nib #6. This requires a 7.4x.5 tap. So what will be the hole size ? 7.4-.5 is 6.9. So I drill a 6.9 mm hole all the way through the grip. I then make a tennon on one end of the grip to receive the threads. I find it best to cut outside threads first, inside threads last. The threads in the coupler I made where 9x1. For outside threads, 9 is the diameter. So I spin a tennon that is 9mm O/D. I use a die holder and the 9x1 die and put that in the drill chuck. Just like tapping, a little oil, in and out until you hit the shoulder. Now the threads at the shoulder are not as deep as the rest of the threads. I simply use a parting tool and part the threads off at the shoulder so that the grip will be able to screw right in and bottom out inside the coupler. Now you simply spin the outside of the grip until it just fits into the coupler and give it a test fit.
 

Attachments

  • P1210935.JPG
    P1210935.JPG
    67.2 KB · Views: 329
  • P1210931.JPG
    P1210931.JPG
    82.9 KB · Views: 364
  • P1210938.JPG
    P1210938.JPG
    66 KB · Views: 384
  • P1210934.JPG
    P1210934.JPG
    76.5 KB · Views: 408
  • P1210936.JPG
    P1210936.JPG
    71.6 KB · Views: 387
Signed-In Members Don't See This Ad

workinforwood

Member
Joined
Mar 1, 2007
Messages
8,173
Location
Eaton Rapids, Michigan, USA.
Now you need the fountain nib to screw into the grip. As before, you chuck up the grip and the 7.4x.5 tap and run that all the way through the grip. Screw in the nib. You see the nib sticks out..measure how much it sticks out. The measurement should be basically 1/2". You need to get the nib into the grip. You already know the o/d of the threads was 7.4. So with a slightly larger bit, a 7.5 bit, you drill into the end of the grip 1/2". Now you also need to seat the little tennon on the nib, so you drill an 8.5 hole 1/8 deep. Now the nib should slide 3/4 in and then hit the threads and screw in and seat itself into the coupler.

Now you can shape and polish your new grip. I just use a post and carbide hand tool to give it some curve.
 

Attachments

  • P1210939.JPG
    P1210939.JPG
    63 KB · Views: 811
  • P1210940.JPG
    P1210940.JPG
    63.6 KB · Views: 377
  • P1210941.JPG
    P1210941.JPG
    67.5 KB · Views: 359

workinforwood

Member
Joined
Mar 1, 2007
Messages
8,173
Location
Eaton Rapids, Michigan, USA.
Now I test fit everything again, including a converter. Of course, a converter will not fit into the back of the grip because the plastic shmidt converters are 7.5 OD. I put some tape on the finished grip to protect it from any scratches. I placed the nib beside the end of the grip so I could visually see how deep it goes in. Then measure from the back end to find out how deep I need to drill for my converter to slip in the hole without removing all the inner threads. I drill in to the back side, remove everything and test fit it all back together. Now I have a couple nib couplers and grips. I like to make any couplers and grips before I start the actual pen, so I know what sort of diameters and lengths I have to work with. total time 4 hrs, and if they were not 18k nibs, then the total cost would have been about $11 ea.

Yep..just a few plumbing parts. Some people won't like the metal on metal action, but that's ok by me. Sometimes I use a plastic cap, and sometimes I use metal..it's my pen and I can do what I want to...that's the freedom of building a custom pen! :)
 

Attachments

  • P1210943.JPG
    P1210943.JPG
    52.7 KB · Views: 298
  • P1210945.JPG
    P1210945.JPG
    77.7 KB · Views: 501

greggas

Member
Joined
Jun 21, 2009
Messages
1,109
Location
North Easton, MA
Thanks for taking the time Jeff to post this. i am just starting down the truly custom kitless road and this is very helpful...now to get my metal lathe
 

soligen

Member
Joined
May 11, 2010
Messages
1,085
Location
Sterling Heights, Michigan
Jeff,

Thanks for this. It is very timely for me. Funny thing is I was in the plumbing department yesterday looking for interesting doodads applicable to pen turning. Looks like I need to go back :)
 

thewishman

Member
Joined
Mar 9, 2006
Messages
8,183
Location
Reynoldsburg, Ohio, USA.
Thanks, Jeff! That is an explanation that I can almost:redface: follow to the end. Your pictures really help make the process understandable.

Will the brass surfaces age well?
 

workinforwood

Member
Joined
Mar 1, 2007
Messages
8,173
Location
Eaton Rapids, Michigan, USA.
A modern fountain pen pretty much has to be made this way if using your typical nib assemblies and refills or converters. If you were to make a front section all one piece that simply screws into a pen barrel, then when you go to unscrew the cap, the entire assembly is likely to unscrew and become lost inside the cap ...like the silly sierra syndrome.

Brass is beautiful. I love the color, whether it's new and shiny or old and tarnished. After I make my pens I will not put any protective finish on the metal. It will just slowly age to a nice patina. A customer can use some brasso to quickly renew the shine, but they never bother with it. Because I don't coat it, it will never have any pealing..it can get some light scratches, easily buffed out if desired, but no plating wear, nothing, just do nothing, the pen will last forever. With this particular design, it takes 2.5 turns to tighten the cap..no big deal at all and the cap is totally secure. The reason it takes only 2.5 turns is because after I rounded the nut, I chuck them and use a boring bar to remove 3-4 threads from the end, so the cap will slide on an 1/8" or so before engaging the threads, and with the threads being brass on brass, they shouldn't ever wear out. In the beginning things look a bit ugly, but everything will wash up nice with soap and water and I'll power buff the threads to a nice high shine. Next..I"ll put the parts to use and start making the body and cap structure. I have a pretty neat idea in my head what I want to make...if you can visualize what you want, there is always some way to make it happen.
 

workinforwood

Member
Joined
Mar 1, 2007
Messages
8,173
Location
Eaton Rapids, Michigan, USA.
I am not a machinist by any means. Everything I know is knowledge gathered from people here at the IAP and a few things from searching around the internet, and then putting it all to practice in the field.

I am now working on the pen section. I want the reduce the diameter of the pen as much as possible with the parts I chose to use. Using a set of calipers, I measure the I/D of the nib coupler where it goes into the body of the pen. I have determined that the thinnest I dare go is 11.5 mm. I simply mounted the part between centers and re-sized the back portion to meet my requirements.

In pic 2, you see I parted some solid brass rods. They are 3.25" long. This is just a number I pulled out of my head that I think sounds nice. The marks on the rods are kinda the look I'm imagining my pen to be.

Next I need to drill the rods. They are chucked into a collet. They should be positioned as close to the collet as possible but you still need enough sticking out just to remove them when finished. The closer to the collet, the less run-out you encounter, more accurate drilling. Although some of my pictures suck because I was just hand snapping some photo's rather than getting all fancy with my dirty oily hands of course...The first thing to drill a hole is to use a pilot bit...what I am showing you here in the third pic is EXTREMELY important in my opinion. This is a technique I was taught by Gary Nichols. When you look at the end of a drill bit, it's not just a point, but there is a short flat section with that point. This should be positioned up and down. This makes the flutes directly behind the point be at the sides of the drill bit, not at the top and bottom. Doesn't matter what you drill, this is how I was taught and it makes very good sense. Because the flutes are on the side, they unload better. If a bit gets loaded up, it will develop pressure from all the debris and that pushes on the bit causing it to drill off center. Flutes on the side can still do this, but it really helps with the unloading, so if you unload the bit often, you should get perfect holes and the unloading will go easier. I use my acid brush and constantly oil the bit, cleaning the debris away at the same time. At first you can drill a 1/4" at a time, but as you get deeper, you can go 1/8" and then maybe a 1/16, it's time consuming, but patience delivers perfection. I drilled 2.25 deep and then flipped the rod and drilled .75 deep. This did not connect the holes, I left a small bridge in between on purpose.

In the last picture, I make the tube section. I use a parting tool to mark my ends, not necessarily as deep as they will be, but enough to know where I want to remove all the material to make a tube. Then I changed to a cheap triangle bit and cored out the inside until the OD was 12.5 mm. That leaves the weakest part of the pen at 1mm. You can go thinner..I'm just not that brave. You make a mistake, you have to start from the beginning and it costs you money. After the middle is down to size, I just replace the bit with my parting tool and square the inside corners.


*** I don't know where to add this info...but this is also important. When you are using rods and collet chucks, you part off a piece of metal and it leaves a burr on the outside edge. You can cut yourself on this burr real nice...but even more than that, you can damage your collets. After I part a rod, I like to just walk over to my belt sander and just spin the edge of the rod end on it to remove the burr so it can't scratch the inside of a collet. Collets will last forever if you take care of them..they need to be cleaned periodically and you don't want to scratch them on the insides or it will cause damage to parts you are trying to make.
 

Attachments

  • P1220951.JPG
    P1220951.JPG
    64.9 KB · Views: 255
  • P1220954.JPG
    P1220954.JPG
    71.2 KB · Views: 268
  • P1220952.JPG
    P1220952.JPG
    59.1 KB · Views: 236
  • P1220946.JPG
    P1220946.JPG
    63 KB · Views: 254
Last edited:

workinforwood

Member
Joined
Mar 1, 2007
Messages
8,173
Location
Eaton Rapids, Michigan, USA.
Now the cap. The idea I have won't allow for my to include the finial as a solid piece attached to the cap..it has to be made separately, so I am simply going to make a tube.

First you need to know how long the tube will be. You need to include length lost by attaching tube to collar and to finial. I just screw on the collar to the nib section and place it on a ruler. I am making my cap tube 2 1/8 long. It will insert into the collar 1/8". I already know the ID on the back of the collar is 12mm. I also need to consider the width of the nib section, nib, grip all of it..the inside of the tube must be larger for it to fit inside.

Now there's no pic..shouldn't need one...a tube is a tube, you drill the inside, I went with 10.5 mm, then spin the outside to 12mm to just squeeze into the end of the collar.

Now in pic 2, I chuck the collar, the back side facing out. I bring in the tailstock with a center on it so make sure the part is sitting square in the collet.

In pic 3, I replace the center with the drill chuck. I put the tube into the drill chuck..just tight enough to hold it, you don't want to squish the tube. I put some solder goo on the tube and inside the collar. I lock the tail and bring the tube 1/8" deep into the back of the collar. Then I just grab my propane torch and heat the joint up nice and hot..when it reaches a certain temp, if you just touch the joint with some solder, the solder will suck itself into the joint all the way around in less than a second with no mess. That's a solid joint.

Now in pic 4 you see I have all the parts other than a finial and clip to make 2 pens.
 

Attachments

  • P1220949.JPG
    P1220949.JPG
    31.3 KB · Views: 154
  • P1220955.JPG
    P1220955.JPG
    66.5 KB · Views: 153
  • P1220956.JPG
    P1220956.JPG
    73 KB · Views: 187
  • P1220958.JPG
    P1220958.JPG
    57.3 KB · Views: 194

workinforwood

Member
Joined
Mar 1, 2007
Messages
8,173
Location
Eaton Rapids, Michigan, USA.
Now I decorate my future pens. Each leaf is hand cut and profiled on the backside, attached to the tubes with some CA glue. Then some stoppers. You see the end of the pen barrel, there is a 3/4" thick leaf glued in the hole..that's why I did not drill all the way through.

I put stoppers in the pens and place them in a mold.

I mark the mold with a green marker to I know where to cut them out.

A few of the leaves are thick enough to stick up beyond the top of the mold. That is a serious issue. You apply pressure, the air will push down the side of those leaves which means you will have some voids. To combat that, I place a piece of wax paper over top. This will even out the air and wax paper will just spin right off later on when I have time to spin the pens out.
 

Attachments

  • P1220962.JPG
    P1220962.JPG
    71.9 KB · Views: 172
  • P1220961.JPG
    P1220961.JPG
    61.7 KB · Views: 235
  • P1220960.JPG
    P1220960.JPG
    77.5 KB · Views: 233

seamus7227

Member
Joined
Mar 18, 2009
Messages
6,220
Location
Wichita Falls, TX
Keep it coming Jeff! You really should compile this into a tutorial for the library! I am curious where you bought the chuck that holds your dies. I found one on ebay but wasn't sure if it would work and if it was the same?
 

workinforwood

Member
Joined
Mar 1, 2007
Messages
8,173
Location
Eaton Rapids, Michigan, USA.
My collet chuck is 5C from Little Machine Shop, and if you are referring to the die holder, I have a couple sizes, from Victor Machinery, and the drill chuck is a keyless chuck from somewhere on ebay..sweet little drill chuck too. I have a 2MT version also for my little wood lathe.
 

seamus7227

Member
Joined
Mar 18, 2009
Messages
6,220
Location
Wichita Falls, TX
Jeff, chuck in reference is in the original post, fourth from the left, holding the die, in the tailstock. Is that the same one you are referring to?
 

workinforwood

Member
Joined
Mar 1, 2007
Messages
8,173
Location
Eaton Rapids, Michigan, USA.
It's not like I use, but yes, that would work if you have a 2MT tailstock. The difference is that mine does not have a morse taper, it's just a post that goes in a drill chuck. There's different size die holders for different dies..because you have small ones and large ones. That one looks excellent though, if it fits your equipment.
 

workinforwood

Member
Joined
Mar 1, 2007
Messages
8,173
Location
Eaton Rapids, Michigan, USA.
I don't know for sure where my die holders came from, most likely victor machinery. Watch the stem sizes. Like he posted..goes in 1/2" drill chuck..well some of the larger die holders like this require a 5/8 drill chuck. My large one did require a 5/8 drill chuck..and I don't have that, so I spun the stem smaller, no problem with a metal lathe.
 

workinforwood

Member
Joined
Mar 1, 2007
Messages
8,173
Location
Eaton Rapids, Michigan, USA.
Ok...I'm back at it trying to remember where I left off after being rudely interrupted by my real job! :wink:

I like to start with the cap on this pen. I want the pen and cap to be almost flush so I want to make the cap thin as possible and will use the cap to help me decide the diameter of the pen. I have a blank, but it's on a tube and it's far from straight after being cast. I trimmed the ends of the resin as close to the tube as possible. This is a custom pen..there's no barrel trimmer pilots, no bushings nothing..that's ok, I barely remember how to use that stuff anyhow. Having a metal lathe makes this job real quick and easy, even though a wood lathe can also do it. The pen is simply mounted between centers and I use the cross slide to spin the pen round. Once the body is round, I can just chuck it in a collet and trim the ends which makes them square..barrel trimmer, not needed. After the ends are square I glue in the threaded connector. I re-mounted the pen between centers..nope, no bushings, just between centers and spun it down thin as I dare go without revealing the threads inside the connector. Then I come back and I spin the acrylic part down just a hair more. I apply a CA finish to bring the pen level with the connector. After it is finished, I put some masking tape on the cap body to protect it, I chuck it in a chuck and clean the burrs off the end so it is smooth to touch inside and out.
 

Attachments

  • P1250963.JPG
    P1250963.JPG
    68.6 KB · Views: 163
  • P1250965.JPG
    P1250965.JPG
    66.2 KB · Views: 146
  • P1250966.JPG
    P1250966.JPG
    48.7 KB · Views: 195
  • P1250972.JPG
    P1250972.JPG
    50.2 KB · Views: 166

workinforwood

Member
Joined
Mar 1, 2007
Messages
8,173
Location
Eaton Rapids, Michigan, USA.
Making the pen...this is closed end construction, so I made a simple jam chuck. It's just a rod that is spun just a hair smaller than the ID of the pen. I put a single layer of masking tap on the rod and twist and jam the pen over the top. This makes a real tight fit and the tape helps stop slipping. The tail stock is used to support the end. Calipers are used to measure the pen as it is brought down to be just a hair less than the OD of the cap. As I did on the cap, I go back and spin the acrylic just a bit less than the metal and apply 4 coats of medium CA to build it back up. The CA seals the wood, but also, CA is harder than the acrylic so when it is sanded with the metal next to it, they will sand at a relatively even pace. If the plastic is softer than the metal, you would sand the plastic faster, leaving a ridge between the two materials instead of a straight transition. I just use med CA by itself and I quick shot of accel inbetween coats. There are some small ridges on the finish from the application. I sand by hand vertical across the blank with 220 dry. You see the pic that looks like it's kinda blurry..well actually it's not blurry, what you are seeing is the sanding dust and some shine spot lines on the pen. When all the shine lines are gone, the finish is smooth across. With a skew I remove any finish from the metal and then I wet sand from 320 to 600 and then MM pads wet and then plastic polish and the pen is just sparkling and evenly finished.
 

Attachments

  • P1250969.JPG
    P1250969.JPG
    48.1 KB · Views: 153
  • P1250968.JPG
    P1250968.JPG
    62.1 KB · Views: 158
  • P1250970.JPG
    P1250970.JPG
    57.4 KB · Views: 165
  • P1250971.JPG
    P1250971.JPG
    49 KB · Views: 155

workinforwood

Member
Joined
Mar 1, 2007
Messages
8,173
Location
Eaton Rapids, Michigan, USA.
Now I have to cut the end off the pen. I spun the crosslide to 70 degrees. I mounted a dremel with a cutting disc to the crosslide with a couple clamps. It takes a long time, you want to cut slow and easy, but simply spinning the hand crank, eventually the end comes off to a nice angle. With a belt sander, I clean up the cut and I apply a few coats of CA by hand and hand sand and polish the end of the pen.

I used my dremel with a cotton swab thingy mounted to the end and polished the threads. I then took the pen and parts into the house and cleaned them with warm soapy water and a tooth brush.

The nib and coupler is assembled tight. Then some 5 min epoxy in the hole and push in the coupler so the top of the nib lines up straight with the angled end. This way when the pen is used to write with, the leaf on the end of the pen is visible behind the users hand, facing up and with the cut being 70 degrees, the leaf is pretty much parallel with the paper as I figure that is about the angle a person holds a pen to paper...somewhere there abouts.

Now I just need to make a finial and clip for the cap.
 

Attachments

  • P1270973.JPG
    P1270973.JPG
    76 KB · Views: 184
  • P1270974.JPG
    P1270974.JPG
    75.2 KB · Views: 270

workinforwood

Member
Joined
Mar 1, 2007
Messages
8,173
Location
Eaton Rapids, Michigan, USA.
Here's a few more pics. I got one pen finished, the second one I had clip issues with and I think I'll have to spin off the finial and start from scratch next weekend. Trying to make that fancy clip..took me 5 tries, finally got one and it broke while assembling the clip. arggh!

I'm cutting the clip from brass rods using a dremel tool.
The clip is heated and then bent. It's pretty simple to bend a straight clip but trying to bend a couple tails is pretty intense. The brass rod with the screws on it is a home made bending jig, and the screws just pop into the holes and can be easily removed. After the clip is installed it is sanded and polished, then I applied tape around the edge to make a wall, glued in the leaf and poured inlace around it.
 

Attachments

  • P1280975.JPG
    P1280975.JPG
    75.3 KB · Views: 167
  • P1280979.JPG
    P1280979.JPG
    74.8 KB · Views: 182
  • P1280981.JPG
    P1280981.JPG
    70.9 KB · Views: 184
  • P1280982.JPG
    P1280982.JPG
    72.5 KB · Views: 198
  • P1280989.JPG
    P1280989.JPG
    80.4 KB · Views: 189

workinforwood

Member
Joined
Mar 1, 2007
Messages
8,173
Location
Eaton Rapids, Michigan, USA.
I think this clip looks amazing. Such a bummer how it all worked out and then I snapped it off while gluing in the finial. I see no way to save it other than part off the finial and rebuild...you see stuff like this and you want to make your own pen parts??? :rolleyes: Persistance..that's the key...can't just give up on it.
 

Attachments

  • P1290994.JPG
    P1290994.JPG
    64.8 KB · Views: 212

Dave Turner

Member
Joined
Jul 23, 2010
Messages
417
Location
Sylvania, Ohio
Excellent article on fountain pen construction. It makes me want to run out and buy a metal lathe. I've attached a PDF version that I made for reference. Thanks so much Jeff.

Dave
 

Attachments

  • Fountain Pen Construction - Jeff Powell.pdf
    693 KB · Views: 629
Top Bottom