First Paua Abalone Pen

Signed-In Members Don't See This Ad
See more from TDahl

TDahl

Member
Joined
Dec 11, 2019
Messages
1,889
Location
Brentwood
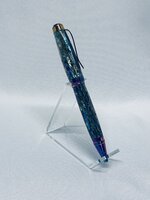
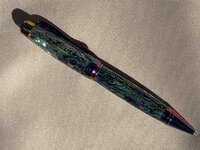
One of the areas I have wanted to explore in pen making is using inlay material. I like the Paua Abalone material and found a sheet online that had all the purple, blue, and green hues I was looking for. I used the Prism Cigar Pen kit from Exotic Blanks to accent the colors. I cut 1/8 inch strips using an X-Acto knife which made clean cuts on the first few strips, but dulled pretty quick and left some rough cuts. I used UV resin to seal the Paua Abalone strips and then casted the tubes with Polyester Resin. Being that this is the first time I have worked with Paua Abalone material, I am fairly happy with the results.

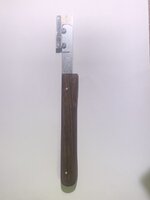
On a side note, I made a razor blade saw that allows me to use standard razor blades with a straight edge (see the last photo.) I can easily flip the razor blade around when the edge gets dull. I found one razor blade will handle one to two blanks with very clean edges.

As always, comments, questions, and critiques are encouraged. Thanks for reading.
 

Attachments

  • IMG_5817.jpg
    IMG_5817.jpg
    380.5 KB · Views: 143
  • IMG_5819.jpg
    IMG_5819.jpg
    352.7 KB · Views: 125
  • Pic for IAP.jpg
    Pic for IAP.jpg
    567 KB · Views: 118
  • IMG_6618.jpg
    IMG_6618.jpg
    67.7 KB · Views: 128
Signed-In Members Don't See This Ad

jttheclockman

Member
Joined
Feb 22, 2005
Messages
19,082
Location
NJ, USA.
Tim very nice pen. It is on my to do list for sure. I thank you for sharing your process because this seems to be a bit of highly guarded secrets as to the cutting and process. If you do not mind a couple questions. There are various grades or materials of this stuff such as real thin that can be wrapped around tubes, then there is the thicker stuff that has either a clear coating on top or is all natural, then there is the stuff that has an adhesive on the back and either clear coated or not. Which type did you use?? If it did not have an adhesive back, what did you use to adhere it to tube? You said you used a UV to seal it before casting, why did you do that? Finally the cutting, did you finally go with utility knife blades and that is what the saw is? Thanks for showing and thanks for taking the time to share process. Again looks like you nailed it. Is there anything you would do different on the next one being this was you very first. ??
 

TDahl

Member
Joined
Dec 11, 2019
Messages
1,889
Location
Brentwood
Tim very nice pen. It is on my to do list for sure. I thank you for sharing your process because this seems to be a bit of highly guarded secrets as to the cutting and process. If you do not mind a couple questions. There are various grades or materials of this stuff such as real thin that can be wrapped around tubes, then there is the thicker stuff that has either a clear coating on top or is all natural, then there is the stuff that has an adhesive on the back and either clear coated or not. Which type did you use?? If it did not have an adhesive back, what did you use to adhere it to tube? You said you used a UV to seal it before casting, why did you do that? Finally the cutting, did you finally go with utility knife blades and that is what the saw is? Thanks for showing and thanks for taking the time to share process. Again looks like you nailed it. Is there anything you would do different on the next one being this was you very first. ??
Thank you for the kind comments JT.

The material I used has the adhesive on the back and is clear coated. It is not very flexible so I tried to keep the strips as thin as possible. I have been working on a second pen where the inlays do not have an adhesive backing. For that blank I used nail polish which worked really well.
I think both clear and colored nail polish work equally well.

The reason I used UV resin to seal the inlays is I did not want to risk having bubble form between the strips when I casted it with the PR.

The blades on the saw are standard single edge razor blades. They have a thinner and sharper edge than X-Acto knives or other hobby knives. The handle gives you more leverage which makes it easier to cut along a straight edge resulting in more consistent strips.

As far as do things differently, I would say just to remember to be patient and take my time preparing the blanks (cutting and matching up the designs of the strips so everything flows together.) I think when working on designs that have a lot of minute details involved, it is very easy for fatigue to set in. It is sometimes better to stop and come back to it later, than trying to push through to complete the task.
 

jttheclockman

Member
Joined
Feb 22, 2005
Messages
19,082
Location
NJ, USA.
I would like to thank you for taking the time to answer my questions and you probably helped others as well. I will have to look into the choice of razor blades as you say. Could be a factor I was not seeing. I have the same stuff with the sticky back so will try that. I look forward to seeing your next one. Thanks again.
 

derekdd

Member
Joined
Jan 29, 2023
Messages
1,052
Location
Wisconsin
Really interesting.

It certainly produced a pen with plenty of wow factor.

Thanks for sharing your process.
 

JohnU

Member
Joined
Jan 31, 2008
Messages
4,924
Location
Ottawa, Illinois
Turned out great Tim! I use the same material you do. The coated abalone sheets cut much easier and the adhesive backs make it less messy. Here's what I do… I like to lightly sand the seams with 400 grit sand paper and then wipe them down with denatured alcohol to clean them. I don't seal the seams with anything but instead warm the PR resin up to 100° before mixing and pouring. That way it's thin enough to get in the cracks but not too hot to speed up the curing before I'm done. I use 45 lbs if pressure with no bubble issues.

Looking forward to seeing your next one!
 
Top Bottom