First kitless attempt...

Signed-In Members Don't See This Ad
See more from Hendu3270

Hendu3270

Member
Joined
Mar 13, 2012
Messages
919
Location
Pearland, Texas
I need to stop with these long winded threads. I finish typing and look back and say, geez! I'm gonna lose everyone's attention in the first paragraph! Oh well, I'm not editing it down….

I recently started a thread about metal lathes vs. wood lathes when it comes to kitless pens, and I've decided to not get a metal lathe for the time being. Although I may end up getting a better quality wood lathe instead. Not sure just yet.

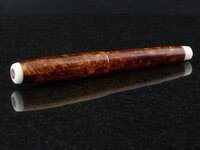
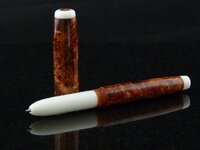
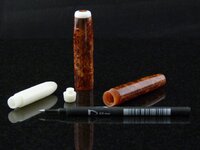
This is my first attempt at a kitless pen. Obviously it's a rollerball and not a fountain, so please don't "shun" me for that. It's turned from a Molten Bronze Rhino blank (had it on hand and seemed like it was worth a shot) and white corian. It uses an ink cartridge from a Magnetic Vertex kit that I had used for parts awhile back. I used 12x0.75 and 9x0.75 for threading. I also used I believe a ¼" tap and die, that I already had, for the little end cap. The end cap is totally useless, but it comes off, so that's something I guess.


I broke the thread area of the first section I made twice, and was really discouraged at that point, thinking I may not be able to deal with these thin materials at my skill level and/or on a wood lathe. It turned out that I was drilling the interior hole for the ink cartridge larger than I needed, and was leaving the threaded area too thin. On the third one, I decreased the interior hole size to fit the cartridge better and it left me with more material to work with at the threads. Once I got that issue figured out, things moved along at a much better pace.


Obviously since this was my first kitless, I did learn a few things along the way.

First, I bought a closed end mandrel over a year ago and had never even opened it up, so I thought it would be a perfect fit for this. I was wrong…I found that for a kitless pen, the closed end mandrel is good for holding the blank when sanding or polishing, and that's about it. It just had too much play in it to do any real work for me.

Second, I've realized I need several more collets for my collet chuck. I have the 5 collet chuck from PSI, and have never really needed any sizes other than what came with it. Now I do!! At one point, when I realized the collets I have wouldn't quite work, I decided to use my pin jaws on my 4-jaw chuck, but that ended up leaving me with an out of round piece to work from, (and some of that is still evident in this pen). It wasn't much out, and you'd never see it on a small turned box, but on a small kitless pen, it just jumps out at you. The little cap at the end of the main body you can see the threaded area is off center when unscrewed. Since it was turned screwed in, it obviously lines up when attached.

and Third, I noticed that my drill chuck Is not as accurate as it needs to be. I posted something about this in another thread recently as well. I could drill a small starter hole with my center bit, then chuck up the bit I needed, and it would be a 1/16" off of that hole. I could rotate the chuck around and see the tip wobble around the hole. This was testing with multiple bits, and to the best of my measuring ability, the bits are all straight. It's a HF drill chuck so I'm blaming it. (I can put centers in the lathe and it's DEAD ON!). I've found I can rotate the drill chuck around to a spot that gets it centered, but that's a hassle to do every time.

Anyways, I'm looking forward to a few more of these in the future. C&C welcome. This pen is nowhere near perfect, but just a first run at this and I have a list of things I want to "tweak" on the next one. The section area needs to be shorter and the main body longer. I think it would look more balanced that way. I also need to buy some of the rollerball nibs and turn a section for those, instead of the way I did it.
 

Attachments

  • first kitless(1).jpg
    first kitless(1).jpg
    182.4 KB · Views: 319
  • first kitless(2).jpg
    first kitless(2).jpg
    165.4 KB · Views: 338
  • first kitless(3).jpg
    first kitless(3).jpg
    176.4 KB · Views: 276
Last edited:
Signed-In Members Don't See This Ad

bjbear76

Member
Joined
Sep 4, 2008
Messages
669
Location
Louisville, KY 40299
I'd be proud if that were mine. I've been putting off taking the plunge into kitless and keep thinking I need to invest in a metal lathe first.
Thanks for the input. I hope my first kitless is half as nice as yours.
 

mredburn

IAP Activities Manager
Staff member
Joined
Jul 5, 2009
Messages
8,752
Location
Fort Myers FL
There are differences in Drill chucks for repeatability. Even Jacobs chucks has different levels for different price points. I have chucks that have .004 repeatability. There are lots of chucks that are over .010 Im not sure why anyone would slam you for starting with a rollerball its a great place to start. The first pen is always a journey and the first step in learning a lot of new things. Your first kitless pen is a great start nothing wrong with it at all. (That the next one wont fix.:biggrin:)

You might make some test drill holes in waste stock remove and rotate your drill chuck 90 degrees each time and see if the Mt mount is part of the problem. It may be your drill chuck is not centered on the Mt mount. If its off center it may not be fixable without replacement. It may be the chuck grabs the drill bit off center. It may also have a certain position it likes better. Just re read your post and noticed you have done this.
 
Last edited:
Joined
Aug 5, 2009
Messages
3,227
Location
Millersburg, OR
Sorry, I have to shun you because your first shot at making a custom pen wasn't a fountain pen...... Now that we're done with that, it looks good. When I do the small caps on the end I thread them on as well because I think it's a better hold than just glue. PR can be a bit of a beast to thread without chipping. For final turning and polishing I made a holder with threads in plastic with a metal rod through it the same size as the inside of the pen. It won't work for roughing but is fine for a few gentle passes and sanding and polishing.
 

tangoman

Member
Joined
Jan 10, 2014
Messages
75
Location
Australia
Chris,

Well done with that pen, the first few are never as good as we would like, lol ! It's what drives us to improve. You and I are both on the same journey and I wish mine where as good as yours !

Regards,
Cam
 

Hendu3270

Member
Joined
Mar 13, 2012
Messages
919
Location
Pearland, Texas
Thanks for the kind words guys. I just went with what materials I had on hand. Gonna be ordering some rollerball nibs and tap and die from MrRedbum soon.

Pressure is on you Mike. Everyone is expecting a beaut' from you.
 

JF36

Member
Joined
Sep 25, 2011
Messages
147
Location
Pen Argyl, PA
That looks great for your first try, as with anything there is a lot to learn on making kitless pens. As far as your threading troubles, how are you holding the die? By hand or in a die holder? I have found that holding the die in a holder for the tailstock when cutting external thread you don't break the threads off as much. Are your dies good quality dies(highspead steel or carbide), I have tried to cut threads using really cheep dies that were not high speed steel or carbide, and they broke the threads every time.
 

Sawdust1825

Member
Joined
May 5, 2013
Messages
83
Location
Illinois
First the pen looks very good. Of course my opinions and $1.98 will get you a so so cup of coffee.:) As for your drill chuck issue it sounds like if I am reading your commentary correctly that depending on the position you index it to in the spindle changes the run out? If so try moving it until you find that "happy" spot and make a mark both on the chuck and the spindle and see if that gives you repeatabilty. I am a bumbling amateur at pen making but have decent machine knowledge. However I may be misunderstanding what is going on. Once again great looking pen and I would be proud to have produced it.
 

Hendu3270

Member
Joined
Mar 13, 2012
Messages
919
Location
Pearland, Texas
That looks great for your first try, as with anything there is a lot to learn on making kitless pens. As far as your threading troubles, how are you holding the die? By hand or in a die holder? I have found that holding the die in a holder for the tailstock when cutting external thread you don't break the threads off as much. Are your dies good quality dies(highspead steel or carbide), I have tried to cut threads using really cheep dies that were not high speed steel or carbide, and they broke the threads every time.

I have a die holder and dies from Victor Machinery, it didn't break while threading. After threading, I screwed the section into another piece that I had tapped to the same threads and secured into my collet chuck. Even with very light cuts it would break. This last one worked better. I have one I'm working on now that worked as well.
 

Hendu3270

Member
Joined
Mar 13, 2012
Messages
919
Location
Pearland, Texas
First the pen looks very good. Of course my opinions and $1.98 will get you a so so cup of coffee.:) As for your drill chuck issue it sounds like if I am reading your commentary correctly that depending on the position you index it to in the spindle changes the run out? If so try moving it until you find that "happy" spot and make a mark both on the chuck and the spindle and see if that gives you repeatabilty. I am a bumbling amateur at pen making but have decent machine knowledge. However I may be misunderstanding what is going on. Once again great looking pen and I would be proud to have produced it.

That's exactly what I did. It's marked now and hopefully won't be an issue anymore. :good:
 

OZturner

Member
Joined
Aug 5, 2013
Messages
6,663
Location
Sydney. NSW. Australia
Great Kitless Chris,
There seems to be quite a ground swell of turners wanting to go Kitless, and you are now well underway.
I liked the way you threw the pass to mike s, and put a load of pressure on him,
I bet you feel good that your first is behind you, and you survived.
Congratulations on a Fine Effort,
Brian.
 

Hendu3270

Member
Joined
Mar 13, 2012
Messages
919
Location
Pearland, Texas
Great Kitless Chris,
There seems to be quite a ground swell of turners wanting to go Kitless, and you are now well underway.
I liked the way you threw the pass to mike s, and put a load of pressure on him,
I bet you feel good that your first is behind you, and you survived.
Congratulations on a Fine Effort,
Brian.

Thanks Brian. Yeah, Mike and I both hit the segmenting "scene" around the same time and seem to be jumping into this one around the same time again. Gotta bust his chops. :biggrin:
 

tgsean

Member
Joined
Jan 6, 2014
Messages
510
Location
Australia
Wow well done mate, you should be proud. I've only just started segmented work, lightyears away from kitless! Thanks for sharing.
 

Kaspar

Member
Joined
Aug 1, 2006
Messages
1,363
Location
Ahead of the curve. Waaay ahead.
My first kitless also used a "molten Bronze" type blank, although mine came from exoticblanks and Dawn called it something else. Anyway, great start on an interesting journey.

I recently started a thread about metal lathes vs. wood lathes when it comes to kitless pens, and I've decided to not get a metal lathe for the time being.

Some of this may be obvious, I'm just spitballin' here, but I'm totally sold on the metal lathe.

It was after my first couple of kitless attempts that I realized how crucial the metal lathe is. You can fool the eyes, but there's no fooling the touch if you can't get your work below .001" in accuracy (or as I think of it, accumulated margins of error.) Since any radial (x-axis /radius) margin of error is doubled (in the diameter) that means you really have to get at or below .0005, because twice that will be .001. I never checked the spindle run out on my wood lathe though I have no reason to doubt they can be as accurate as a metal lathe. The run out on my Micromark 7 x 14 metal lathe could not be measured. Even with my .0001 S&W dial indicator, the indicator did not move. That is one very accurate spindle. The point being, once I started using the metal lathe, I never looked back.

Repeatability is, of course, the key. Inaccuracy is the sum of all margins of error in all your pieces of equipment (lathes, chucks, mandrels) and every time you perform a process on something (cutting, drilling etc.)

For example, one thing that makes repeatability hard on any type of lathe is that even a good self-centering chuck can easily be off by .003 (Even the top notch and pricey Bison chucks for metal lathes come in at .0004 which means a radially turned piece can still be .0008 - still under that .001 benchmark, but closing in.)

There are ways around this and folks who do it a little differently have already chimed in. Another thing to consider is how much deflection can add to your margins of error. (Always work as close to the spindle as your chucking tools will allow. Support longer pieces from both ends where you can.) A metal lathe allows you to take off a lot of (plastic or wood) stock, fast, but then has the fine control to round out the cost of deflection once you get close (if you have a sturdy mandrel. I've been using drill rod to make the various mandrels I use now. Since these mandrels will be the base for turning numerous pens, I take the time to make them very accurate.)

Again, some or all of this may be perfectly obvious.

For me, the real breakthough came when I learned how to tram a work piece with a four independent jaw chuck on a metal lathe. It took some practice, and I'm always refining my ability, but I can now tram a workpiece to within .0002 in two or three minutes. It is well worth it, because boy does that make everything fit together nicely.

Good luck in your continued journey.
 
Last edited:

Hendu3270

Member
Joined
Mar 13, 2012
Messages
919
Location
Pearland, Texas
My first kitless also used a "molten Bronze" type blank, although mine came from exoticblanks and Dawn called it something else. Anyway, great start on an interesting journey.

I recently started a thread about metal lathes vs. wood lathes when it comes to kitless pens, and I've decided to not get a metal lathe for the time being.

Some of this may be obvious, I'm just spitballin' here, but I'm totally sold on the metal lathe.

It was after my first couple of kitless attempts that I realized how crucial the metal lathe is. You can fool the eyes, but there's no fooling the touch if you can't get your work below .001" in accuracy (or as I think of it, accumulated margins of error.) Since any radial (x-axis /radius) margin of error is doubled (in the diameter) that means you really have to get at or below .0005, because twice that will be .001. I never checked the spindle run out on my wood lathe though I have no reason to doubt they can be as accurate as a metal lathe. The run out on my Micromark 7 x 14 metal lathe could not be measured. Even with my .0001 S&W dial indicator, the indicator did not move. That is one very accurate spindle. The point being, once I started using the metal lathe, I never looked back.

Repeatability is, of course, the key. Inaccuracy is the sum of all margins of error in all your pieces of equipment (lathes, chucks, mandrels) and every time you perform a process on something (cutting, drilling etc.)

For example, one thing that makes repeatability hard on any type of lathe is that even a good self-centering chuck can easily be off by .003 (Even the top notch and pricey Bison chucks for metal lathes come in at .0004 which means a radially turned piece can still be .0008 - still under that .001 benchmark, but closing in.)

There are ways around this and folks who do it a little differently have already chimed in. Another thing to consider is how much deflection can add to your margins of error. (Always work as close to the spindle as your chucking tools will allow. Support longer pieces from both ends where you can.) A metal lathe allows you to take off a lot of (plastic or wood) stock, fast, but then has the fine control to round out the cost of deflection once you get close (if you have a sturdy mandrel. I've been using drill rod to make the various mandrels I use now. Since these mandrels will be the base for turning numerous pens, I take the time to make them very accurate.)

Again, some or all of this may be perfectly obvious.

For me, the real breakthough came when I learned how to tram a work piece with a four independent jaw chuck on a metal lathe. It took some practice, and I'm always refining my ability, but I can now tram a workpiece to within .0002 in two or three minutes. It is well worth it, because boy does that make everything fit together nicely.

Good luck in your continued journey.

Dude!! Quit trying to talk me into getting a metal lathe!! I'm still at a very delicate place in my decision, and could be swayed easily. :biggrin:

I've been putting off getting a nicer wood lathe for quite some time now and think I should do that first. There may still be a metal lathe in my future, but for now, I think it makes more sense to upgrade the wood lathe. Sounds like you definitely have yours dialed in. :wink:
 

Kaspar

Member
Joined
Aug 1, 2006
Messages
1,363
Location
Ahead of the curve. Waaay ahead.
Dude!! Quit trying to talk me into getting a metal lathe!! I'm still at a very delicate place in my decision, and could be swayed easily. :biggrin:

I've been putting off getting a nicer wood lathe for quite some time now and think I should do that first. There may still be a metal lathe in my future, but for now, I think it makes more sense to upgrade the wood lathe. Sounds like you definitely have yours dialed in. :wink:

Heh, well, the advice is worth what you paid for it. There is an appreciable learning curve with the metal lathe. But knowing what I know now, I would have gone straight to a metal lathe.

I can't say for sure, since I didn't go that route, but I imagine one can make a very clean, accurate pen with a wood lathe. I just wasn't patient enough or smart enough to do it.
 
Top Bottom