First in a series of four

Signed-In Members Don't See This Ad
See more from Fred Bruche

Fred Bruche

Member
Joined
Feb 11, 2018
Messages
975
Location
Philadelphia 19146
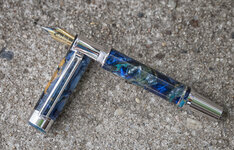
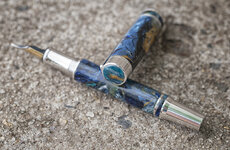
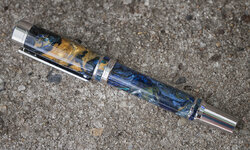
A long time in the making, but I'm finding more time to spend in the shop lately, so this project is slowly moving forward.
Last year I poured a few blocks using liquid diamond resin and the plan was to make "inspired" color combinations using micas and pigments.
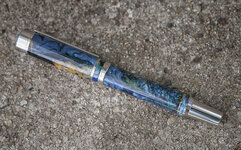
This block was loosely inspired by the famous Van Gogh's Starry Night painting and one blank about 6x1x1 was used to make this pen.
The hardware is my beloved Blingless Harvest in rhodium plating.
C&C welcome.
XC3Y7693.jpg XC3Y7694.jpg

XC3Y7697.jpg XC3Y7699.jpg
 
Signed-In Members Don't See This Ad

sorcerertd

Member
Joined
Sep 30, 2019
Messages
2,701
Location
North Carolina, USA
I love that pour overall and your attention to the details; the bands, finial, and even the clip. Might I inquire as to how you turned the primary center band insert? I've been wanting to do this on a kit such as the diamond knurl, but wasn't sure how to secure it for turning after drilling it out to the proper size.
 

Fred Bruche

Member
Joined
Feb 11, 2018
Messages
975
Location
Philadelphia 19146
I love that pour overall and your attention to the details; the bands, finial, and even the clip. Might I inquire as to how you turned the primary center band insert? I've been wanting to do this on a kit such as the diamond knurl, but wasn't sure how to secure it for turning after drilling it out to the proper size.

I typically make some kind of jam chuck using Delrin for each ring/band type. I don't have a fixed design, making it work as I go.

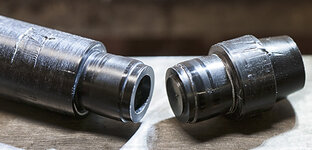
Here are a few pictures of the setup for the center band for this pen.
XC3Y7703.jpg
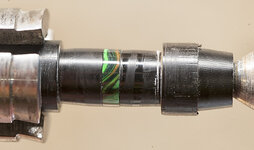
The part on the right goes in pin jaws, the part on the left has a conical hole that connects to a live center in the tailstock. The alignment is made by the mortise on the right part and the tenon on the left part. Once these parts butt together the space left is the width of the ring. Most of the shaping is done before the ring gets off the blank, small retouching and polishing is done on that chucking system

XC3Y7705.jpg
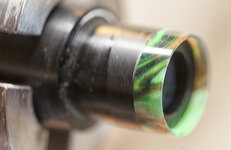
Here's a ring set on the right part. This is a finished ring I remounted but in this configuration I can square and clean up the side of the ring that was released from the blank (blue masking tape to stabilize the friction fit, very gently with a square carbide, moving towards the headstock, to reach final width, 5mm in this case).

XC3Y7706.jpg
The ring is now securely held for final shaping and polishing.
 
Last edited:
Top Bottom