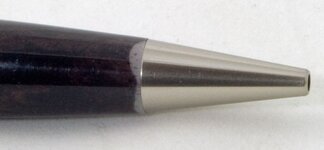
First CA finish. Burmese blackwood

Signed-In Members Don't See This Ad

manskirtbrew

Member
Joined
Feb 9, 2015
Messages
9
Location
Hackettstown, NJ
Just did this guy tonight. Had a few issues with the finish, and had to go back to bare wood twice.

This is also the first pen I've turned between centers instead of on a mandrel. I really liked doing it that way, but was curious if you all had any tips on how to handle trimming the dried CA off the ends after finishing. I tried a barrel trimmer, but that was obviously a bad idea. I think that's what led to the white bits at the nib end. At that point I was in no mood to start from scratch again :biggrin:

Overall, though, I'm happy with it. The finish went on quickly. Things could have been smoother, but I was afraid of sanding through the finish. I used pump activator from a good distance away. I found out the trick is to make sure the CA is on thin and even before spraying, otherwise it balls up and makes white spots. Next time I buy some I'm going to try the aerosol.

pen1.jpg

pen2.jpg

pen3.jpg
 
Signed-In Members Don't See This Ad

magpens

Member
Joined
Feb 2, 2011
Messages
15,911
Location
Canada
Nice looking finish ! Too bad about that end near the nib.

You wrote:

"This is also the first pen I've turned between centers instead of on a mandrel. I really liked doing it that way, but was curious if you all had any tips on how to handle trimming the dried CA off the ends after finishing."

What I do is hold the barrel vertical between thumb and first two fingers, and sand the end on 320 grit paper on a flat surface (ie. kitchen table). You should move the barrel to make circles of white dust on the sandpaper. After 10-12 circles, rotate the barrel about 90 degrees and repeat. Continue until you just get to the point of sanding the end of the brass tube. You can start with coarser paper (ie. 180) if you are very careful and use a light touch ... it goes a little faster but you risk chipping. But finish up with finer paper (320 or 400).
 
Last edited:

manskirtbrew

Member
Joined
Feb 9, 2015
Messages
9
Location
Hackettstown, NJ
Nice looking finish ! Too bad about that end near the nib.

What I do is hold the barrel vertical between thumb and first two fingers, and sand the end on 320 grit paper on a flat surface

Thanks! This is what I ended up doing once I realized where I'd gone wrong, on the wing of my tablesaw. I was just worried about rounding over the edges, so I was wondering if there was a better way.
 

magpens

Member
Joined
Feb 2, 2011
Messages
15,911
Location
Canada
Yes, there is a risk of rounding the edge. I try to compensate for that tendency by rotating the blank. Hopefully you don't have too much excess hardened CA to take off the end.
 

cal91666

Member
Joined
Jul 10, 2013
Messages
220
Location
Richmond, VA
I've also had the white spots at the end of a blank that looks exactly like what is in your picture if I didn't seal the end of the blank with CA and water from wet sanding soaked into the wood.
 

manskirtbrew

Member
Joined
Feb 9, 2015
Messages
9
Location
Hackettstown, NJ
I've also had the white spots at the end of a blank that looks exactly like what is in your picture if I didn't seal the end of the blank with CA and water from wet sanding soaked into the wood.
Oh interesting, that could very well be it. I did some wet sanding before I finished, so it could have soaked into the end grain. I'll keep an eye out for that next time, thanks!
 

Charlie_W

Member
Joined
Nov 16, 2011
Messages
5,918
Location
Sterling, VA USA
All good points already given.
I seal the ends of the blanks with thin CA on a paper towel and just blot some on. I do this before any turning.

I use a knock our rod in a drill chuck mounted in the tail stock and just add some sandpaper(with some double stick tape) to a small turning that you face off flat in the headstock. This sands the ends of the blank radially and square with the tube. This prevents any chipping of the CA finish. Again, blot the ends with thin CA before wet sanding.

Another cause of this besides CA hanging over the ends is that sometimes the pen parts fit too tight. When you press in any part, the brass tube expands. Some kits and parts fit tighter or looser than others. Some are so loose, you have to glue them in .
Your turned material and finish is very thin on some kits and can not handle the expansion. Some acrylics but more so on Truestone and some of these types of products can split or crack even with time if there is pressure from an expanded tube.
A CA finish also is not flexible enough to stretch and pops loose from the wood leaving what you see. Sort of like peeling a fingernail back too far.

On many kits, I will file the inside of the tube with a round chainsaw file and then roll some sandpaper around a dowel or your tube insertion tool and clean up the inside after using the file. I like the parts to press in easily. A touch of glue using the tip of a toothpick will lock parts in that are a little loose and keep a clip from rotating.

Hope this helps!
 
Last edited:

Edgar

New Member Advocate
Staff member
Joined
Feb 6, 2013
Messages
6,900
Location
Alvin, TX 77511
+1 on the Rick Herrell sanding mill

I also use mine to touch up the ends of my blanks after turning, regardless of finishing technique, to make sure they are squared up prior to assembly.
 
Top Bottom