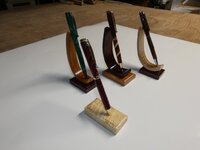
First attempt at pen stands

Signed-In Members Don't See This Ad
See more from Pen_man_ship

Pen_man_ship

Member
Joined
Dec 29, 2019
Messages
126
Location
Boothbay, Maine
It's with mixed feelings I show you my first pen stands. You all know about the first time you do something...wait until you see the next ones!
Materials: Pecan on Walnut, Walnut on Cherry, Figured Maple on Walnut, and a Maple block (yes, salvaged fire wood, I cull my wood three times before they hit the stove)
I made two of each of them. P1010649.jpg
 
Signed-In Members Don't See This Ad

Fred Bruche

Member
Joined
Feb 11, 2018
Messages
972
Location
Philadelphia 19146
Don't forget to "save" a slimline to enter the upcoming BASH! šŸ˜Š
 

jttheclockman

Member
Joined
Feb 22, 2005
Messages
19,082
Location
NJ, USA.
Glad to see you going beyond the pen making and trying to enhance your pens. I think this is an important part of this hobby and helps show off your craftsmanship and talents more so than a simple pen blank. Will say this though I do like the curved stands but not a fan of those where you stick a nib into a hole and the reason is you now have a chance of removing plating with the constant rubbing on a rough surface. I believe a horizontal stand to lay the pen down on would be more to the liking. You could stay on the same theme as the curved ones and just put 2 half circles on a strip of wood with a curve cutout on the top to support the pen. You could get fancy and segment the strips with different woods to match the others. You could segment the curved ones also. The possibilities are as endless as pen blank making. Like the product and keep up the good work.
 

bsshog40

Member
Joined
Oct 2, 2018
Messages
2,354
Location
Omaha, Tx
I think they look very nice! I've seen similar to these and I love the curved setup. I have to ask though as I've not done any, how to y'all get the curverd wood?
 

jttheclockman

Member
Joined
Feb 22, 2005
Messages
19,082
Location
NJ, USA.
I think they look very nice! I've seen similar to these and I love the curved setup. I have to ask though as I've not done any, how to y'all get the curverd wood?
Simple start with a flat board and draw the shape on the top and use a bandsaw or scrollsaw and cut it out. Sand and finish. You do not bend the actual wood.
 

Pen_man_ship

Member
Joined
Dec 29, 2019
Messages
126
Location
Boothbay, Maine
Simple start with a flat board and draw the shape on the top and use a bandsaw or scrollsaw and cut it out. Sand and finish. You do not bend the actual wood.
Correct, I drew the line with a french curve, cut on a bandsaw, then faired with sanders. This was one of my errors. While the spindle sander did a great job on the inside the belt sander was too aggressive removing the wood unevenly. Funny, I was thinking of bending the wood next time in a steam box and clamping to a mold.
 

studioseven

Member
Joined
May 6, 2014
Messages
793
Location
Wisconsin
The stands look great. Another project for me to tackle some day. By the way, what finish did you use on the stands?

Seven
 

jttheclockman

Member
Joined
Feb 22, 2005
Messages
19,082
Location
NJ, USA.
Correct, I drew the line with a french curve, cut on a bandsaw, then faired with sanders. This was one of my errors. While the spindle sander did a great job on the inside the belt sander was too aggressive removing the wood unevenly. Funny, I was thinking of bending the wood next time in a steam box and clamping to a mold.
Not much gained by bending in my opinion. Not for something that small. More work than needed.
 
Top Bottom