Finishing brown mallee

Signed-In Members Don't See This Ad

Jeremymc98

Member
Joined
Dec 4, 2017
Messages
107
Location
Lexington, KY
Hey gang I'm looking for suggestions on finishing brown mallee burl. The first pen I made looked great but after 2 weeks the CA is separating off in huge bubbles. I'm sure it's due to the oil in the wood but what other options are there for a good shinny durabnle finish?
 
Signed-In Members Don't See This Ad

DJBPenmaker

Member
Joined
Nov 10, 2016
Messages
539
Location
Cheshire, UK
I finished one with CA a week ago and nothing untoward happening so far. I did clean thoroughly with denatured alcohol first, so fingers crossed I don't have the same problem. I'll post here if it does start to separate.

Sent from my SM-G955F using Tapatalk
 

Pierre---

Member
Joined
Jun 10, 2012
Messages
410
Location
France
If you goal is durability : wet sand it, wet micromesh it, buff it, linseed oil it, let it dry and write with it. Every time one will use the pen, the finish will become better and better with the skin contact. It works well with very hard woods such as Bmb.

Quite the opposite, if you use a varnish, lacquer or CA, the best day is right out of the lathe, then using the pen will spoil the finish little by little.
 

DJBPenmaker

Member
Joined
Nov 10, 2016
Messages
539
Location
Cheshire, UK
If you goal is durability : wet sand it, wet micromesh it, buff it, linseed oil it, let it dry and write with it. Every time one will use the pen, the finish will become better and better with the skin contact. It works well with very hard woods such as Bmb.

Quite the opposite, if you use a varnish, lacquer or CA, the best day is right out of the lathe, then using the pen will spoil the finish little by little.
I'm not sure if Jeremy sells his pens but high gloss is always the best seller and a shiny finish is what he is aiming for. What you suggest will never achieve a high gloss.

Sent from my SM-G955F using Tapatalk
 

PenPal

Member
Joined
Nov 29, 2006
Messages
2,708
Location
Canberra, A.C.T., Australia.
Hey gang I'm looking for suggestions on finishing brown mallee burl. The first pen I made looked great but after 2 weeks the CA is separating off in huge bubbles. I'm sure it's due to the oil in the wood but what other options are there for a good shinny durabnle finish?

Sorry Jeremy but Brown Mallee Burl has no natural oil I have found,I have handled thousands of these with no problems to speak of. I am selective and throw in the bin cracked,weird blanks,wasting time with poor blanks takes several times those rippers.

First examine your technique in finishing. I have a mate down the road from me a pro burl gatherer and wholesaler,one time he allowed me to sell a couple of thousand for him at my cost to members of the U Beaut Forum. I discarded any sus blanks,ie size ,shape imperfections, sold the lot in three weeks,not one complaint ever.

It is a delight to turn.Trust you have success.

Peter.

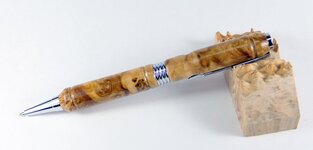
Had a quick look back in my album, This is Brown Mallee Burl resting on an offcut of Brown Mallee.
 

Attachments

  • DSCF7693.JPG
    DSCF7693.JPG
    42.6 KB · Views: 443
Last edited:

leehljp

Member Liaison
Joined
Feb 6, 2005
Messages
9,314
Location
Tunica, Mississippi,
I have used Mallee many times over the years and no problem with finishing.

The situation that you described sounds like you may have waxed the blank and then added a thin coat of CA. Using paper towel to apply CA works great, but until you get accustomed to it, the paper towel will absorb about 90% and the build up of CA will be only superficial.

Early on for me, I did put a couple of coats of CA, sanded it smooth and waxed it. Truth is that I sanded the CA off and the wax on top made it look like it was covered in CA. Then in a week or so, the wax came off and it looked terrible. I learned at that time to build up coats of CA.
 

magpens

Member
Joined
Feb 2, 2011
Messages
15,913
Location
Canada
Peter, thanks for posting in this thread and also for the picture of your pen.

That pen is exquisite !! . But you didn't even tell us how you finished it !!

Please ..... !!
 
Last edited:

magpens

Member
Joined
Feb 2, 2011
Messages
15,913
Location
Canada
I have used Mallee many times over the years and no problem with finishing.

Using paper towel to apply CA works great, but until you get accustomed to it, the paper towel will absorb about 90% and the build up of CA will be only superficial.

I also use blue paper shop towel. . And indeed, it does absorb a lot of the glue ... unless you can think of a way to stop that from happening.

I hope that reporting this is appropriate here and not a hijack of the thread, which is about ... well ... finishing.
I will toss out one of my trade secrets and see what the response is.

I fold the paper towel up into multi-layer strips, then I cut the strips apart, then I unfold each strip until it is only double-thickness and cut it into thirds. . This results in double-layer sections about 1 1/4" by 3 3/8" in size.

Remember that this is a double-layer of paper towel, not multi-layer.

In my final step, preparing for CA application, I put household "Scotch" tape (that name not being used as a trade name anymore, but a generic name now) ... it is more correctly called Invisible Tape ... totally covering one side of my double-layer piece of blue paper towel ... about 3 overlapping strips of tape.

The other side of the paper towel "Band-Aid" is used to spread the CA. . The tape prevents excessive absorption of CA through and by the paper.

And when I am applying the CA, I put this double-layer, taped piece of blue paper towel UNDERNEATH the pen blank, which is on the lathe, mounted between centers, with the lathe turning under power at extremely slow speed (like 30-60 RPM).

I drizzle the fine CA onto the top of the pen blank, and spread the CA with quite rapid back and forth motion of the paper towel piece.

There really is very little absorption of CA into the paper towel ... largely because there is very little paper compared to the way I used to do it with the multiple layers of paper ... thanks to the physical support and impermeability of the "Scotch" tape. . My fingers stay cleaner also. . No gloves.

I use both ends of the paper towel "Band-Aid" section, then cut off the glue ends and get two more applications out of it.

I have several sections ready to be used so that I can keep applying CA for about 10 minutes before getting back to the first section of towel.

Maybe someone will benefit from this. Maybe someone can improve on my method. . I know many people now use hobby store thin foam sheets. I haven't tried that but plan to do so imminently.

I apply 8-10 coats of CA and then sand smooth. . Compared to my previous method, the pre-sanding quality of the surface is much better, less sanding is required, and instead of starting the sanding process with 180 grit, I can now start at 240 or sometimes even 320. . I have been very happy with the results and my finishing process goes much quicker.
 
Last edited:

DJBPenmaker

Member
Joined
Nov 10, 2016
Messages
539
Location
Cheshire, UK
Just to add to my earlier comments I apply all my CA using just one only of those very small plastic bags that the smaller pieces of the pen kit come in. Just about fits my finger. I always clean first with denatured alcohol, then at about 500 rpm I apply a layer of ultra thin CA which soaks well into the wood, followed by about six layers of medium CA. Using the bag method non of the CA is lost and it deposits a really thick, smooth layer. As always there is a learning curve but you soon get the hang of it after a few attempts.

Sent from my SM-G955F using Tapatalk
 

PenPal

Member
Joined
Nov 29, 2006
Messages
2,708
Location
Canberra, A.C.T., Australia.
Peter, thanks for posting in this thread and also for the picture of your pen.

That pen is exquisite !! . But you didn't even tell us how you finished it !!

Please ..... !!

Its a number of years ago but light papered to 800 grit, two coats of CA. The fact the blank included Sapwood appealed to me. This blank came from South Australia where this Mallee excells in colour.

Just one coat of CA takes a devil of removing so I know two coats is plenty,no finishing after this.

I will go the distance next week using many coats of CA and wet finishing for the first time
 

DJBPenmaker

Member
Joined
Nov 10, 2016
Messages
539
Location
Cheshire, UK
Peter, thanks for posting in this thread and also for the picture of your pen.

That pen is exquisite !! . But you didn't even tell us how you finished it !!

Please ..... !!

Its a number of years ago but light papered to 800 grit, two coats of CA. The fact the blank included Sapwood appealed to me. This blank came from South Australia where this Mallee excells in colour.

Just one coat of CA takes a devil of removing so I know two coats is plenty,no finishing after this.

I will go the distance next week using many coats of CA and wet finishing for the first time
I find the more layers, the more it 'pops'
I've never wet sanded CA on wood, I worry about moisture soaking in on the end grain and getting underneath the finish at the ends. Might be ok, just never done it.

Sent from my SM-G955F using Tapatalk
 

PenPal

Member
Joined
Nov 29, 2006
Messages
2,708
Location
Canberra, A.C.T., Australia.
My sentiments but I have a memory of the most exquisite finish ever by a guy in Tasmania using routinely the method of wet finishing on Tasmanian Tiger Myrtle,mind bending. So I will break my habit so far,bit like I once did (took the exhaust of my motor bike and screamed around the block) I feel the need even just once.

Peter.
 

DJBPenmaker

Member
Joined
Nov 10, 2016
Messages
539
Location
Cheshire, UK
My sentiments but I have a memory of the most exquisite finish ever by a guy in Tasmania using routinely the method of wet finishing on Tasmanian Tiger Myrtle,mind bending. So I will break my habit so far,bit like I once did (took the exhaust of my motor bike and screamed around the block) I feel the need even just once.

Peter.
I'm of the same mind try things once and if you don't like it don't do it again [emoji5]

Sent from my SM-G955F using Tapatalk
 

Curly

Member
Joined
Nov 20, 2010
Messages
4,828
Location
Saskatoon SK., Canada.
If you have the blank mounted between 60 degree conical centres that are waxed, the CA will wrap around the ends and seal the end grain. When you are done stand the end of the blank on a sheet of 320 paper and gently sand the end to the tube.

I prefer building the CA to 10 coats give or take, sanding to 400 and then buffing with the Beall wheels. Sand with the lathe on and then off lengthwise for each grit starting with 280/320 and ending with 400 and then 0000 steel wool. Good old Bounty Select a size paper towels here. :)
 

DJBPenmaker

Member
Joined
Nov 10, 2016
Messages
539
Location
Cheshire, UK
Hey gang I'm looking for suggestions on finishing brown mallee burl. The first pen I made looked great but after 2 weeks the CA is separating off in huge bubbles. I'm sure it's due to the oil in the wood but what other options are there for a good shinny durabnle finish?
You could try the melamine method described on the Beaufort ink website. It works really well, not as shiny as CA but still a very nice gloss finish.

Sent from my SM-G955F using Tapatalk
 

magpens

Member
Joined
Feb 2, 2011
Messages
15,913
Location
Canada
Thanks for your comments, Peter, Derek and Pete. . Always appreciate hearing from you guys.

I don't wet sand CA either, but I do use a little spit sometimes !
 

magpens

Member
Joined
Feb 2, 2011
Messages
15,913
Location
Canada
Just to add to my earlier comments I apply all my CA using just one only of those very small plastic bags that the smaller pieces of the pen kit come in. Just about fits my finger. I always clean first with denatured alcohol, then at about 500 rpm I apply a layer of ultra thin CA which soaks well into the wood, followed by about six layers of medium CA. Using the bag method non of the CA is lost and it deposits a really thick, smooth layer. As always there is a learning curve but you soon get the hang of it after a few attempts.

I have tried this method using the little ziplocks on my finger ....
the problem I had is that the CA flows off the baggie (onto my lathe) before I get a chance to apply it to the blank. With those tiny bags, I can't seem to get a "dimple" where the CA can stay put until I transfer it to the blank.

Please tell me how you make it work ? I can see that it would be superior to the paper towel method.
 

DJBPenmaker

Member
Joined
Nov 10, 2016
Messages
539
Location
Cheshire, UK
Just to add to my earlier comments I apply all my CA using just one only of those very small plastic bags that the smaller pieces of the pen kit come in. Just about fits my finger. I always clean first with denatured alcohol, then at about 500 rpm I apply a layer of ultra thin CA which soaks well into the wood, followed by about six layers of medium CA. Using the bag method non of the CA is lost and it deposits a really thick, smooth layer. As always there is a learning curve but you soon get the hang of it after a few attempts.

I have tried this method using the little ziplocks on my finger ....
the problem I had is that the CA flows off the baggie (onto my lathe) before I get a chance to apply it to the blank. With those tiny bags, I can't seem to get a "dimple" where the CA can stay put until I transfer it to the blank.

Please tell me how you make it work ? I can see that it would be superior to the paper towel method.
Hi
What I find works is to put the bag over my finger and hold it just touching against the underneath of the rotating blank (about 500 rpm) and then drizzle a little CA onto the top of the rotating blank and immediately distribute it along the blank going to and fro a few times to make it smooth and before the CA starts to set.
It's easy to put too much on this way because none of the CA is absorbed as it is when using a paper towel but you soon get the hang of it.
Hope it works for you.
Cheers Derek


Sent from my SM-G955F using Tapatalk
 

Jeremymc98

Member
Joined
Dec 4, 2017
Messages
107
Location
Lexington, KY
Thanks for the advice guys.. I don't was my blanks before finishing with CA so I am not sure what happened. My typical process is 3 coats of thin then 3-5 coats of medium. MM to 12000 then Hut polish a few times. The bubbles are growing and look like old icing breaking away from a delicious Krispy Kreme doughnut.

Can it be sanded off and refinished or more problem than it's worth?
 

magpens

Member
Joined
Feb 2, 2011
Messages
15,913
Location
Canada
Derek,

Thanks for your clarification ... helps a lot. . I will try that just for the heck of it even though I am not looking for an improvement to my method.

That is just what I do with my double-thickness-blue-towel-and-Scotch-tape Band-Aid instead of your little ziplock baggie.
 

coffeeslug

Member
Joined
Apr 20, 2017
Messages
23
Location
Chicago
Thanks for the advice guys.. I don't was my blanks before finishing with CA so I am not sure what happened. My typical process is 3 coats of thin then 3-5 coats of medium. MM to 12000 then Hut polish a few times. The bubbles are growing and look like old icing breaking away from a delicious Krispy Kreme doughnut.

Can it be sanded off and refinished or more problem than it's worth?

Not 100% sure but it sounds like the wood might have too much moisture left in it. CA reacts to excess moisture and oil in unusual ways like this. It also reacts to temperature strangely.

I would try sanding it all off (a pain, i know) and re-applying the CA. Unfortunately, sanding to this point may take off precious width that you need for the pen components and cause the diameter to be off. You may be able to balance this with extra coats of CA though.

Best of luck.
 

leehljp

Member Liaison
Joined
Feb 6, 2005
Messages
9,314
Location
Tunica, Mississippi,
Jeremy,

No one can know what you are actually doing but you. Sanding and applying finish are pure 100% subjective to the individual. How one person interprets the pressure and application is subjective. A 250-300 lb person will use light pressure (to them) in sanding at a much more pressure than a 140 lb person who claims to use heavy pressure.

The point is - you are having problems. Bubbles. You are using 3 coats of thin and 3 - 5 coats of medium. If 5 different people did exactly that, AND the blank was measured BEFORE any finish were applied, and then, the blank was measured AFTER the 6 to 8 coats were applied - you would have 5 different thickness measurements.

The only way to really determine is with measuring with calipers before and after. a point zero zero five (.005) build up is exactly that. And starting with 1200 MM and progressing through to 12000 will build up a film that will be just over microns thick. Added to that the wax will add a layer or two. I would re-think and ask if that is the Hut polish bubbling off. I have seen that and I have experienced that, and I deliberately got away from Hut polish for that reason. Then I learned that my idea of sanding was different from reality/actuality - after I got a good set of calipers and let the calipers determine how much CA was actually on it BEFORE adding wax/polish.
 

leehljp

Member Liaison
Joined
Feb 6, 2005
Messages
9,314
Location
Tunica, Mississippi,
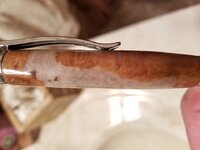
Here's a pic of what happened after a 2 weeks or just sitting

Did you add or apply the wax/polish on it before applying CA? Did you put BLO on it before CA? BLO doesn't usually do that but if it is put on and not "burnished" in before adding CA, that "could" happen.

That looks like CA "lift" that occurs on the ends of some finished "oily wood" blanks. That also happens when CA is just as thick on the bushing as on the blank, then when separating the bushing from the blank, the breaking off of the bushing causes the lifting, and it happens more on oily blanks. This is because the CA doesn't stick well to unprepared oily blanks. The Mallee is not that oily in my experience.

Another question: Did you put denatured alcohol on it? Did you do this in cold or humid weather?

Did you have it sitting on a desk in which sunlight came in and shined on it for a few hours at a time, probably over a few days? That is another possibility and sunlight even in a cool room does strange things to wood under glass or protectants.

Sorry for the questions, just trying to find a connection for that.
 
Last edited:

1080Wayne

Member
Joined
Feb 5, 2006
Messages
3,339
Location
Brownfield, Alberta, Canada.
The regularity of the boundaries are typical of a sanding operation on wood that is not uniformly hard , so Hank`s question on whether there was a pre-coat of anything oily or waxy that was subsequently sanded off is pertinent . Which also leads to the question of the type of sandpaper you used . Some are stearate coated . I don`t use them , but it may be remotely possible that it might interfere with CA adhesion .

Last question would be , has the affected area grown since you first noticed it .
 

PatrickR

Member
Joined
Apr 8, 2017
Messages
1,423
Location
Rural America
Definitely an adhesion issue. One of the following.

Contamination (clean the blank with da between sanding grits and before finishing, allow to dry fully before using CA)

Bad CA (replace it)

Wood not fully dry or reached equilibrium for your climate before you started (weigh the blank when you get it, check it periodically)

Sanding too fine before finishing (polished wood has no tooth to hold the finish)

Good luck with the next one.
 
Last edited:
Top Bottom