finely, after 70 years!!!!

Signed-In Members Don't See This Ad
See more from plantman

plantman

Member
Joined
Jan 2, 2012
Messages
3,437
Location
Green Bay, Wi
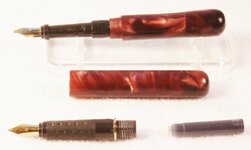
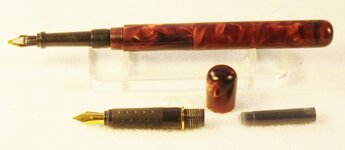
Finely after 70 years and almost 20 years of pen making, I have made a true kitless pen. Oh, I have pulled the cartrages out of Bic pens and turned wooden blanks to make pens in the past, but this is my first tapped and threaded pen. I started with a Molten Bronze blank, and a set of fine, and broad calligraphy nibs. Since a calligraphy pen is usualy longer than a normal pen, I made the cap end longer, threaded the other end of the nib, and turned a finial to protect the threads. Now the cap can be posted to the back of the nib end, and makes it a longer pen. Any regular nib or roller ball could also be threaded into this end. This old dog learned some new tricks, but it took a lot of treats to get it close to right. Jim S
 

Attachments

  • DSCF0001 (800x372).jpg
    DSCF0001 (800x372).jpg
    217.9 KB · Views: 431
  • DSCF0002 (800x479).jpg
    DSCF0002 (800x479).jpg
    231.3 KB · Views: 367
  • DSCF0004 (800x348).jpg
    DSCF0004 (800x348).jpg
    198.2 KB · Views: 318
Last edited:
Signed-In Members Don't See This Ad

SDB777

Member
Joined
Feb 6, 2010
Messages
6,620
Location
Cabot, Arkansas USA
This means I still have 16.5yrs left to make one also!!!

Where did you get the nib from? And will a converter pump fit inside?


I can only hope my first kitless comes out this well....ya dun gooood!!


Scott (been watchin' Larry the Cable Guy today....sorry) B
 

plantman

Member
Joined
Jan 2, 2012
Messages
3,437
Location
Green Bay, Wi
I like the shape and the blank Jim, looks great.
In the first pic, is that a crack i see or just the pic?


Harry

Harry; You were correct, it is a crack! I must have twisted the cap on to tight trying to make the pattern on the blank look better for the photo, and did not notice it open up. I looked at the photo several times, and than had to look at the pen. As I took different shots I removed the cap and the crack closed up so I didn't notice it. Another lesson learned, don't overtighten plastic threads!!! Thanks for pointing that out to me, I will try to repair it. Jim S
 
Last edited:
Joined
Aug 5, 2009
Messages
3,229
Location
Millersburg, OR
Well done. I hope you wrote down some notes because when you do your second one you will get to a point and be saying to yourself, " There was something about this step that was going to do different. What was it?" I've never had that particular issue myself. :redface:
 

plantman

Member
Joined
Jan 2, 2012
Messages
3,437
Location
Green Bay, Wi
This means I still have 16.5yrs left to make one also!!!

Where did you get the nib from? And will a converter pump fit inside?


I can only hope my first kitless comes out this well....ya dun gooood!!


Scott (been watchin' Larry the Cable Guy today....sorry) B

Scott: I believe I purchased the origenal caligraphy kit from Michel's. It came with the 2 nibs, ink, and a pink slide together pen plus instructions for under $5. I only wanted the nibs to pratice with, so they are very inexpensive. I believe I have also seen a kit there that contains 5 different size nibs only. A better quality and price. Use the 50% off one item coupon. Yes a converter pump will fit inside. I find that going kitless you have nothing holding you to any size pen you want to make. After putting together almost every kit made, using most woods that can be bought and a lot of different synthetic blanks, I found I needed to take the next step and design and make my own pen from scratch. It realy gives you a feeling that you have truely made your own pen at last. Jim S
 
Last edited:

mark james

IAP Collection, Curator
Joined
Sep 6, 2012
Messages
12,751
Location
Medina, Ohio
WOW... So it is possible to teach a dog....

Wonderful work! Very inspiring!

Keep posting. Thank you for sharing.
 

plantman

Member
Joined
Jan 2, 2012
Messages
3,437
Location
Green Bay, Wi
Jim; I used a m12x.75 tap/die set, m9x.75 tap/die set, 7/16th drill bit, 21/64th drill bit, and a 1/4" bit to fit the refill in. Look in the library on this site for a tutoial by Mike Redburn A.K.A "mredburn", "Tap and Dies for Kitless Pen Making". It is a beginners guide for kitless pen makeing, and has a list of the more common sizes of tap and die sets used. I suggest, if you are going to try kitless, get your nib first!! This is the only dimension you can not change unless you turn the nib holder itself. (next project), everything else is up to you what size you want to make it. If you follow Mike's directions you should not have to many setbacks. Look for other tutorials in the library, on youtube, or in more advanced pen books for articles on kitless pen making. If you have questions, just ask, there are many talented people on this site that do fantastic kitless pens. Jim S
 
Last edited:

Hendu3270

Member
Joined
Mar 13, 2012
Messages
919
Location
Pearland, Texas
Good job Jim. I just finished my first attempt at a kitless and used the exact same blank. I'll be posting up some pics in the next couple of says.
 

plantman

Member
Joined
Jan 2, 2012
Messages
3,437
Location
Green Bay, Wi
Sorry to be the one to point that out Jim. That's still a great looking pen. Hope you can repair it.


Harry

Thanks Harry!! I have repaired and refinished it. I noticed as I was workng with the cap, that the crack stays closed until the last quarter turn. Can any of you experts out there tell me what I did wrong and how to avoid this on the next one??? Thank all of you for your kind words, it makes an old heart feel good!!!!!! Jim S
 
Last edited:

OZturner

Member
Joined
Aug 5, 2013
Messages
6,662
Location
Sydney. NSW. Australia
Beautiful Pen, Jim
Love the construction to enable the cap to be posted, to increase the length and balance of this pen.
Terrific Craftsmanship, your Fit and Finish is Superb.
Can't wait for your next one.
Congratulations,
Brian.
 

Hendu3270

Member
Joined
Mar 13, 2012
Messages
919
Location
Pearland, Texas
Sorry to be the one to point that out Jim. That's still a great looking pen. Hope you can repair it.


Harry

Thanks Harry!! I have repaired and refinished it. I noticed as I was workng with the cap, that the crack stays closed until the last quarter turn. Can any of you experts out there tell me what I did wrong and how to avoid this on the next one??? Thank all of you for your kind words, it makes an old heart feel good!!!!!! Jim S

I'm no expert! But what I think is happening, based on what happened with me on one attempt is this. The last few threads are not fully cut since the tap is tapered at the end. The male threads on your main body are trying to thread into that area and spreading it apart. I'm wondering if you were to put it back on the lathe and take off of those first couple of threads on the body, if it might just fix the issue. Again, I'm no expert.
 
Last edited:

Dalecamino

Local Chapter Leader
Joined
Jan 2, 2008
Messages
14,572
Location
Indianapolis, In.
Sorry to be the one to point that out Jim. That's still a great looking pen. Hope you can repair it.


Harry

Thanks Harry!! I have repaired and refinished it. I noticed as I was workng with the cap, that the crack stays closed until the last quarter turn. Can any of you experts out there tell me what I did wrong and how to avoid this on the next one??? Thank all of you for your kind words, it makes an old heart feel good!!!!!! Jim S
At the end of your threaded tenen, closest to the body, remove some of the threads with your parting tool. It's called a relief.
 

plantman

Member
Joined
Jan 2, 2012
Messages
3,437
Location
Green Bay, Wi
WOW... So it is possible to teach a dog....

Wonderful work! Very inspiring!

Keep posting. Thank you for sharing.

That's "Old Dog" to you Mark!! I may not be able to lift my leg as high as I used to, but my bark is louder!! Thanks for the kind words everyone. Jim S
 
Last edited:
Top Bottom