Finally...bubble free

Signed-In Members Don't See This Ad

Dale Allen

Member
Joined
Oct 27, 2012
Messages
1,384
Location
Massillon, OH
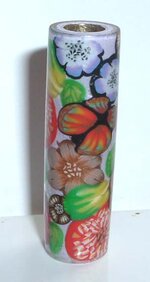
Was finally able to achieve this clear casting with no bubbles.
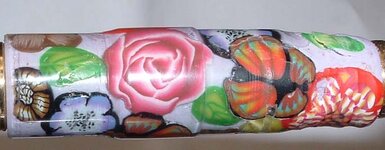
Earlier attempts with a vacuum setup was disaster!
Credit goes out in large part to the post from 4 years ago by Don Ward in which he related his process to a demo he had seen by Barry Gross.
I was able to create a mold that allows me to rotate the blank while it is in the resin so that I could see and manage the bubbles before it set up.
There is some separation from the base clay at one end. That end was sprayed with a clear lacquer prior to casting. The other end is fine and had 1 coat of thin CA.
Next step is to turn away all of the PR to see how well it sticks to the base and to see how thin I can go with the resin.
 

Attachments

  • bubfree.jpg
    bubfree.jpg
    32.6 KB · Views: 342
Signed-In Members Don't See This Ad

SDB777

Member
Joined
Feb 6, 2010
Messages
6,620
Location
Cabot, Arkansas USA
When you say vacuum set-up, are you saying you tried to vacuum the bubbles out of the PR before mixing the catalyst in?


Cool blank!


Scott (chili dogs aren't cold) B
 

Dale Allen

Member
Joined
Oct 27, 2012
Messages
1,384
Location
Massillon, OH
Scott, don't laugh too much but here is what I used. I have an old model foodsaver unit that I used on a quart jar. We use a new one and vac seal jars of soup when the wife makes a big batch. Keeps much longer that way. Anyhow, I mixed the MKEP into the warmed resin and set the cup inside the jar. Then ran a vac on it twice till the lid sealed. This, I am assuming, took out most of the air bubbles. However there didn't seem to be many in there to begin with. Then after it is poured in the mold I chase the rest away with the end of a large paper clip.
Here is the destructive test of that blank. Sorry but it is toast now!
On 1 end I got too aggressive and went too far. The end that had the CA prep held up better. However, taking the PR down to the clay is not going to be an option so a reconsideration of the clay sizing is now in order.
As I see it, even the PR is not going to make a bond to the PVC clay so it will need to be an encapsulation of sorts.
I had hoped in this test that the PR could be used to fill in the spaces but that won't work!
 

Attachments

  • turned.jpg
    turned.jpg
    46.8 KB · Views: 182

Dale Allen

Member
Joined
Oct 27, 2012
Messages
1,384
Location
Massillon, OH
Am I reading this right that you are unable to get the casting to adhere to the polymer clay?


Not like the adhesion you would get with a dedicated adhesive.
On the latest one, I turned the clay down juyst a bit with a skew and light sanded. Then I pre-painted the clay with the PR and did not use any CA. It looks as though there are very few areas where the PR is not touching the clay. You know, those shinny areas that you can only see when the light strikes it just right.
Still experimenting here!:biggrin:

Much of this is uncharted territory. Consider the difficulty of dealing with the PVC. The glue used in the plumbing industry is a solvent type, but that cannot be used here for obvious reasons. And, Krylon was many years developing a paint that would stick to PVC and other plastics. It works OK but it is not an ideal bond. Even if you had a glue that will bond the to both materials, we are not dealing with both surfaces being cured, rather that one in in the curing process. I'm not going to hire the services of a chemical engineer so I do the next best thing....I experiment. :eek:
I have the time and a little money to do so.:)
 
Last edited:

Dale Allen

Member
Joined
Oct 27, 2012
Messages
1,384
Location
Massillon, OH
Saw it and read through it several times.
I've been working on this process for a while now, ever since I began working with the clay and months before that thread was posted.
What I am describing is what I would call a void more than a bubble. Bubbles are typically round and suspended in the meterial. This is a void where the material did not stay in contact with the base, for whatever reason.
 

its_virgil

Member
Joined
Jan 1, 2004
Messages
8,126
Location
Wichita Falls, TX, USA.
I clean the surface of snake skins with either acetone or lacquer thinner prior to placing them in the mold. I also wear nitrile gloves when gluing and molding to keep hand oils off the skin.
Do a good turn daily!
Don
 

SDB777

Member
Joined
Feb 6, 2010
Messages
6,620
Location
Cabot, Arkansas USA
Scott, don't laugh too much but here is what I used. I have an old model foodsaver unit that I used on a quart jar. We use a new one and vac seal jars of soup when the wife makes a big batch. Keeps much longer that way. Anyhow, I mixed the MKEP into the warmed resin and set the cup inside the jar. Then ran a vac on it twice till the lid sealed. This, I am assuming, took out most of the air bubbles. However there didn't seem to be many in there to begin with. Then after it is poured in the mold I chase the rest away with the end of a large paper clip.
Here is the destructive test of that blank. Sorry but it is toast now!
On 1 end I got too aggressive and went too far. The end that had the CA prep held up better. However, taking the PR down to the clay is not going to be an option so a reconsideration of the clay sizing is now in order.
As I see it, even the PR is not going to make a bond to the PVC clay so it will need to be an encapsulation of sorts.
I had hoped in this test that the PR could be used to fill in the spaces but that won't work!


I don't get a lot of bubbles in my clear casting to require vacuum, so I thought maybe your PR had bubbles because of pouring into the cup or something.

Are you using a resin saver type mold?


Just throwing out some questions:
#1: Have you tried ModPodge over the clay before casting PR?
#2: Have you experimented with MEKP amount to allow more of the 'air' to escape?
#3: Warming PR before pouring?


Scott (you'll get there...nice polymer cane) B
 

Dale Allen

Member
Joined
Oct 27, 2012
Messages
1,384
Location
Massillon, OH
Scott; Thank you for the comments and suggestions.
When I poured PR in the past, which was last year so I don't do much of it, I had not concerned myself with the bubbles. Occasionally I would see some when turning but would just fill it with CA and go on. This clear casting however is a different story.
I had not considered modpodge. I'll have to see what it is made from and get some for testing. I did warm the PR before adding and after adding the MEKP and I add a few extra per oz due to the cooler shop. I think I use 8 per ounce. It gets hard enough after I put it in the oven for about 10 minutes at 150. If I don't, it takes days to harden.
That is why I am trying alumilite today on another test.

As for the mold, well, I made my own for this next try, pictured below.
It is a rough first attempt but I think it will work. Interesting stuff that #3 RTV mold material.
 

Attachments

  • mold1.jpg
    mold1.jpg
    25.6 KB · Views: 103

SDB777

Member
Joined
Feb 6, 2010
Messages
6,620
Location
Cabot, Arkansas USA
For color swirl PR we go with 5drops per ounce. And it gets hard enough to turn in approximately 24hrs without cooking. But we still cycle it through the toaster oven anyway.

I have used ModPodge for coating stamps and such in clear casting with great success. By it does require a fair amount of time to 'cure' before pouring PR on it, then again I don't get in a big rush to do it anyway.

I will watch your progress as you move along. And wish you all the best!


Scott (fun experiments are painful) B
 

Dale Allen

Member
Joined
Oct 27, 2012
Messages
1,384
Location
Massillon, OH
Thanks Scott, I appreciate the encouragement!
Do you do anything with Alumilite?
I turned my first one and cannot get much of a shine on it.
I did see where the full cure is 72 hours so I'll wait another day or 2 and see.
 

SDB777

Member
Joined
Feb 6, 2010
Messages
6,620
Location
Cabot, Arkansas USA
Thanks Scott, I appreciate the encouragement!
Do you do anything with Alumilite?
I turned my first one and cannot get much of a shine on it.
I did see where the full cure is 72 hours so I'll wait another day or 2 and see.


Bob does the Alumilite stuff here, and I am not familiar enough with the process of the stuff to be of any help....sorry.

I do know he has set up a set of three buffing wheels on a mandrel for it.


Scott (pizza is on the way) B
 
Joined
Dec 27, 2010
Messages
121
Location
Plano Texas
I have used both the Alumilite clear and water clear. The water clear is easier to turn (75D hardness) and the clear is a little more picky in that it is harder (80D). Both will turn fine but the water claims to have UV inhibitors in it and no mention of that in the clear. Clear hardens quicker at about half of water clears setup time, which I haven't gotten anywhere near their 15 minute time for the water clear. All in a pressure pot, but the temps were in the upper 50s with heated molds.

Both will shine up fine if worked right. I will wet sand using standard papers up to 800 grit, then use Abralon 1000, 2000 and 4000. From there you need to polish. You can use #2 and #1 Novus plastic polishes or use a automotive rubbing compound ( I use 3M Perfect-It) and if you have removed the scratches with proper sanding, it is pretty clear at that point.

You could also use Micro-Mesh to get the same results, just takes longer.

The above comes from my recent experiments to cast polka dot blanks and casting about 30 blanks in the last 3 weeks or so. You can see a few of them on the Turningwood.com Facebook page.
 

Dale Allen

Member
Joined
Oct 27, 2012
Messages
1,384
Location
Massillon, OH
Good info there Steve, thank you.
I considered the water clear but decide I wanted the harder stuff, although the difference is minor.
Not sure if the UV additive would be that much of a deal, but maybe.
I have discovered that you need to let this stuff cure for a few days before trying to put any kind of a shine on it. Too soon and it is like trying to shine rubber!
 
Top Bottom