feedback please

Signed-In Members Don't See This Ad
See more from ScottBigHead

ScottBigHead

Member
Joined
Apr 9, 2012
Messages
10
Location
Rhode Island
looking for some feedback on the form. This is not only my first stopper, but the first "thing" i have done on a wood lathe. i was just screwing around with the form, on a piece of Cherry burl. i have just received the stopper mandrel from member: Smercker ( great price and fast shipping, thanks !) and wanted to make some sawdust. i have to go spend a buck on some new carbide tools, as i hacked this out with some old beat up tools that came with the e-bay lathe. and i know it need finer sanding, i only had 100 on hand to shape it, , but all in all for a 1st attempt im kinda happy with it. didnt loose a finger, didnt fly off and kill me, and i think i like the shape. i have ordered up a few of the wedge shaped stoppers, butnow im thinking the teardrop shape might work better.

thoughts?
 

Attachments

  • 2012-07-30 10.33.15a.jpg
    2012-07-30 10.33.15a.jpg
    25.6 KB · Views: 215
  • 2012-07-30 10.34.21a.jpg
    2012-07-30 10.34.21a.jpg
    22 KB · Views: 229
Signed-In Members Don't See This Ad
Great start. I think the opinion that matters is yours. You turn what you feel like turning when you turn something. The piece of wood is great. To me it is a little large but it is a skill builder. I try to keep my stoppers low profile so the bottle can still fit under the cabinet with the stopper in. For form, when the wood is as nice as this I like it to be simple and let the wood catch your eye and not beads and coves.

Tools - We all started with beat up tools. Master them. Use them to learn to sharpen so when you do buy a $100 gouge you know the edge you like and how to get it w/out wasting that high dollar steel. Don't depend on carbide because it can't do everything.
 
Looks good to me. I like the unusual looking shapes. Sometimes the different looking shape will catch someones eye & make a sale for you. Good job on your 1st turning.
 
Well, you asked for critic so, here is mine...!

Bottle stoppers have no "official size and shape" however, there a few things that you may consider when making them. One of them, has been already mentioned and that is the length of the stopper to still fit in a normal fridge door however, not all open bottles need to be refrigerated...!

The second, and most crucial TO ME is, a bottle stopper should never finish in a sharp point. The fact that can seriously hurt your hand if the stopper its "hand tapped" as 99.9% of people do when, inserting a bottle stopper that they want to seal properly.

Apart from that, your imagination is the limit...!

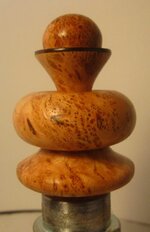
I have recently (yesterday) shown here, 2 stoppers that I've done, without any consideration to if will fit in a fridge or not, when in use. They are also a lot wider at the base than most stoppers but, that was the way I wanted them to look so, and apart from the fact that, you could do a better finish in that lovely piece of wood, if you had finer sand paper grits but that, you already know.

Good tools so help considerably so, carbide tipped tools are particularly handy with burls that are a little on the hard side of things...!

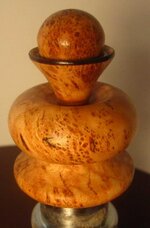
I like the shape of your stopper however, I would be a little concerned with the thickness of the top "cone" at the base joint, particularly on burls that have grain all over the place and flaws/crevasses that can easily compromise its strength so, may be an issue and may not be...!

I also thing that, for someone that has never turned before, you're certainly are a courageous bloke by attempting such a shape so, 10 points to you for that...!

Keep up the good work and good luck with the purchase of those new tools...!

Cheers
George
 
I like the shape. I don't think that you need carbide tools, but rather learn on regular turning tools and your ability to be a good turner will be more broad. As someone else mentioned there are many things that you cannot do with carbide tools.
In the picture I can not see the bottom, but can see a large piece of metal and I wonder if the stopper sits on the shoulder of the metal portion of the stopper or what I am looking at in the picture.
 
Back
Top Bottom