Fancy Trimrings

Signed-In Members Don't See This Ad
See more from mark james

mark james

IAP Collection, Curator
Joined
Sep 6, 2012
Messages
12,720
Location
Medina, Ohio
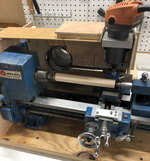
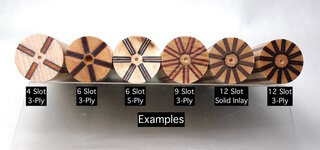
I finally finished this up. Tulip wood, Padauk, Maple, Red and white veneers. 6 slotted. This has been on my mind for several years now and finally worked through it last week.

C/C welcomed.

73A4EDA4-C011-4D60-A8F0-050CF8F5E818_1_201_a.jpeg
2CAD6A1D-6B56-4E5C-997E-25A2277E719E_1_201_a.jpeg
8A371D2B-CB23-4EDD-8A0D-CB322AA1D170_1_201_a.jpeg
8E63753F-696C-4451-A57B-A7928C44B53E_1_201_a.jpeg
4BA05DCC-34F2-47ED-BD00-EE53BDCF623F.jpeg
2BD81BE7-1A10-4117-95D2-C30339A474F4.jpeg
ED5A6250-4D5C-43BC-B7E7-F5017D0798B4.jpeg
53A67CE2-E781-49CD-9746-D44CF876645C_1_201_a.jpeg
 
Signed-In Members Don't See This Ad

mark james

IAP Collection, Curator
Joined
Sep 6, 2012
Messages
12,720
Location
Medina, Ohio
I like it! How did you cut the slots for the insert "cane"? (reminds me of a poly clay cane)
I used "Frankie..." My Frankenstein Atlas Clausing lathe. No motor, no pulleys. But it does have a heavy-duty indexing plate, and a router mounted to cut slots. It's purpose in life is to hold the blank rock solid as I cut precise slots.
 

Attachments

  • 56AF36B0-46EA-4312-90B2-CA27D7CD7EC7_1_201_a.jpeg
    56AF36B0-46EA-4312-90B2-CA27D7CD7EC7_1_201_a.jpeg
    424.1 KB · Views: 171
  • 5D2D72CE-BB4B-47A4-8E17-E8B5EB9AE562.jpeg
    5D2D72CE-BB4B-47A4-8E17-E8B5EB9AE562.jpeg
    203.6 KB · Views: 176
  • 3AFD29DB-224C-402A-A295-47DB271318E9.jpeg
    3AFD29DB-224C-402A-A295-47DB271318E9.jpeg
    169.2 KB · Views: 163

KenB259

Member
Joined
Dec 24, 2017
Messages
3,537
Location
Michigan
Very nice and very precise, wonderful job. I just got an epiphany from your blank though. Years ago I made a pen out of canary wood, I have been looking for wood for years that looked like my "canary wood" pen. My "canary" wood pen looks just like your Tulip wood. I now know, my "canary" wood was mismarked and was actually tulip wood !!
 
Last edited:

mark james

IAP Collection, Curator
Joined
Sep 6, 2012
Messages
12,720
Location
Medina, Ohio
Very nice and very precise, wonderful job. I just got an epiphany from your blank though. Years ago I made a pen out of canary wood, I have been looking for wood for years that looked like my "canary wood" pen. My "canary" wood pen looks just like your Tulip wood. I now now, my "canary" wood was mismarked and was actually tulip wood !!
LOL! Boy can I relate. My blank sat in my bin for easily 8 years, kind of tough to pair. After turning it I had no idea what it was; a deep rabbit hole search last night until I found it. I kept think Canarywood, Zebrawood? I like the way it is with these rings.
 

magpens

Member
Joined
Feb 2, 2011
Messages
15,913
Location
Canada
@mark james - Beautiful work, Mark !!!!

Thanks for all the pics showing details of construction.

In one pic, I see horizontal lines on the central part of the barrel. . Are those just to help with aligning the two 6-slotted rings ?

Another Q ... how do you cut your solid inlay strips so uniform in thickness and matching the width of the router slots ?
 

mark james

IAP Collection, Curator
Joined
Sep 6, 2012
Messages
12,720
Location
Medina, Ohio
@mark james - Beautiful work, Mark !!!!

Thanks for all the pics showing details of construction.

In one pic, I see horizontal lines on the central part of the barrel. . Are those just to help with aligning the two 6-slotted rings ?

Another Q ... how do you cut your solid inlay strips so uniform in thickness and matching the width of the router slots ?
Hi Mal. Yes, the lines are for alignment. The first three I did of this design I misaligned each time... (I'm a slow learner). It fixed it very nicely.

Uniform inlay strips: Byrnes Thickness sander. The thickness of the drum is on a dial, so I can mill my strips to an exact fit. Going from .026" - .024" is easy.

(An expensive toy, I got mine used - but was never unpacked).
 

mark james

IAP Collection, Curator
Joined
Sep 6, 2012
Messages
12,720
Location
Medina, Ohio

wood128

Member
Joined
Sep 16, 2006
Messages
1,532
Location
Cocoa Beach, Fl, USA.
Excellent work Mark. I really like those beautiful rings. Do I see black veneer around the squares in the rings ?
You are doing some precise work in cutting and gluing those segments together. The glue you are using is also the best. I need some help in designing and construction of some new designs !!! Take care. When is your next scuba trip ? Do you remember how to swim ? !!!!!!!!
 

mark james

IAP Collection, Curator
Joined
Sep 6, 2012
Messages
12,720
Location
Medina, Ohio
Excellent work Mark. I really like those beautiful rings. Do I see black veneer around the squares in the rings ?
You are doing some precise work in cutting and gluing those segments together. The glue you are using is also the best. I need some help in designing and construction of some new designs !!! Take care. When is your next scuba trip ? Do you remember how to swim ? !!!!!!!!
Hi Joe.

The black thin lines between the Padauk and Maple slots would be the West System epoxy. However, I just finished another rod where I framed the inlays with thin styrene (.020 I believe). When that is combined with the outer rings, they will be framed in white.

I'll help in any way I can!

SCUBA has been on hiatus since 2019, and may not happen until 2022. I am at my in-laws every other week (just got back today), so things need to be flexible for their care both 95).

If a whale can swim, then I should be OK. I actually do laps at the local rec center - started back 2 weeks ago.

Be well.
 

KMCloonan

Member
Joined
Jun 13, 2017
Messages
1,459
Location
Round Lake, Illinois
I used "Frankie..." My Frankenstein Atlas Clausing lathe. No motor, no pulleys. But it does have a heavy-duty indexing plate, and a router mounted to cut slots. It's purpose in life is to hold the blank rock solid as I cut precise slots.
Awesome pen Mark, and amazing setup for cutting the slots. I really like the examples photo. Just incredible.
 
Top Bottom