Wmcullen
Member
I'm not sure if this process is right or wrong; unique or common. But it works for me and I want to share in case it's interesting. |
The Problem
According to Gestalt Theory "the human brain will attempt to simplify and organize complex images or designs that consist of many elements, by subconsciously arranging the parts into... a whole..."
For instance, 16 dots can either create a pattern...
...or when places differently can imply a continuous path.
I wanted to explore these principles with a series of pens.
Here's my process
(Not rocket surgery, just how I do it.)
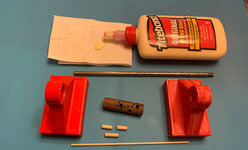
1. I started with a block of dark morado wood drilled with a 7mm bit.
2.A brass tube without glue was inserted into the dark wood and placed between two regularly prepared blanks on a mandrel.
3. The light wood blanks acted like a vice to "hold" the morado in place.
This is not the final turning, so I neither sanded nor finished.
4. It's sometimes helpful to draw patterns of your intended path.
5. I drilled a series of holes free-hand, careful to only penetrate one side.
Tip #1: Sharp bits make a big difference. I recently sharpened mine and wish I'd done it sooner.
Tip #2: I position bits so only a little bit sticks out of the chuck. This cuts down on bending and wandering.
6. Small dowels are glued into all the holes. Thin dowels (3/32") can be cut with sharp scissors.
Tip #3: It's worth your time to inspect the end of the dowel after every scissor cut. If the new working end is damaged or torn, it might need to be trimmed again before using.
7. Assembling the dowels on an old mandrel is a GREAT way to free up a hand and work quickly.
Tip #4: Remove the glued piece from the mandrel before it dries. Please don't ask how I know this!!
8. Once everything is set, re-drilling the center hole removes bits of wood and dried glue.
9. Glue a brass tube into the blank and trim.
Tip #5: If the dowels stick out too far, consider trimming them before turning.
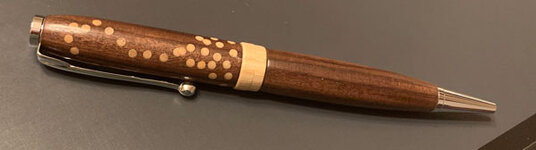
10. Turn the pen.
So far this is my favorite pen which mixes 3/16" and 3/32" dowels (from Walmart) with a light wood center band. But I have more to make.
Summary
If you're looking for inspiration, you might want to explore Gestalt Theory and cook up your own design experiments based on the principles.
Resource Link: https://www.toptal.com/designers/ui/gestalt-principles-of-design
 . I love what you are doing. Cheers.