
Warren White
Member
So many questions....
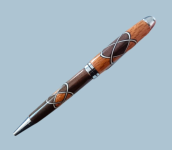
I would like to enhance my Celtic Knot pens with metal on either side of the wood inlay. I hope I am not asking too many questions of those whose business it is to make these beauties. It is something I want to try as I improve my skills. Nearly all of my pens are slimline, in case that makes a difference in the approach I should use.
1. I hear that flashing is a choice for the metal. Is that what you suggest, and/or are there other choices?
2. Do you scuff the metal so the glue/epoxy holds? How?
3. What type of glue/epoxy have you had success with? What should I avoid?
4. Any suggestions regarding drilling the combination metal/wood inserts?
5. How do you trim the metal to the blank as you are assembling the pen blank prior to turning. I have used a chisel for the wood, then sanded, but I haven't a clue regarding trimming the metal.
6. Do normal tools work for turning the blank with metal enhancements?
7. Any precautions or suggestions not covered by my questions?
Again, I hope I haven't overstepped any boundaries here. I know many of you sell your pens and it isn't my intention to compete in any way. If these are trade secrets, I respect that.
Thank you for your consideration. I am so impressed by the artistry shown in the work of members of the IAP.
Warren


") very nice. The sky is the limit. So much can be done from there also. Change the infill strips. Use more than 2 colors and make basically 4 pens at the same time and keep interchanging. In other words you have 4 different colors as the solid woods. You are hooked my friend. Sorry.
very nice. The sky is the limit. So much can be done from there also. Change the infill strips. Use more than 2 colors and make basically 4 pens at the same time and keep interchanging. In other words you have 4 different colors as the solid woods. You are hooked my friend. Sorry.