Eggs Finished!

Signed-In Members Don't See This Ad
See more from Charlie_W

Charlie_W

Member
Joined
Nov 16, 2011
Messages
5,918
Location
Sterling, VA USA
Here are the finished Ambrosia Maple eggs I had prepped last week and a couple other maple eggs with terrific grain.

A8C75561-E5D7-4EB1-8C72-5FACC77679DA.jpeg
D5A23199-9499-46B9-9A20-147B989AAD7B.jpeg
 
Signed-In Members Don't See This Ad

Charlie_W

Member
Joined
Nov 16, 2011
Messages
5,918
Location
Sterling, VA USA
From a wooden chicken? OK, the grain and finish are great. Thanks. How did you turn them?

I like the wooden chicken comment!!!

These are turned between centers, part down small and sand all you can. Then saw off the little nub on the end leaving a tad, trim with a carving knife and hand sand....then finish.
 

robutacion

Member
Joined
Aug 6, 2009
Messages
6,514
Location
Australia - SA Adelaide Hills
G'day Charles,

From the explanations you made about how to make the eggs, I believe you are not using any sort of jig to turn the second part of the egg which is the "separation" end, right..?

I don't know if you ever saw the egg making jig I made many years ago, it was a time where I had the bug to turn wooden eggs, I turned hundreds and hundreds, many of which (about 20 or so) I still have in the house in one of the Easter bowls I made also at that time. I did find that finishing the eggs with this jig was not only easier but it would accelerator considerably the time to make them.

It has been many years since I used the jigs or even spoke about it, your thread made me think about it and I thought in showing some pics of the jig
and answer any questions that you or any member may have on how to make the jig and how it's used, is quite simple indeed.

Cheers
George
 

Attachments

  • my turnings 042_(1).jpg
    my turnings 042_(1).jpg
    30.2 KB · Views: 138
  • my turnings 044_(1).jpg
    my turnings 044_(1).jpg
    23.9 KB · Views: 161
  • my turnings 019a_(1).jpg
    my turnings 019a_(1).jpg
    55.2 KB · Views: 134
  • my turnings 018_(1).jpg
    my turnings 018_(1).jpg
    40.8 KB · Views: 142
  • my turnings 010a_(1).jpg
    my turnings 010a_(1).jpg
    60.6 KB · Views: 179
  • my turnings 020_(1).jpg
    my turnings 020_(1).jpg
    41.5 KB · Views: 153
  • my turnings 028_(1).jpg
    my turnings 028_(1).jpg
    40.9 KB · Views: 138
  • my turnings 041_(1).jpg
    my turnings 041_(1).jpg
    26.6 KB · Views: 153
  • my turnings 050_(1).jpg
    my turnings 050_(1).jpg
    42.7 KB · Views: 154
  • my turnings 073_(1).jpg
    my turnings 073_(1).jpg
    40.7 KB · Views: 175
  • my turnings 074_(1).jpg
    my turnings 074_(1).jpg
    56.2 KB · Views: 162
  • my turnings 075_(1).jpg
    my turnings 075_(1).jpg
    60.8 KB · Views: 159
  • my turnings 077_(1).jpg
    my turnings 077_(1).jpg
    46.1 KB · Views: 175
  • my turnings 078_(1).jpg
    my turnings 078_(1).jpg
    35.2 KB · Views: 171

donstephan

Member
Joined
Jul 24, 2016
Messages
255
Location
Cincinnati Ohio
You might like the resulting complex grain pattern from turning an egg of red or white oak when the medullary rays are especially prevalent.
 

Woodchipper

Member
Joined
Mar 15, 2017
Messages
5,138
Location
Cleveland, TN
Thanks for the photos! Easy to find those PVC parts at the local box store or hardware store. What do you use for finish? Do you count your eggs before they are "hatched?";)
 

Charlie_W

Member
Joined
Nov 16, 2011
Messages
5,918
Location
Sterling, VA USA
George, thanks for all the pics...they are great! I have seen this type of PVC fitting set up before but not with your thoughtful piece inside to push the finished egg outđź‘Ťđź‘Ť
Another turner I know used a piece of thin PVC/Poly (sink drain tail piece) and slit it so it would expand as the egg was slid in. I think he only did sanding with this set up.....and all his eggs needed to be the same size.
 

robutacion

Member
Joined
Aug 6, 2009
Messages
6,514
Location
Australia - SA Adelaide Hills
Thanks for the photos! Easy to find those PVC parts at the local box store or hardware store. What do you use for finish? Do you count your eggs before they are "hatched?";)
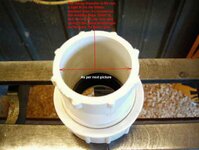
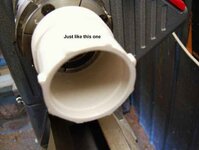
G'day mate, I assume your comments are referring to my post made early, right...? if that is the case, I used various types of finish from friction polish to varnish, I particularly liked to use a very thing clear satin varnish made by Feast Watson, I simply put a bunch of finished/sanded eggs in between 2 boards wide enough to hold the eggs but not let them fall through, spray one side, turn and spray the other side, the varnish is a very fast dry one so you don't have to wait long before you can turn them and ort handle them afterwards.

No, I don't keep count of the eggs but I like to keep count on my chickens ...! ;)

Cheers
George
 
Top Bottom