
You are using an out of date browser. It may not display this or other websites correctly.
You should upgrade or use an alternative browser.
You should upgrade or use an alternative browser.
Easy Peasy Spirals
- Thread starter KenB259
- Start date
Signed-In Members Don't See This Ad
See more from KenB259

Yes, of course, the piece of blank you start with has to be accurately the length of the pen you are making to ensure that the spirals are equally spaced around the final pen barrel.


Thanks, Ken. . Those pen "components" were all made on my metal lathe. . The only purchased parts are the refill and spring.
The pen was my entry in the 2018 BASH Kitless Contest. .
I have made others with different inlay structures/colors, but have not shown because I don't do photographs very often.


Signed-In Members Don't See This Ad
bmundy
Member
Beautiful pen.... What type of kid is that?
Assuming you meant kit. It's a Knurl GT.Beautiful pen.... What type of kid is that?
bmundy
Member
Thank you... Yes I meant kit hahahah
@KenB259
Interesting design, Ken !! . Very attractive.
I wonder if this is how you made it .... let me know !
You cut a slot on each of the 4 sides of an accurately squared blank ... from corner to opposite corner on each side.
Then you glued the triple-veneer inlay into each slot. . Then you rounded and added the end caps. .
Would that be right ?
I submitted a similarly-designed pen to the BASH two or three years ago. .
I wonder if the pics would still be on IAP ....
EDIT:
I think this is it .... thanks to a very helpful member (who shall go unnamed) for assisting with location of the photos.
Last edited:
Mal you pretty much nailed it. The only thing you need to pay attention to is to measure the length you need, for any given pen, is to measure each side of the center of the glued up blank. Otherwise you won't end up with the same width stripes.@KenB259
Interesting design, Ken !! . Very attractive.
I wonder if this is how you made it .... let me know !
You cut a slot on each of the 4 sides of an accurately squared blank ... from corner to opposite corner on each side.
Then you glued the triple-veneer inlay into each slot. . Then you rounded and added the end caps. .
Would that be right ?
I submitted a similarly-designed pen to the BASH two or three years ago. .
I wonder if the pics would still be on IAP ....
Mal you pretty much nailed it. The only thing you need to pay attention to is to measure the length you need, for any given pen, is to measure each side of the center of the glued up blank. Otherwise you won't end up with the same width stripes.
Yes, of course, the piece of blank you start with has to be accurately the length of the pen you are making to ensure that the spirals are equally spaced around the final pen barrel.
mark james
IAP Collection, Curator
Another beauty Ken. I've only done spirals if they are noodles...  I love the clean lines.
I love the clean lines.SteveJ
Member
Well done
I like that Mal. The thin red pieces are a nice touch. I have never seen those pen "components" before.@KenB259
Interesting design, Ken !! . Very attractive.
I wonder if this is how you made it .... let me know !
You cut a slot on each of the 4 sides of an accurately squared blank ... from corner to opposite corner on each side.
Then you glued the triple-veneer inlay into each slot. . Then you rounded and added the end caps. .
Would that be right ?
I submitted a similarly-designed pen to the BASH two or three years ago. .
I wonder if the pics would still be on IAP ....
EDIT:
I think this is it .... thanks to a very helpful member (who shall go unnamed) for assisting with location of the photos.
View attachment 307463
I like that Mal. The thin red pieces are a nice touch. I have never seen those pen "components" before.
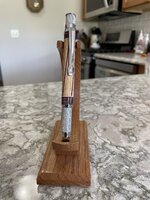
Thanks, Ken. . Those pen "components" were all made on my metal lathe. . The only purchased parts are the refill and spring.
The pen was my entry in the 2018 BASH Kitless Contest. .
I have made others with different inlay structures/colors, but have not shown because I don't do photographs very often.
KMCloonan
Member
Looks great! The different woods work very well together. Amazing finish!Chrome Knurl GT. Woods are goncola alves, purpleheart and holly. End caps are some leftover maple burl pieces dyed purple. View attachment 307449View attachment 307451View attachment 307452
Bob in SF
Member
It's a beauty, Ken!
Alchemist
Member
Oh!!! This has my spider sense tingling! Great looking pen!
Dalecamino
Local Chapter Leader
Very nice Ken!
RichAldrich
Member
Really good!