Drilling best practices

Signed-In Members Don't See This Ad

writeturnz209

Member
Joined
May 14, 2020
Messages
10
Location
West Virgina
the one big issue i have been having since i started is drilling the holes for the tubes. I have tried different things on my own but am failing. What is the best tools to use? I have a drill press. Should i invest in a pen blank vise? And how are you guys doing the round acrylic blanks?
 
Signed-In Members Don't See This Ad

magpens

Member
Joined
Feb 2, 2011
Messages
15,913
Location
Canada
I agree whole-heartedly with the suggestion by FGarbrecht.

Before you do the drilling, be sure to round the blank on the lathe . . This greatly helps to keep the hole aligned on the blank's center-line.

The round acrylic blanks should be drilled in the same way.

The drilling operation should be started with one of the standard, smaller size, center drills. .
If the hole size required for your brass tube is larger than 3/8", you could also drill an intermediate size hole after using the center drill.

For example, if your brass tube requires a 27/64" hole, you could first use the center drill, then a 5/16" drill, and finally the 27/64" drill.

There is no "cut-and-dried" rule. . Your experience in drilling various materials will guide you.
 
Last edited:

howsitwork

Member
Joined
Jul 9, 2016
Messages
2,299
Location
Thirsk
Which ever way you do it, slow and steady with FREQUENT withdrawal of the drill bit to keep the flutes clear of chips helps.

I use a drill press and hold the blanks in a vice with v jaws to support the sides. Also check for vertical by extending the bit and eyeballing it next to the blank if using a drill press.
 

monophoto

Member
Joined
Mar 13, 2010
Messages
2,542
Location
Saratoga Springs, NY
This is another of the subjects that make great fodder for debate in a gathering of pen turners - everyone has at least one opinion.

I find that drilling on the lathe is the most reliable approach, but it's not the only way to do it. A drill press is another good approach. One of the factors people often encounter with drill presses is that the quill travel isn't long enough to drill the hole in a single pass, and that raises the stakes when it comes to how you hold the blank for drilling.

A purpose-made drilling vise is one solution, but again there are other ways that also work. I use a wooden screw clamp - aka a Jorgensen clamp. If you place the clamp on a bench while you are tightening down on the blank, it will automatically align the blank to be perpendicular to the bench in one direction (ie, to the faces of the jaws) - so the challenge is how to align the blank vertically along the other axis. The approach that I saw somewhere and adopted is to attach a couple of scraps of wood to the jaws using double stick tape (glue also works, but that becomes a permanent solution). Then, tighten the screws to bring the jaws together to grip the two blocks of wood. Move to the drill press, and holding the clamp jaws flat on the drill press table, drill a hole (perhaps 1" diameter) in the blocks of wood that is centered on the seam between them (leaving semi-circular mortises across the two blocks when you later open the clamps. Now, to load a blank, place the clamp on the bench so the two jaws are flat on the benchtop. Tighten the jaws with the blank in those two mortises. Because the clamp was held flat on the drill press table, the mortises are perpendicular to the bottom of the clamp, and therefore the blank will automatically align to that perpendicular position.
 
Joined
Jan 10, 2013
Messages
237
Location
Howell, Michigan
I drill on the lathe, also. With acrylics, I wet the drill bit and partial hole with a water and dish soap solution to help keep the bit cool. Take your time drilling to prevent melting the acrylics.
 

qquake

Member
Joined
Feb 8, 2004
Messages
5,007
Location
Northern California
I routinely use my drill press. I have a light aluminum vise with homemade V jaws, that are held in place with rare earth magnets. That allows them to slide side to side slightly, in case a square blank isn't totally square. It works just as well with round blanks. I have a chuck with blank drilling jaws, but rarely use it just because of the hassle with switching out the pen mandrel and chuck. I have used it, however, in cases where accuracy is critical. Like a Wonder Windows blank I turned for a friend.
 

Attachments

  • 009.jpg
    009.jpg
    475.7 KB · Views: 197
  • 009.jpg
    009.jpg
    471.8 KB · Views: 168
  • ww02.jpg
    ww02.jpg
    112.5 KB · Views: 195

Curly

Member
Joined
Nov 20, 2010
Messages
4,828
Location
Saskatoon SK., Canada.
Really before any of us recommend anything perhaps you can go into detail about what you are using to drill with (type of drill press, brand and kind of drills and the clamp or vice you use) and the drill speeds, drill all the way through in one pass or clear the chips lubricant if acrylics. What is happening that you don't think is right or like? In other words what are your problems with what you are doing. It might be something simple that we can help you work through with what you have before throwing money on the problem.
 

TonyL

Member
Joined
Mar 9, 2014
Messages
8,902
Location
Georgia
I messed holes up on a drill press and on a lathe (and enjoyed acceptable results with both) - so I do not know the best (or safest). However, I achieve the most consistent and true results when:

  • I drill on a lathe using a Jacobs chuck (I use a brand called Harvest) on the tail stock end.
  • Start the hole with a center drill (in the Jacobs chuck)
  • Make sure by bits are sharp (I own a drill doctor, but started sharpening by hand, it takes seconds, once you get the hang of it).
  • Penetrate the blank no more than 3/4 of in inch at a time (just a rough estimate), possible shorter or longer runs depending on the density of the material, but not more than an inch.
  • Remove debris from the flutes (with a toothbrush. etc), after each penetration.
  • I lock the tail stock (of course), but always hold the Jacobs check when drilling and withdrawn the drill. Again, not sure if this is safe.
  • When withdrawing the drill the drill is still spinning. This seems to keep things centered on the way out; this could be my imagination or wishful thinking. Again, not sure if this is safe.
  • I always return the ram (I thank this is what it is called - the movable cylinder inside the tail stock) to the least extended position after each plunge to minimize run-out.
  • I use Bostik drill lubricant before each plunge.
  • Rpms between 700 and 900.
  • I happen to use Nova chucks on the headstock, but achieved the same results with the PSI/Rockler pen jaws.

I having said the above. I have seen , in-person, "beautiful" holes drilled by excellent pen turners with a non-secured, Ryobi bench top drill press, standard black drill bits, no center drilling, no lubricant, no limit of depth or cleaning of the, so what do I know?

BTW, I am not knocking Ryobi, I am just stating what I have actually seen.

Happy drilling...my least favorite part, followed closely by sanding :)
 

egnald

Member
Joined
Jun 9, 2017
Messages
3,061
Location
Columbus, Nebraska, USA
Greetings from Nebraska. I have had good luck using drill bits specially made for drilling plastic. Traditional HSS bits usually have flutes ground at 90 degrees with no rake. The steep angle causes the bit to grab and often crack or fragment the plastic. Dedicated plastic bits have a 60 degree grind which reduces the penetration rate and helps them scrape the plastic away with less grabbing.

Even with 60 degree bits the drill speed plays an important part. Plastic can soften or melt when heat builds up causing catches inside the hole - slower speeds and frequent clearing of the flutes (or the addition of lubricants) all help.

To compensate for chip out on the exit hole, I cut plastic blanks extra long before drilling. That way I can saw off the exit hole if it chips or blows out from drilling.

(I used to manage a machine shop where we fabricated industrial equipment using a plethora of materials including Lexan and plexiglass. I learned a lot of things from the master machinists there, including how to deal with machining plastics for guards and other machine parts).

Regards,
Dave (egnald)
 

SteveG

Member
Joined
Dec 21, 2009
Messages
2,985
Location
Eugene, Oregon 97404
Sharp drill bits are essential, and mid-grade and low cost bits (like those in sets found at big box stores) are not as sharp as is desired. Another issue is that these bits that are sharpened slightly off center, or the bit is not straight. The solution is to purchase high quality drill bits, typically found at machine shop supply sources. You will eventually need to resharpen, and need to maintain the original quality when doing so. I have found that a Drill Doctor will provide a good result for pen work.
 

monophoto

Member
Joined
Mar 13, 2010
Messages
2,542
Location
Saratoga Springs, NY
Lots of good advice here. Let me add a few more thoughts:

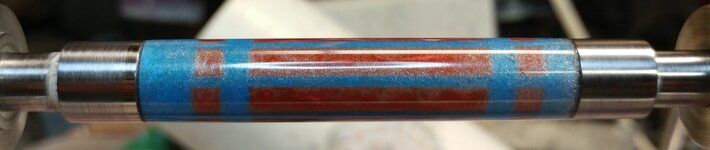
1. Pen blanks usually have the grain parallel to the long dimension. The grain pattern in the wood reflects the difference in the rates of growth in the summer (rapid growth) and winter (slow growth) seasons back when the blank was actually a tree. If the grain pattern is strong and distinct, that often also means that there is a big difference in the hardness of the wood between summer and winter growth. It's easier for the drill bit to penetrate softer wood. Taken together, all of that means that its entirely too easy for the drill bit to flex enough to follow the softer grain in the wood rather than maintain a straight line, especially if the bit is advanced into the blank too fast. To avoid this problem, regardless of whether drilling on a drill press or a lathe, advance the bit very slowly. The bit has to cut a hole before the bit can advance into it - if you force the bit, it will deviate and follow the softer portions of the grain.
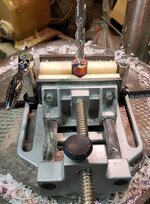
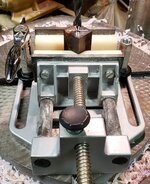
2. When drilling on a drill press, the bit is rotating against a stationary blank. When drilling on the lathe, the bit is stationary and the blank is rotating. In either case, the relative speed of rotation is important. Too slowly, and the bit will cut slowly, and since you have to cut a hole in the blank before you can advance the bit into that hole, the entire drilling process will be very slow. Too fast, and you will generate heat from the unavoidable friction caused by the relative movement between the bit and the blank, and too much heat can cause the blank to crack. As others have noted, the sweet spot for rotational speed is in the range of 400-800 r/min.
3. Allowing swarf to build up in the flutes of the bit increases friction and heat. So periodically back the bit out of the hole and clear the swarf out of the flutes. How periodically? I generally don't try to advance the bit more than about 1/2" before backing out to clear swarf.
4. You can reduce friction by lubricating the bit with BLO or wax. However, if you are drilling a pen blank where you intend to glue a tube in the hole, putting oil or wax into the hole could complicate gluing.
5. When drilling on the lathe, the jacobs chuck is held in the tailstock ram by friction, and when you extract it to clear swarf, you can break the seal which will cause the bit and chuck to loosen and start spinning. It is generally recommended that you grip the chuck with your left hand when drilling to keep this from happening. I would add that it is helpful to wear a glove on your left hand - if the chuck does come loose and start spinning, the knurled outer shell of the chuck will act like sandpaper on a bare hand - DAMHIKT. I use a kevlar carver's glove for this purpose.
 

leehljp

Member Liaison
Joined
Feb 6, 2005
Messages
9,314
Location
Tunica, Mississippi,
I'll add three things that have already been said:
1. Drilling on a DP is OK, but you do NEED something to hold the blank steady for sure.
2. I drill primarily on the lathe, but once in a blue moon, I will drill on a DP.
3. As mentioned, sharp bits.

Many people invest in a Drill Doctor, at least the 500 model, and the 750 is better. If you are not adept at sharpening drill bits on a grinder, you need one of these if you continue to make pens. Sharp bits are a necessity.

ON a Drill Press: A pen vise is a necessity. One can drill a 3/8 inch hole in the middle of a 2x4 all day long without a problem. There is enough wood to hold the board together as you drill a hole. HOWEVER, when one tries to drill a 3/8 inch hole in a 3/4 inch square blank, (depending on the type of wood) there is not enough strength all the way around to keep it from having a blowout from time to time. A vise gives strength to the walls of the blank, therefore a necessity. A second part is unless you have a high end DP or you are excellent at tuning it, DPs have more runout than most lathes and will introduce wobble. Wobble is your enemy, even on a lathe.

Again I will mention as most above have - I drill on the lathe most of the time - more precise for me.

Lots of great info above from ALL the guys!
 
Last edited:

Jonkou

Member
Joined
May 1, 2020
Messages
138
Location
Alton Bay, NH
Use the big lathe now because it has over 4" quill travel and it's rock solid, but done with the same technique on the mini. Speed abt 600 rpm, 1/2" at a time back out to clean waste. Go slow and easy with brad point bits for wood and machinist bits, no lubricant, for plastics. Pretty much follow a combo of Louie and Tony's methodology so won't repeat all except hold the chuck at all times when backing out.


6877A317-78A9-48B2-9D15-230CB74D3032.jpeg788E6FB4-E8AB-4D90-B11E-212EE2AC896C.jpeg5043179F-E96B-4934-BA43-8CBE3CD72B64.jpeg
 

howsitwork

Member
Joined
Jul 9, 2016
Messages
2,299
Location
Thirsk
It's also worth investing in a few "larger drill bits " to ream the hole of the wood,is very gummy or closes up ( think Lignum Vitae ) after drilling. If you use the next drill bit up 7.1 instead of 7 mm for have enough room to insert the tube and glue without the wood wiping the glue from your tube ! Or for a really fine fit drill with a 6.8 mm bit then redrill effectively reaming the hole out to exactly 7mm with a 7mm bit.
For really fragile blanks someone on the forum told me to wrap it in string and then soak the string in CA before drilling to, as Hank says above , give the blank sone wall strength for drilling. Always allow lots of curing time and don't use accelerator on it if you,do this.
 

Jarod888

Member
Joined
Mar 11, 2012
Messages
449
Location
Brighton, Colorado
I would echo the advise from above. I drill on the lathe, and start with a centering bit. I use mineral oil on kitless pens because there isnt any gluing involved so the mineral oil wont interfere. I typically drill a wooden blank, let it sit for a while and redrill it. Occasionally the wood will shrink a bit and redrilling clears out any tightness before inserting the tube. I've also found gorilla glue to center the tube in the drilled hole.
 

leehljp

Member Liaison
Joined
Feb 6, 2005
Messages
9,314
Location
Tunica, Mississippi,
I'll add in one more help: Here is a HF list of 3 sets that they have of 115 piece sets:

Another helpful thing is to find a drill bit chart that offers both metric, inch, and factions in a comparative list (probably several pages long). This will help in times when you need a microscopic change in drill bit sizes.
 

duderubble

Member
Joined
May 9, 2020
Messages
133
Location
Missouri
Wish I had read this about holding the drill chuck when backing out before breaking two blanks and a bit.

I'm new at this but I will add I find it less cumbersome to switch between mandrel and chuck if I do sets of a type of pen. 3 to 5 of the same pattern allows me to change over less often.
 

monophoto

Member
Joined
Mar 13, 2010
Messages
2,542
Location
Saratoga Springs, NY
I'll add in one more help: Here is a HF list of 3 sets that they have of 115 piece sets:

Another helpful thing is to find a drill bit chart that offers both metric, inch, and factions in a comparative list (probably several pages long). This will help in times when you need a microscopic change in drill bit sizes.


First, let me endorse Hank's suggestion about the HF drill bit sets. They have something of a 'Rodney Dangerfield' reputation (don't get no respect), but I have found them to be a good investment. I opted for the high-speed steel set, and I reserve them exclusively for wood and plastic - I have a collection of odd bits that I acquired over the years (some were from my Dad and are probably 60-70 years old at this point) that I use for metal.

Second, if you have an iPhone or iPad, there is an app called iEngineer that provides a wealth of information about nuts and bolts, the holes that they go in, including both imperial and metric dimensions, and the bits required to drill those holes (fractional, lettered and wire gauge), threading, etc. It's free for the basic SAE version but there is a small charge to add information on metric threads. There is also a version for Android.
 

randyrls

Member
Joined
Feb 2, 2006
Messages
4,821
Location
Harrisburg, PA 17112
I'll add in one more help: Here is a HF list of 3 sets that they have of 115 piece sets:

To joint the thread; I mark the shank of each drill bit with a sharpie. When the bit gets several marks, I replace it with a Norseman or similar quality bit.
 

leehljp

Member Liaison
Joined
Feb 6, 2005
Messages
9,314
Location
Tunica, Mississippi,
I know the Norseman set is a great set. I won't argue with that and they are worth it.

As to the HF - I will mention my favorite in the next paragraph. But what I have learned - Get a GOOD set. I bought a set of HF Forstner bits years ago. They worked well when I didn't have anything else, but sometimes I had to fight them to get the job done. Then about 15 years ago I bought some TN coated sets. Not much better. About 5 years ago, I bought a set of Freud for nearly $200 and they have been night and day different from the others. WORTH EVERY PENNY even at 3 times the price of the cheap ones.

Back to the HF 115 set. I looked at the HF Cobalt set (before they brought in the "Warrior" set.), and I purchased a set. I have been very pleasantly surprised. The Cobalt set at $100+ dollars are worth 3 times the price of the other sets - in their performance for me. I am sure that if I had spent $200 for a name brand set of cobalt bits I would be singing their praises too. But the $115 cobalts are WAY MUCH better than the $40 and $50 sets, IMO. I will admit that I am speaking with drilling in metal as well as wood. The cheaper ones, even with cutting oil did not cut well even in soft metals, but the cobalt ones, with cutting oil went through different metals like they were wood. Sharper and hold there edges too. And cut well in hard woods too.

Good average priced tools work, but sometimes they make you work harder and longer and give tiring results. It sure is nice to pick up a good tool and know that you can focus on the end product instead of fussing around with the tool!
 
Last edited:
Top Bottom