Damascus Steel - 2nd Attempt

Signed-In Members Don't See This Ad

Bob Wemm

Member
Joined
Mar 9, 2012
Messages
1,994
Location
Kalbarri, Western Australia
I posted my first attempt a few days ago and knew that I needed more metal in the mix.

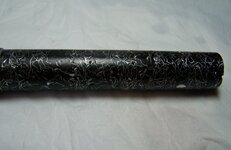
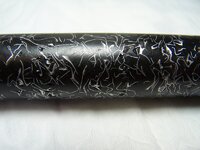
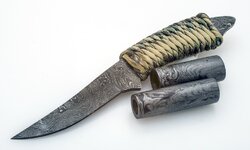
This blank has 1000 +- 50 metal strips ranging from 1/32 to 1/8 wide and from 1 1/4 inches to 2 1/2 inches long. Each strip was twisted individually so that none of them sat flat against each other.

Clearly I need probably that many again to get the desired result.:redface::redface::redface:

So it seems that this one will be a pen, but no more.

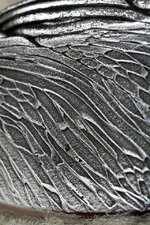
I reckon the only way to get this look is by using Polymer Clay, and that will be my 3rd attempt.

Thanks for looking, C&C welcome.

Bob
 

Attachments

  • 001.JPG
    001.JPG
    95.9 KB · Views: 354
  • 002.JPG
    002.JPG
    125 KB · Views: 541
Signed-In Members Don't See This Ad

Skie_M

Member
Joined
Aug 7, 2015
Messages
2,737
Location
Lawton, Ok
In traditional blacksmithing, there is an item known as a "cable knife". It is made by taking a mid carbon steel cable and heat treating it to increase surface carbon content while it is reduced in diameter to remove all the air voids within it ... the milder steel in the core of the wires is essential in the end product to increase it's flexibility and overall strength, while the higher carbon in the outer parts of the cable wires end up forming the extra hard steel that will keep the edge sharp.

In pure essence, it is a form of damascus steel.

An easy way to replicate this type of appearance would be to obtain a skinner blend of very long thin polyclay that ranges from silver in the core to black on the outside, and cut it into multiple equal pieces... perhaps 27 of them, arranged in a long spiraled pattern.

Squeeze them all together as you roll them into a single cane. Roll it out thinner and then fold (or cut and re-apply multiple pieces) and roll again. Make your final cane about 4 inches long, and 2 inches wide or more. Cut your cane LENGTHWISE into 1/8th inch slices and apply the appealing looking slices to your barrel tube. Roll to remove seams and blend the slices together if you used more than one. Use a spare mandrel and bushings if you wish, to achieve near-finished dimensions. If you wish to finish on the lathe, use oversized bushings. Sanding can be done for the entire depth, revealing changing patterns within the blank. Make sure you bake before turning on the lathe for finishing process.
 

Bob Wemm

Member
Joined
Mar 9, 2012
Messages
1,994
Location
Kalbarri, Western Australia
In traditional blacksmithing, there is an item known as a "cable knife". It is made by taking a mid carbon steel cable and heat treating it to increase surface carbon content while it is reduced in diameter to remove all the air voids within it ... the milder steel in the core of the wires is essential in the end product to increase it's flexibility and overall strength, while the higher carbon in the outer parts of the cable wires end up forming the extra hard steel that will keep the edge sharp.

In pure essence, it is a form of damascus steel.

An easy way to replicate this type of appearance would be to obtain a skinner blend of very long thin polyclay that ranges from silver in the core to black on the outside, and cut it into multiple equal pieces... perhaps 27 of them, arranged in a long spiraled pattern.

Squeeze them all together as you roll them into a single cane. Roll it out thinner and then fold (or cut and re-apply multiple pieces) and roll again. Make your final cane about 4 inches long, and 2 inches wide or more. Cut your cane LENGTHWISE into 1/8th inch slices and apply the appealing looking slices to your barrel tube. Roll to remove seams and blend the slices together if you used more than one. Use a spare mandrel and bushings if you wish, to achieve near-finished dimensions. If you wish to finish on the lathe, use oversized bushings. Sanding can be done for the entire depth, revealing changing patterns within the blank. Make sure you bake before turning on the lathe for finishing process.


Thank you for that info.
Much appreciated.

Bob.
 

jttheclockman

Member
Joined
Feb 22, 2005
Messages
19,082
Location
NJ, USA.
This is going to have a nice effect. If you did not get too many air pockets this should really look quite nice. I like your thinking outside the box. Can not wait to see it spun. Good luck
 
Last edited:

Bob Wemm

Member
Joined
Mar 9, 2012
Messages
1,994
Location
Kalbarri, Western Australia
This is going to have a nice effect. If you did not get too many air pockets this should really look quite nice. I like your thinking outside the box. Can not wait to see it spun. Good luck

Hi John,
Hopefully there will not be too many air pockets, as the strips were added in lots of about 4 - 6 at a time, and then went into the pressure pot. The external chips are from the blunt carbide cutter that I used to get the blank round. It was sanded to only 320 and I coat of thin CA applied to show the surface a bit better.

Bob.:)
 

jttheclockman

Member
Joined
Feb 22, 2005
Messages
19,082
Location
NJ, USA.
This is going to have a nice effect. If you did not get too many air pockets this should really look quite nice. I like your thinking outside the box. Can not wait to see it spun. Good luck

Hi John,
Hopefully there will not be too many air pockets, as the strips were added in lots of about 4 - 6 at a time, and then went into the pressure pot. The external chips are from the blunt carbide cutter that I used to get the blank round. It was sanded to only 320 and I coat of thin CA applied to show the surface a bit better.

Bob.:)

Is it steel or aluminum??

I also would be curious to know when finished turned is the metal felt protruding past the acrylic or did you get a nice transition??? The reason I ask is because I started a pen about 2 years ago and basically due to health reasons i have not been able to complete but what I was running into was a couple problems. I used aluminum and black resin. When I spun the blank the resin cut faster than the aluminum and I had a hard time getting all to feel on the same plane. But I also ran into a problem of the resin separated from the aluminum, causing blank failure. I have since tried a couple things to correct this but have not yet been able to cast my blank and try the results. Hopefully some time next year.
 
Last edited:

Skie_M

Member
Joined
Aug 7, 2015
Messages
2,737
Location
Lawton, Ok
First one was shavings from M3 composite titanium, wasn't it?


True damascus has alternating layers of high carbon and low carbon steel, generally in layers of high number ... 128 to over 1000 per inch. To replicate that in polyclay would be extremely difficult, as when you compress so many layers together the clays tend to blend together. Going with fewer layers may give an interesting appearance, but it wouldn't look like folded steel.


I'm wondering if it would be feasible to create a pen using a multitude of copper foil layers held together with solder and made into a pen ... the differences in color would be striking and would resemble a form of damascus much better, but the layers would have to be quite thin and sandwiched together closely. Brass has a high copper content and could be soldered as well ... it may also work for this.
 

Charlie_W

Member
Joined
Nov 16, 2011
Messages
5,918
Location
Sterling, VA USA
Is it steel or aluminum??

I also would be curious to know when finished turned is the metal felt protruding past the acrylic or did you get a nice transition??? The reason I ask is because I started a pen about 2 years ago and basically due to health reasons i have not been able to complete but what I was running into was a couple problems. I used aluminum and black resin. When I spun the blank the resin cut faster than the aluminum and I had a hard time getting all to feel on the same plane. But I also ran into a problem of the resin separated from the aluminum, causing blank failure. I have since tried a couple things to correct this but have not yet been able to cast my blank and try the results. Hopefully some time next year.[/QUOTE]

John, Bob,
I would think that even if you got a good turned surface, the sanding would take the resin lower than the metal.
My approach would be to turn slightly small, sand as usual and then do a thick build up CA finish. Built up oversize and then turn and sand back down to specs.
This will leave a round smooth pen and the metal will be protected from oxidation.
 

Bob Wemm

Member
Joined
Mar 9, 2012
Messages
1,994
Location
Kalbarri, Western Australia
Is it steel or aluminum??

I also would be curious to know when finished turned is the metal felt protruding past the acrylic or did you get a nice transition??? The reason I ask is because I started a pen about 2 years ago and basically due to health reasons i have not been able to complete but what I was running into was a couple problems. I used aluminum and black resin. When I spun the blank the resin cut faster than the aluminum and I had a hard time getting all to feel on the same plane. But I also ran into a problem of the resin separated from the aluminum, causing blank failure. I have since tried a couple things to correct this but have not yet been able to cast my blank and try the results. Hopefully some time next year.

John, Bob,
I would think that even if you got a good turned surface, the sanding would take the resin lower than the metal.
My approach would be to turn slightly small, sand as usual and then do a thick build up CA finish. Built up oversize and then turn and sand back down to specs.
This will leave a round smooth pen and the metal will be protected from oxidation.[/quote]


John and Charlie, it is aluminium, cut from Pie containers. The fine aluminium from the seals in Coffee tins etc. seems to twist better, but is much harder to obtain.
I can just feel the metal but as I said it has only been sanded to 320 and has only 1 coat of thin CA.
A few of the other castings I've made have ended up quite rough after white diamond buffing, so I will take your advice Charlie and build up a layer of CA to protect the whole thing.

Thank you for your thoughts.

Bob.:)
 

jttheclockman

Member
Joined
Feb 22, 2005
Messages
19,082
Location
NJ, USA.
Bob

I hope you keep tract of your progress on this and let us know the ups and downs. I will be following. I am in a similar situation as I mentioned. When I did these pens I did not have any problems with the resin being underexposed in relations to the aluminum. I used my skew to turn them after getting down to a good size with my carbide cutter. I did not add any CA after polished. The attempt I made awhile ago I had some problems and may have to go the route with the CA. Will be watching. Thanks.


Bob Wemm

Member
Joined
Mar 9, 2012
Messages
1,994
Location
Kalbarri, Western Australia
The blank is in the bin, at least as soon as I get some of the kit pieces back out.
What a BLO**** disaster. Obviously the Resin (Polyester) is not a good fixing agent for this type of Aluminium, there were multiple blowouts during the turning process, and even removing the nylon bushes after the CA finish caused more breakouts. But I persevered and finally began to assemble the pen.
The disaster continued and now there are large amounts of aluminium and resin laying on the floor. The only thing remaining is to extract the few bits from the tubes.

I don't recommend this process to anyone.:redface::redface::redface::redface::redface::redface::redface::redface:

Thanks for showing interest in this.

Bob.
 

jttheclockman

Member
Joined
Feb 22, 2005
Messages
19,082
Location
NJ, USA.
-
Bob sorry to hear this. Can you say what might have been the downfall. Did the resin not stick to the metal??
 

jttheclockman

Member
Joined
Feb 22, 2005
Messages
19,082
Location
NJ, USA.
OK Bob. We need to figure this out because you and I have the same interest in using aluminum in our pen castings. Here is what I know. The pens I shown in this thread were not combination casted. I cast the black acrylic alone and then cut the segmentation and used epoxy to hold the aluminum in. This is why they held together and turned well with no problems.

But I thought I posted this problem here before but I just looked and could not find it so I will explain here. Before I had to depart from my shop due to health reasons I was working on several pens but one in particular was a blank that I wanted to embed aluminum bars in a black resin. If I could get this to work I had other designs I wanted to try. I glued the aluminum to the tube using Med. CA. No problems there. They stick very well and instantly. Then I mixed my resin and poured my tubes. No bubbles and they looked good. Let cure for a couple days. Started to turn and used a carbide cutter with new cutting edge. Going well but then big chunks and pieces started popping off. No catches and no vibration as i turned. At this point I tossed the blank and considered a failure.

I posted this on a forum and thought it was here but I may have been wrong, looking for answers. The one answer I did get that made sense was after I casted the blank, I put in my toaster oven after a couple days of curing as I normally do to make sure the blank is cured. What the poster said was that it may have caused a reaction of the metal heating and expanding at a different rate of the resin and when it cooled it pulled away from the resin. Or the resin pulled away from the aluminum. Now I roughed up the aluminum before I casted to get rid of any oils or contaminants.

I have since made a new partial blank but have not yet been able to cast and then test this theory. Steps that I am trying this time is I will not use heat. and I coated the aluminum with permanent black marker (hoping that the adhesion is better. ) I use Silmar 41 resin. I am hoping that there is not the possibility that the two materials are incompatible.

I hope you continue to experiment and not give up. I sure am not. But it maybe some time before I can continue.

Good luck. It would have looked great I am sure.:)
 

edstreet

Member
Joined
Aug 12, 2007
Messages
3,684
Location
No longer confused....
I have taken the liberty to be the first person in this thread to post damascus. Sorry but with a thread on damascus and none being shown seems just wrong on so many levels.

Shavings does not constitute damascus, neither does this junk called M3 'damascus', nor do they even look remotely close.


This is Patriot Damascus, 440C, 4800, SA203-E, 1084, 1080, 1095, & Pure Nickel.

attachment.php


This is Cable Damascus, 1085 steel cable
attachment.php


As for grain structure and shape goes.
attachment.php


This is 4 layers of 5160, 3 layers of 203E, 3 layers of 52100 and 3 layers of 15N20. folded 5 times = 416 layers total.
attachment.php
 

Attachments

  • IMG_6738.jpg
    IMG_6738.jpg
    158.7 KB · Views: 2,008
  • IMG_6744.jpg
    IMG_6744.jpg
    181.9 KB · Views: 5,802
  • IMG_6752.jpg
    IMG_6752.jpg
    145.8 KB · Views: 1,219
  • 1085-cable-damascus-macro.jpg
    1085-cable-damascus-macro.jpg
    331.3 KB · Views: 2,331

Skie_M

Member
Joined
Aug 7, 2015
Messages
2,737
Location
Lawton, Ok
140453d1446556689-damascus-steel-2nd-attempt-1085-cable-damascus-macro.jpg


Yup ... that's a nice close up image of a cable knife. :)

You can see the silvery outlines of the higher carbon steel and the grey/black pits of more pure iron quite clearly in that photo.

This is one of the easier forms of damascus to replicate using polyclay. The other types depicted by Ed would be much more difficult to attempt, as they need too many distinct layers, and attempting to make that many layers in a pasta machine would only blur and mix them together. That's how you make a skinner blend, after all... It only takes 7 or 8 foldings to blend it together where you can't see distinct lines anymore. Clay doesn't work like steel.


I'm gonna save up some money and get some copper foil to play with ... see if I can't make myself a very pretty damascus style knife. :)
 

Bob Wemm

Member
Joined
Mar 9, 2012
Messages
1,994
Location
Kalbarri, Western Australia
I have taken the liberty to be the first person in this thread to post damascus. Sorry but with a thread on damascus and none being shown seems just wrong on so many levels.

Shavings does not constitute damascus, neither does this junk called M3 'damascus', nor do they even look remotely close.


This is Patriot Damascus, 440C, 4800, SA203-E, 1084, 1080, 1095, & Pure Nickel.

attachment.php


This is Cable Damascus, 1085 steel cable
attachment.php


As for grain structure and shape goes.
attachment.php


This is 4 layers of 5160, 3 layers of 203E, 3 layers of 52100 and 3 layers of 15N20. folded 5 times = 416 layers total.
attachment.php

Well SIR, In my first post of the FIRST ATTEMPT I did Quote (FAUX) Damascus Steel.

I most sincerely apologise for this UNFORGIVABLE ERROR in omitting to add (FAUX) to this post, my second attempt.

I am surprised that a person of your incredible Standing in the world of Knowledge and Craftmanship, would actually lower yourself to even add something to this TRIVIAL THREAD.

THANK YOU FOR YOUR INPUT..

Bob.
 

jttheclockman

Member
Joined
Feb 22, 2005
Messages
19,082
Location
NJ, USA.
Bob do not sweet the stupid things such as Ed's post. He is showing off his photo skills again. Your attempt is not to duplicate Damascus to its extreme and we all got that. You are trying a technique that for a lack of a better word looks like Damascus or you were hoping to. Ed is on one of those campaigns again today as you can see from other posts today.
 

mbroberg

IAP Activities Manager, Emeritus
Joined
Mar 9, 2009
Messages
5,954
Location
Columbus, OH
Bob,

Don't worry about what Ed posts. The first two sentences of his post clearly demonstrate that he hasn't a clue about what you are trying to accomplish or what this thread is about. The rest of the post reinforces his ignorance.

Keep doing what you are doing. I'm betting you will get the look you are going for. I can't wait to see your third attempt.
 

Curly

Member
Joined
Nov 20, 2010
Messages
4,828
Location
Saskatoon SK., Canada.
Swarf is not a Klingon.

Instead of spending the time cutting and twisting foil or food containers, use swarf (metal cuttings or shavings) from a lathe, milling machine, or even a drill press. It would need to be cleaned thoroughly and perhaps etched to make a surface that resin would stick to but I think it should work. Alumilite or epoxy might work better than PR too.
 

Bob Wemm

Member
Joined
Mar 9, 2012
Messages
1,994
Location
Kalbarri, Western Australia
Instead of spending the time cutting and twisting foil or food containers, use swarf (metal cuttings or shavings) from a lathe, milling machine, or even a drill press. It would need to be cleaned thoroughly and perhaps etched to make a surface that resin would stick to but I think it should work. Alumilite or epoxy might work better than PR too.

Hi Curly,
I had thought about that, in fact I have a friend here in Kalbarri who turns metal and he just happens to love working with Aluminium, so I'm going to put the hard word on him. Cutting and twisting that many pieces sure has knobs on, so that little bit of an experiment has seen it's use by date.

I also thought about using epoxy rather than PR resin, it would have to be longer setting than 5-minute though, so that means a trip to somewhere.

Thank you for your feedback.

Bob:)
 

Bob Wemm

Member
Joined
Mar 9, 2012
Messages
1,994
Location
Kalbarri, Western Australia
A bit more background.

A Buddy and I shared a challenge to create a "LOOK ALIKE" Damascus steel pen blank, I think he has given up after a couple of his ideas were disasters, but I am going to have another go at least.

Both of mine have fallen very short of the "Damascus" look so far, but I'm working on it.

Thanks for the support guys.

Bob.
 
Top Bottom