Cutting Corners with Bandsaw

Signed-In Members Don't See This Ad

Wmcullen

Member
Joined
Dec 1, 2020
Messages
398
Location
Fairfax, Virginia
I'm not sure if this process is right or wrong; unique or common. But I want to share in case it's interesting.​

28: Cutting Corners with Bandsaw
last post- 27: Customized Zero Clearance Bandsaw Peg Jig
(3d *.obj file attached)
p28.7.jpg

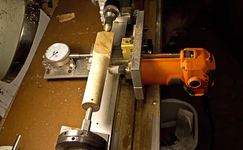
Tony mentioned he uses his bandsaw to remove corners from brittle blanks before turning.
We started talking about developing a simple 3d printed blank holder.​
The Problem
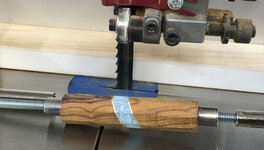
Cutting a blank at 45 degrees freehand feels like a fast way to have a problem.
pg2.jpg

Our Solution
(Not rocket surgery.)

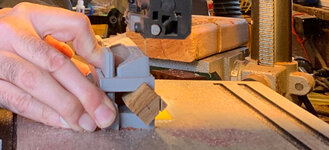
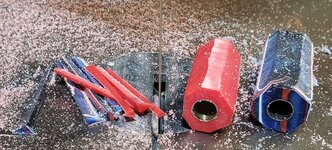
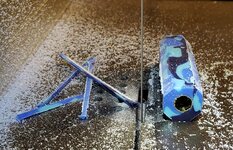
Print a v-grooved sled to hold a squared blank and keep our fingers further away from the cutting.
p28.11..jpg

p28.6.jpg

The jig accommodates square blanks from 5/8" to 1". It is intended for rough cuts. Precision is not one of its traits.
p28.10..jpg

p28.2.jpg

*Optional Stop Block Attachment
We designed an extra piece that can be CA glued to the bottom of the jig and used in conjunction with a 1" wide x 0.25" tall stop block (not provided). This way the sled would glide along without having to eyeball the cut.

3D Model
Attached is an obj file called CornerShave4.obj
The model is provided as-is. A bandsaw blade will go through this plastic like a hot knife through butter. I never rely on printed plastic for protection. I only use this to keep my fingers far away from the blade.

Thanks for looking!
- Cullen
 

Attachments

  • p28.9..jpg
    p28.9..jpg
    45.9 KB · Views: 180
  • CornerShave4.obj
    161.7 KB · Views: 232
Signed-In Members Don't See This Ad

qquake

Member
Joined
Feb 8, 2004
Messages
5,014
Location
Northern California
Forgive me if I am missing something here...If you're a woodturner why do you need a bandsaw to cut the corners?
I always trim the corners of acrylic blanks before I start turning them. Makes it easier to rough them round, and they're less prone to chipping.
 

Attachments

  • 058.jpg
    058.jpg
    503.1 KB · Views: 152
  • 024.jpg
    024.jpg
    551.4 KB · Views: 153
  • 030.jpg
    030.jpg
    489.8 KB · Views: 154

gimpy

Member
Joined
Mar 10, 2012
Messages
2,584
Location
Danville, Pa
Forgive me if I am missing something here...If you're a woodturner why do you need a bandsaw to cut the corners?
Watch
Listen
Learn

New ideas are great
Especially when they can
Save tools
Have safety features

I'm sure you are well rounded, experienced
woodturner/worker/tradesman

Please share your tips & tricks
so that we all can learn something
new

Thank you
 

penicillin

Member
Joined
Feb 27, 2019
Messages
1,036
Forgive me if I am missing something here...If you're a woodturner why do you need a bandsaw to cut the corners?
First: I speak only for myself and what I do.
Second: Like @qquake, I do it on the plastic (e.g., acrylic) blanks. I have not found a need to do it on wood blanks.
Third: I have not used a bandsaw for a while. Instead, I prefer to use a belt sander to accomplish the same results.

I clamp the plastic pen blank by the ends using a ratchet clamp, and sand off the corner edges using a belt sander. Pay attention to even sanding along the edge (not too much top or too much bottom). Roll the blank as you sand to make a smooth, round, corner edge.

Why? It helps to prevent chipouts. It also means less of the "hard work" on my roughing gouge, which means less time spent sharpening.

CAUTION: Using a belt sander creates a lot of very fine plastic dust with lots of static electricity. It clings to everything and doesn't like to blow or vacuum off. I put a shop vac at the end of the sanding belt to collect the dust.
 

egnald

Member
Joined
Jun 9, 2017
Messages
3,105
Location
Columbus, Nebraska, USA
I made a jig to do this on my bandsaw by making a couple of octagonal pieces of wood with a quarter-20 ready bolt through them and a quick release knob. I mount the drilled and tubed blanks with the bushings and spacers, then use the fence on my bandsaw as a guide for the jig. It uses the tube as a reference so the octagonal blanks are concentric with the tube and not necessarily the center of the blank. By cutting on all 8 surfaces it permits more bulk of a blank to be removed rather than just nipping the corners off. It was easy to make. The pictures provide a better explanation than I could ever hope to. - Dave

IMG_1762 Cropped 2.jpg
IMG_1747 Cropped.jpg IMG_1748 Cropped.jpg
 

Attachments

  • IMG_1749 Cropped 2.jpg
    IMG_1749 Cropped 2.jpg
    221.6 KB · Views: 170

TonyL

Member
Joined
Mar 9, 2014
Messages
8,915
Location
Georgia
Forgive me if I am missing something here...If you're a woodturner why do you need a bandsaw to cut the corners?
One doesn't need one. It is just an option. I practice this more for non-wood materials. It not a must..just another way of going about it.
 

jttheclockman

Member
Joined
Feb 22, 2005
Messages
19,132
Location
NJ, USA.
Artie, cutting the corners off a blank is one of those things that some do and some don't find a need. I am one who does not find a need. Others think they save on wear of their tools but again I believe it comes down to being able to control your tools and to sharpen them well. I have never found a problem turning square stock round weather acrylic or wood. Just takes a light touch to get it round. Now of course if segmenting this could be a great way to equalize a blank for an octagon. You find there are many ways to get to final product. some use CA some use other things. Some use epoxy and some use CA to glue tubes in. again whatever you feel comfortable to do. But the thing is find out what works for you. Make take some trial and error but you will get there.
 

Wmcullen

Member
Joined
Dec 1, 2020
Messages
398
Location
Fairfax, Virginia
Forgive me if I am missing something here...If you're a woodturner why do you need a bandsaw to cut the corners?
Hi Artie-
I thought the SAME thing when I heard the question. But when someone mentioned they were turning "brittle" material it made a lot more sense. Thanks for asking the question.
I made a jig to do this on my bandsaw by making a couple of octagonal pieces of wood with a quarter-20 ready bolt through them and a quick release knob.
Thanks for chiming in Dave. Your jig has been a great inspiration!!
 

Aurelius

Member
Joined
Feb 26, 2021
Messages
102
Location
Pittsburgh, PA
First off, let me applaud your design and fabrication on the jig. It's beautiful.
That said, I still don't quite understand why you need it. I get trimming the corners of the blank. What I don't understand is why you would want this jig versus just tilting the table of the band saw 45 degrees? Am I missing something?
 

leehljp

Member Liaison
Joined
Feb 6, 2005
Messages
9,326
Location
Tunica, Mississippi,
First off, let me applaud your design and fabrication on the jig. It's beautiful.
That said, I still don't quite understand why you need it. I get trimming the corners of the blank. What I don't understand is why you would want this jig versus just tilting the table of the band saw 45 degrees? Am I missing something?
Everyone is different and each one has his on preferences. I do like the jig vs using a table saw. I have used a TS a couple of times with a home made jig, but I too prefer the BS and a jig. And I sometimes use a round over bit in my router table. Works great.

AS to a TS and tilting the TS blade, " to me," - if the blank is under the 45° blade, that is extremely dangerous, even with a jig. If the blank is on the outside, the base is being cut out from under it, making for potential danger too. Even using this jig on a 90° TS blade would be safer than using it on a tilted blade.
 

dogcatcher

Member
Joined
Jul 4, 2007
Messages
2,361
Location
TX, NM or on the road
I have some jigs like this, not to round off turning blanks, but to make flat sides on tool handles. This is to keep the tool from rolling off the table.

The only time I remove the corners is when I am getting ready to turn a "million piece" segmented blank, but the I load it up on the lathe, turn on the lathe and use a "40 grit" skew on an angle grinder and sand it to round.
 

jrista

Member
Joined
Aug 12, 2021
Messages
2,241
Location
Colorado
I made a jig to do this on my bandsaw by making a couple of octagonal pieces of wood with a quarter-20 ready bolt through them and a quick release knob. I mount the drilled and tubed blanks with the bushings and spacers, then use the fence on my bandsaw as a guide for the jig. It uses the tube as a reference so the octagonal blanks are concentric with the tube and not necessarily the center of the blank. By cutting on all 8 surfaces it permits more bulk of a blank to be removed rather than just nipping the corners off. It was easy to make. The pictures provide a better explanation than I could ever hope to. - Dave

View attachment 321802
View attachment 321804 View attachment 321805
This is really cool. Lets you use the fence to guide and keep the cuts very strait. I have to give this a try.
 

Aurelius

Member
Joined
Feb 26, 2021
Messages
102
Location
Pittsburgh, PA
Everyone is different and each one has his on preferences. I do like the jig vs using a table saw. I have used a TS a couple of times with a home made jig, but I too prefer the BS and a jig. And I sometimes use a round over bit in my router table. Works great.

AS to a TS and tilting the TS blade, " to me," - if the blank is under the 45° blade, that is extremely dangerous, even with a jig. If the blank is on the outside, the base is being cut out from under it, making for potential danger too. Even using this jig on a 90° TS blade would be safer than using it on a tilted blade.
I get what you are saying and it is absolutely true that tilting the blade on a table saw could make for some dicey situations. However, I was asking about tilting the table on a band saw which, I thought, would accomplish the same thing as the jig.
 

leehljp

Member Liaison
Joined
Feb 6, 2005
Messages
9,326
Location
Tunica, Mississippi,
I get what you are saying and it is absolutely true that tilting the blade on a table saw could make for some dicey situations. However, I was asking about tilting the table on a band saw which, I thought, would accomplish the same thing as the jig.
Sorry for the misunderstanding.

I once had a 12" craftsman band saw in which the blade tilted and the table stayed level. That was a sweet BS, and made for easy miter cuts rather than tilting a table. I miss that saw.
 

crokett

Member
Joined
Dec 4, 2012
Messages
610
Location
Mebane, North Carolina
Wood I never take the corners off. I used to not take the corners off of plastics. After trying it, it is actually slightly faster to take the corners off and a good deal more pleasant since I don't get plastic chips bouncing off my face mask. Once the blank is round plastics are fun to turn. done correctly you get a continuous ribbon that gets sucked straight into the vacuum.
 

Wmcullen

Member
Joined
Dec 1, 2020
Messages
398
Location
Fairfax, Virginia
I get what you are saying and it is absolutely true that tilting the blade on a table saw could make for some dicey situations. However, I was asking about tilting the table on a band saw which, I thought, would accomplish the same thing as the jig.
Aurelius: Great point. Thanks for adding it!
 

Wmcullen

Member
Joined
Dec 1, 2020
Messages
398
Location
Fairfax, Virginia
Cutting Corners with Bandsaw - UPDATE
1.jpg

Tony and I decided to increase the distance between the finger guard and blank.
He reports that this version is just as easy to handle.
The only (slight) downside is that the pieces don't fit into a single print.
Therefore, I'm including the geometry (obj files) as two separate files.
Best,
Cullen
 

Attachments

  • CornerShaveLargeTop.obj
    110.9 KB · Views: 137
  • CornerShaveLargeBottom.obj
    46.2 KB · Views: 144

shastastan

Member
Joined
Jan 15, 2014
Messages
323
Location
N CA
Cutting Corners with Bandsaw - UPDATE
View attachment 326592
Tony and I decided to increase the distance between the finger guard and blank.
He reports that this version is just as easy to handle.
The only (slight) downside is that the pieces don't fit into a single print.
Therefore, I'm including the geometry (obj files) as two separate files.
Best,
Cullen
If anyone is selling these, I would be happy to buy one. I tried making my own jig, but it didn't work out as I had hoped. PM me if with a price which I'm sure will be less than me buying a 3D printer :)
 

Painfullyslow

Member
Joined
Mar 5, 2022
Messages
378
Location
Connecticut
@Wmcullen just wanted to say thank you for providing the 3d files. I just started a print on these to see how they come out.

FYI the .obj files are incredibly small, around ~4mm. I had to scale up 1000% for a workable size.
 

Wmcullen

Member
Joined
Dec 1, 2020
Messages
398
Location
Fairfax, Virginia
I had to scale up 1000% for a workable size.
You're welcome. I'm happy to share.
While I build my models in inches, when it comes time to turn into gcode I always need to scale up 10x in Cura.
The nice thing is that the measurements come out perfect when I do that.
Thanks for the note.
 

Twojugs

Member
Joined
Jan 10, 2022
Messages
9
Location
Ontario, Canada
@Wmcullen I made a simpler design, but I like yours much better. However, I have several problems when trying to print.

1: My slicer (Prusaslicer) gives an error when trying to load the .obj file. 2: When I import it into Meshmixer and convert to an .stl, it's way too small. 3: The finger guard section appears to have part of the guard 'embedded' into the top surface as there is geometry under the top surface. 4: Not clear to me if the two columns are attached to the base? Are they printed separately and glued-on?

Thanks for the great design.
Tony
 

hooked

Member
Joined
Mar 25, 2019
Messages
280
Location
Boston
When you convert to an .stl you will also want to scale up 1000%. That will be the full size. I also had to turn the object so that it sits flat on the printer. It printed with no issue for me. The columns are printed to the base.

BTW..I printed the update, not the first file in this thread.

1649696970525.png
 

Wmcullen

Member
Joined
Dec 1, 2020
Messages
398
Location
Fairfax, Virginia
@hooked - As always, thanks for the assist!
@Twojugs - I agree with hooked: using the second version, found halfway down the comments, might make a better print. And yes, my obj files often need to be scaled up 10x and flipped 90 degrees. Hope it's helpful and, as always, inspect the final print and only use if you're comfortable it will improve things for you.
Best,
Cullen
 

howsitwork

Member
Joined
Jul 9, 2016
Messages
2,316
Location
Thirsk
I think it's a brilliant idea for increased safety. I made a wood version some time back but 3D looks a good way to go too.

Great thing about this site is it encourages thinking "outside the box" and like advice one can take it or leave it.

Thanks Cullen
 

farmer

Member
Joined
Jun 16, 2012
Messages
807
Location
NV
I never use plastics. wood, animal parts, or stone.
I use a veneer trimer on the tool post to make my cuts that are done on a lathe.
Like a hot knife through butter ............
If I cut the corners the wood is used for inlays.
 

Attachments

  • 1649863806289.png
    1649863806289.png
    165.3 KB · Views: 127

Painfullyslow

Member
Joined
Mar 5, 2022
Messages
378
Location
Connecticut
I never use plastics. wood, animal parts, or stone.
I use a veneer trimer on the tool post to make my cuts that are done on a lathe.
Like a hot knife through butter ............
If I cut the corners the wood is used for inlays.
You do realize that most here do not have access to metal lathes?
 

Wmcullen

Member
Joined
Dec 1, 2020
Messages
398
Location
Fairfax, Virginia
Hi @alanha
Thanks for the question. I'm happy to post these models (as-is) so people can have them printed somewhere. I don't have a 3d printing service to recommend. I'm a little sorry that national chains like "office depot" and "staples" haven't brought this service to their local shops, but I guess it's still a bit specialized. If you can't find a place to have the file printed, DM me and maybe we can work something out. In the past I've printed and mailed in exchange for you making a donation to a charity.

In case it's interesting, I also put together a scribing tool that marks where to cut pen blanks into octagonal shapes. Link

Thanks for looking at my post,
- Cullen
 
Signed-In Members Don't See This Ad
Top Bottom