Cut-n-Crown

Signed-In Members Don't See This Ad

jasontg99

Member
Joined
Feb 21, 2009
Messages
1,597
Location
Portsmouth, Virginia
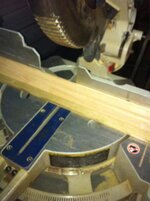
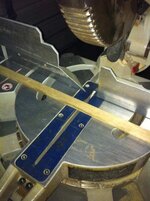
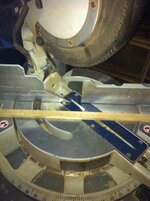
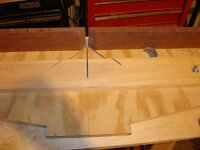
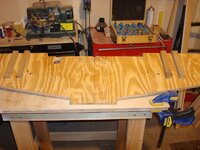
I'm thinking of buying this crown moulding system so I don't mess it up totally like I've done in the past.

Does anyone have any real world experience with this system to give me some idea if it's worth the $150?

I think you forgot something. The link may help! :biggrin:
 
Joined
Jun 28, 2010
Messages
1,830
Location
Pineville, Louisiana
miter cuts

Maybe this can help. I dont cope mine bit it can be coped this way also, just follow the cut with your coping saw.
I have done this a million times. You dont need anything other then a miter saw and optional coping saw.
Let me know if my crud picture helps any.
 

Attachments

  • IMG_0113.jpg
    IMG_0113.jpg
    32.1 KB · Views: 290

Parson

Member
Joined
Jun 10, 2009
Messages
798
Location
Houston, Texas
Jason, here's the web link for general interest:

http://www.cutncrown.com/

The idea behind this thread is to discover someone who actually owns it or has used it and found it to be worth the money or a waste of money. I can only imagine a couple of thousand pen turners must have bought this system after seeing it at a woodworking show!
 

KenV

Member
Joined
Oct 28, 2005
Messages
4,720
Location
Juneau, Alaska.
Chop box with the crown moulding upside down and a coping saw and an airnailer and life is really good. If you are using some very large crown moulding, you may need to install some one by support material -- but that big a crown moulding is not common.
 

ctubbs

Member
Joined
Sep 12, 2010
Messages
3,588
Location
Murray, Kentucky
The best thing to do with your $$$ is find an old retired finish carpenter and ask him to show you how to hang Crown. He can teach you all there is to know about Crown in an hour, visit with him, buy some lunch and coffee while you and he are talking. Heck, he might even enjoy teaching so much to a fellow woodworker that it might be free. You will be much better off with the correct knowledge to do it right without all the gadgets. All you really need is a miter box/saw that will saw square and 45 degree and a coping saw. Coping is easy, even I can do it. Cut the end to 45, mark with a Sharpee along the edge of the cut next to the face and cut that away with a slight back bevel. That way, when teh wood pulls back in the dry, you will see the other piece show very slightly instead of two miters pulling apart. The joint will almost never show.
This is not from me. My late neighbor was a union finish carpenter from Chicago and for a bit of time talking and a few cups of coffee, he came oner and taught me a little of his lifetime knowledge. Best of luck finding one of those.
Charles
 

MesquiteMan

Retired Head Moderator
Joined
Oct 18, 2005
Messages
5,678
Location
San Marcos, TX, USA.
I am a master trim carpenter and I would not waste the money on that. You can do 100% of your crown work by simply turning it upside down as suggested above. Put the part that sits on the wall flat on the fence of your miter saw. If you want to make it easier, cut a short piece of crown and put it up against the fence nice and flat. Then mark a line on the bed of your mitersaw with a pencil. That will be your reference line. If you have a lot to do, take a scrap piece of wood the length of your saw bed and use some CA glue on each end to glue it to the bed on the line. Then you just drop your piece of crown in and cut away. When done, hit the piece of wood with a hammer and it will pop right off, leaving no CA behind.

If you are planning to cope your inside cuts (the only way I will run any trim), just cut a 45 and use your coping saw to cope out the area, angling back a little to provide some back relief so it fits better. Also, if coping, make your piece about 1/16" longer than you need. That way it will snap fit in and leave absolutely no gaps if you do it right.

I have done thousands of feet of crown this way and never found a need for even using the compound miter function of my saws. Using my method is basically the same as the gizmo you are asking about but it is about $.02 in materials vs. $150!! This is a complete waste of money if you ask me!
 

MesquiteMan

Retired Head Moderator
Joined
Oct 18, 2005
Messages
5,678
Location
San Marcos, TX, USA.
Since you asked...no I have not used this exact specific jig. There are, however, other very similar crown molding jigs out there that I have either tried myself or seen demonstrated at various Professional Builder's Shows. This one is nothing special, certainly not for $150. I know you are not open to any new ideas on much cheaper ways to do this but since I took the time to go out to my shop and take some pictures, I am going to share them anyway so maybe it will help someone else who is reading this thread.

Set the crown on the saw with the wall side against the fence with a scrap board in front of it:
attachment.php


Now CA glue the piece of wood to your bed on each end. Be sure to not glue the wood to the pivoting portion of the bed so that you can set different angles.

attachment.php


Now you can set the miter to any angle you want and cut away!

attachment.php
 

Attachments

  • cr1.jpg
    cr1.jpg
    29.3 KB · Views: 349
  • cr2.jpg
    cr2.jpg
    38.6 KB · Views: 346
  • cr3.jpg
    cr3.jpg
    36 KB · Views: 355

Parson

Member
Joined
Jun 10, 2009
Messages
798
Location
Houston, Texas
Curtis, that certainly is an interesting idea! Thanks for making a special trip out to the shop and taking pix. I know it's cold too! Hopefully, others will get their head around your pix and it will help them save some money on their crown molding projects.

The miter saw I am using is borrowed. I'm confident the owner will not be happy if I CA glue anything to it, even if I sand it off when I'm done. He's really picky about his equipment and treats them more like rare European sports cars vs. tools to use hard.

I may just buy the one 45 degree jig. I just don't have time to screw this project up at all and throwing an extra $35 dollars at it up front to save hundreds of dollars and extra days of my time is worth it to me.
 
Last edited:

MesquiteMan

Retired Head Moderator
Joined
Oct 18, 2005
Messages
5,678
Location
San Marcos, TX, USA.
Oh, and if you are coping the corners, the fancy little angle gauge is irrelevant since the cope will take out any discrepancy in the 90 degree angle. Finding the angle is only important if you plan to miter the inside corners and no matter how tight and precise you cut it, IT WILL OPEN UP ON YOU. But, you did not ask about that so sorry for the intrusion!:biggrin:
 
Last edited:

MesquiteMan

Retired Head Moderator
Joined
Oct 18, 2005
Messages
5,678
Location
San Marcos, TX, USA.
Curtis, that certainly is an interesting idea! However, the miter saw I am using is borrowed and I'm confident the owner will not be happy if I CA glue anything to it, even if I sand it off when I'm done. He's really picky about his equipment.

And I too am EXTREMELY picky about my equipment. I make part of my living with it afterall! As a matter of fact, the saw in the photo has ONLY been used by myself. You have a less picky owner than I am since I DO NOT loan out my job tools to ANYONE, even my dad!

That CA WILL NOT leave any marks or residue of any kind on the saw when you tap the board with a hammer. ALL of the glue will come off with the board. If, by chance, any stays behind, you can scrape it off with you fingernail. CA just does not bond well to smooth metal. The saw in the photo has had this done on it at least 75 times and shows no signs at all of CA.

Then again, I also use CA to glue temporary stop block on my router table and even tablesaw with no issues at all! It just pops right off. Try it on one of your metal surfaces and you will see!

If you just really do not want to even try it, then take a piece of MDF and glue a piece on it at 90 degrees, basically making a sub bed and sub fence. Then glue your block to that and you will have a portable jig that can be used on any saw in the future as long as it is the same crown.

Or, just spend the $150 and don't look back!:biggrin:
 
Joined
Aug 5, 2009
Messages
3,230
Location
Millersburg, OR
This is my jig. Pic 1 overall view, Pic 2 Close up of the cutting area, the hole is so I can see the miter gauge, Pic 3 is the bottom. The notch in the back goes around the saw and the 1x1 go over the outriggers. I have a Makita 10" sliding miter saw. I don't think you will be happy with most of the jigs out there.
 

Attachments

  • saw1.JPG
    saw1.JPG
    147 KB · Views: 154
  • saw2.JPG
    saw2.JPG
    102 KB · Views: 176
  • saw3.JPG
    saw3.JPG
    145 KB · Views: 156
Joined
Jun 28, 2010
Messages
1,830
Location
Pineville, Louisiana
We tried:biggrin:
I to have cut thousands of feet and many of those feet are the large 7 1/4 crown. I think I will try the super glued stopper to my saw, I never wanted to spend the $ on the dewalt stoppers.
 
Joined
Aug 5, 2009
Messages
3,230
Location
Millersburg, OR
I haven't used that particular jig. I find that you get better results when the crown is supported on both sides of the cut and the more of it you have supported the better. My jig is just under 4' wide.
 

ctubbs

Member
Joined
Sep 12, 2010
Messages
3,588
Location
Murray, Kentucky
Curtis, you might as well give up, he just is not interested in anything except that darn blue jig. Let him go ahead and waste his money on a piece of crap that is guaranteed to not do what he thinks it will. Like you stated, if both ends are mitered, a gap will open, always has always will. Just the nature of the beast. You have been extremely helpful and even gone way out of your way to offer your best professional advice to no avail. I, for one, do appreciate your hints of the CA for the temp fence on the saw bed. That will come in mighty handy. Thank you.
Charles
 

jttheclockman

Member
Joined
Feb 22, 2005
Messages
19,212
Location
NJ, USA.
Curtis, you might as well give up, he just is not interested in anything except that darn blue jig. Let him go ahead and waste his money on a piece of crap that is guaranteed to not do what he thinks it will. Like you stated, if both ends are mitered, a gap will open, always has always will. Just the nature of the beast. You have been extremely helpful and even gone way out of your way to offer your best professional advice to no avail. I, for one, do appreciate your hints of the CA for the temp fence on the saw bed. That will come in mighty handy. Thank you.
Charles


I will disagree with part of that statement about a mitered joint will always open up. How do you do window or door casings??? Do you miter the corners or do you plinth block them??? I have 45 degree mitered all my oak moldings in my house and to date none have seperated. I did take the time to biscuit join the miters and have been happy ever since. Takes no more time than getting that perfect fit mitering. I found when doing this the Lion Miter trimmer is a well worthwhile investment to sweeten a joint and sneek up on the exact measurement.

I do agree about these jigs for moldings. Curtis showed you a perfect example to get accurate cuts. The key there too is to support the length of the molding so it does not twist on you. If you don't want to use CA glue use hotmelt glue. It will do the same thing and snap off when done without leaving any residue. Coping a molding takes abit of practice and the more detail it is the more practice so don't make it sound that easy. Using a coping saw defys some ideas we have when useing a saw. Takes abit of dexterity. Some people can use a sabre saw and a file and they are good to go but again practice is the key.
 

MesquiteMan

Retired Head Moderator
Joined
Oct 18, 2005
Messages
5,678
Location
San Marcos, TX, USA.
I will disagree with part of that statement about a mitered joint will always open up. How do you do window or door casings??? Do you miter the corners or do you plinth block them??? I have 45 degree mitered all my oak moldings in my house and to date none have seperated. I did take the time to biscuit join the miters and have been happy ever since. Takes no more time than getting that perfect fit mitering. I found when doing this the Lion Miter trimmer is a well worthwhile investment to sweeten a joint and sneek up on the exact measurement.

John,

Both of us were talking specifically about inside corners in crown molding, not door or window trim. I still stand behind the statement that 100% of mitered inside CROWN molding will open up sooner or later. It is just a matter of physics including wood movement and house movement.

Door and window trim is a completely different type of miter with the molding laying flat. Even door and window trim will crack at the miter if nothing is done to it. You mentioned using biscuits. That works fine with casing but will not work with crown or base, obviously. When I do casing work with a profile, I do not use biscuits and never have failure but I do use plenty of glue on the joints.

Actually, the last 3 houses I have trimmed have all had plain 1x4 door and window casing. the joints were butt joints in the craftsman style. Instead of just butting it together with glue, I actually make up the entire assembly on the job bench using pocket screws and glue and then install it as one piece with absolute perfect surface alignment and no cracks on the painted trim.
 
Joined
Jun 28, 2010
Messages
1,830
Location
Pineville, Louisiana
Now this is in new homes, but every joint I have made has opened up Humidity and house movement being the culprits + the mdf I use is supposed to be stable (they say) but it too always opens up no matter how good my joint is. The wood crown mould is just finger jointed cut offs from the mill I suppose.
 

MDEdwards

Member
Joined
Sep 6, 2008
Messages
85
Location
Raleigh, NC
Parson,
I have used plastic molding too. And hated myself for it!
I was comfortable with coping, but my outside corners have been inconsistent. So we went with outside corner blocks(we have many outside corners). We love the look. One thing I didn't notice in the master carpenters' descriptions is: I ripped 2x4's at 45* to make a nailing surface for the crown and corner blocks.
In the kitchen we used smaller inside corner blocks to 'carry the theme' from the other rooms. There also, I found that putting up backing made for a more secure fastening with smaller nails.
Michael
 

MesquiteMan

Retired Head Moderator
Joined
Oct 18, 2005
Messages
5,678
Location
San Marcos, TX, USA.
Yep, blocking is used on all jobs I do crown on. I screw the blocking directly to the top plate with long screws and suck it up tight. Then it is just a matter of nailing with my choice of nailer and not having to worry about trying to hit joists or studs.
 

MDEdwards

Member
Joined
Sep 6, 2008
Messages
85
Location
Raleigh, NC
Yep, blocking is used on all jobs I do crown on. I screw the blocking directly to the top plate with long screws and suck it up tight. Then it is just a matter of nailing with my choice of nailer and not having to worry about trying to hit joists or studs.
Well said Curtis.
If I wasn't clear about that plastic jig, I hated it!:curse:
It's not going to exactly fit the crown molding you come home with.
 

rsulli16

Member
Joined
Jun 9, 2010
Messages
163
i have it. and i liked it. it does take the upside down left is right right is left aspect out of it a little. the pix to follow is right on it, you also get a poster, so you can keep it straight in your head. I couldn't do one cut, forget which because my 10 in. miter saw wasn't big(deep) enough, but if you go to the diagonal opposite picture , it is the same cut.
but i don't know about $150.00 i paid $40 or $50 at a show came withthe bag, all three pieces of plastic ramps you put the moulding on to cut( yes plastic is good here for accidental touches of the blade) and the video.
Also, get a better angle finder than the one that comes with it for the first step, i got a digit one somewhere.
hope this helped
Sulli
 

AceMrFixIt

Member
Joined
Oct 1, 2008
Messages
625
Location
Jacksonville, FL
I once found a video for making a saw setup guide for the cuts. Using scrap, make a left and right inside corner peice and the same for outside corner. Good luck.
 
Joined
Aug 5, 2009
Messages
3,230
Location
Millersburg, OR
Slightly off topic, I found it works best to cut your outside miters slightly long. It looks better to have the crown match up than to have it tight to the wall. If the corner detail is prefect but the wall needs a little caulking because of a gap after paint nobody will know. Also the more precise the measurement has to be the less I use a tape measure. If you hold the piece in place and mark the bottom you can also mark the direction of the miter so there is less confusion when you are at the saw.
 

jttheclockman

Member
Joined
Feb 22, 2005
Messages
19,212
Location
NJ, USA.
I will disagree with part of that statement about a mitered joint will always open up. How do you do window or door casings??? Do you miter the corners or do you plinth block them??? I have 45 degree mitered all my oak moldings in my house and to date none have seperated. I did take the time to biscuit join the miters and have been happy ever since. Takes no more time than getting that perfect fit mitering. I found when doing this the Lion Miter trimmer is a well worthwhile investment to sweeten a joint and sneek up on the exact measurement.

John,

Both of us were talking specifically about inside corners in crown molding, not door or window trim. I still stand behind the statement that 100% of mitered inside CROWN molding will open up sooner or later. It is just a matter of physics including wood movement and house movement.

Door and window trim is a completely different type of miter with the molding laying flat. Even door and window trim will crack at the miter if nothing is done to it. You mentioned using biscuits. That works fine with casing but will not work with crown or base, obviously. When I do casing work with a profile, I do not use biscuits and never have failure but I do use plenty of glue on the joints.

Actually, the last 3 houses I have trimmed have all had plain 1x4 door and window casing. the joints were butt joints in the craftsman style. Instead of just butting it together with glue, I actually make up the entire assembly on the job bench using pocket screws and glue and then install it as one piece with absolute perfect surface alignment and no cracks on the painted trim.


Curtis

I did realize you both were talking about crown molding and I would agree about doing the coping and this is the way most professionals do it. I watch This Old House and Tommy and Norm do it that way all the time. :)

I wrote this long post but will leave it as such and say that both ways are acceptable and doable. And yes you can biscuit join both base and cove moldings.
 

Parson

Member
Joined
Jun 10, 2009
Messages
798
Location
Houston, Texas
Just thought I'd pop back in on this thread I started and show you all the results of 26 days of work, most of which were 14+ hours long and without a day off. I took the room and bathroom down to the shiplap boards. The only bits I did not do myself were the sheetrock and electrical work and I hired a company to install the carpet I purchased. I also framed out the closet as this room had no closet. This will be my new home office...

http://gallery.me.com/randallneighbour#100068

BTW, the cut-n-crown jig I bought and used for the crown moulding saved me lots of hours fiddling with a jig setup I had no time to build and many board feet of cut-wrong moulding due to it's unique design (which eliminates moving the blade angle). It was also really helpful when I had to navigate the fact that the ceiling drops nearly 3 inches from one side to the other (the guy who framed out the house in 1902 must have been on a serious bender when working on this room of my home!). Jigs like this are "worthless" to seasoned trim carpenters, but oh-so-appreciated by guys like me who just want to do it fast and right the first time.
 
Last edited:
Top Bottom