Custom Finial for Legacy Upgraded Jr. Gentelman kit

Signed-In Members Don't See This Ad

egnald

Member
Joined
Jun 9, 2017
Messages
3,061
Location
Columbus, Nebraska, USA
Greetings from Nebraska.

I think I have finally established a regimen for making custom finials for the Legacy, Upgraded Junior Gentleman kits.

Turning: I started out by epoxying my leftover bit of blank to a 3/4-inch square dowel and holding it in my pen drilling jaws for turning. This worked out pretty good, but it made me a little nervous turning something so small up next to that big spinning chuck. About a week ago though I broke down and bought a collet chuck along with a set of ER32 collets. For the last couple of pens I have used hot melt glue to glue the leftover bit of blank to a 3/4-inch round dowel and holding it in the 3/4-inch collet. I think this has worked out really good.

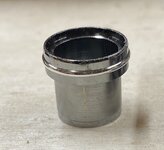
Turning: I started out using calipers to turn the finial down to size, but after doing a few measurements I found that the metal finial the is pressed out is just over 10mm in diameter, so I started using a 10mm open end wrench as my gauge for turning the tenon part of the finial. Even though they are a bit undersized, with the additional thickness of the CA and the tolerances of the parts, they fit very nicely.

Finishing: I started by using my standard CA finish along with wet sanding with MicroMesh before parting the finial off. I was not happy with how easy it was to sand through on the finial. For the past couple of kits, I still used a CA finish, but I cut the number of coats of both thin and medium in half and I have foregone the MicroMesh. I suppose it is because of the reduced number of coats and the fact that the finial is so small that the CA seems to go on very evenly and it dries very glossy. As long as they continue to look as good as the last few have I will forego the MicroMesh completely - time will tell.

Parting off: I started by parting the finial all the way off using a carbide parting tool, but after doing a few I started stopping when the tenon was about 5/32 of an inch and then sawing the part off with a fine tooth pull saw. The tenon fits easily in the hole where the commercial finial was.

I use a scratch awl to scuff up the metal in the cap before epoxying the finial in place.

Thank You to everyone who encouraged me to take this baby step into customizing. I am really hooked on this custom finial thing. Who knows, maybe some day I will get enough courage (and tools) to make something kit-less.

Regards,
Dave

PS I just finished the finial for a pen made from a Lacewood blank. I will post the finished pen to the "Show Off Your Pens!" forum when I get the rest of it completed.
 
Signed-In Members Don't See This Ad

egnald

Member
Joined
Jun 9, 2017
Messages
3,061
Location
Columbus, Nebraska, USA
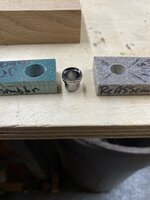
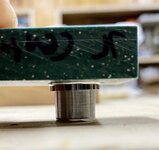
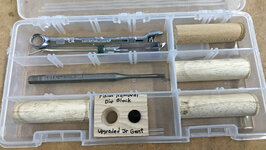
I even made a Factory Finial Removal Die out of a piece of very hard Hickory. I drilled a 27/64 through hole and then put a nice chamfer lead in for the cap to sit in when I press out the kit finial. I bought a 5/32 pin punch to drive it through so I don't have to smack so hard on any of my transfer punches. I also bought a small angled scratch awl to roughen the surface of the cap up to give it a little more tooth for the epoxy and I bought a dedicated 10mm open end wrench to use for sizing the tenon while I am turning it. So, I sort of now have a finial removal kit - as soon as I find the perfect sized plastic pencil box to keep it all in.

Some day I need to get another 10mm wrench and try sharpening the jaws to try to turn it into one of those perfect sized easy tenon cutters that I have seen people talk about out there on YouTube.

Learning how to do new stuff is really FUN!!!

Dave
 

JohnU

Member
Joined
Jan 31, 2008
Messages
4,924
Location
Ottawa, Illinois
I made my block out of white oak to punch the stock finial out. I also made a punch set out of corion to disassemble the center band so I can match it to the custom finial. I also keep the stock parts in case I want to swap out platings with other sets. It's little things like these that set the pens apart from others… and keeps it fun.
 

egnald

Member
Joined
Jun 9, 2017
Messages
3,061
Location
Columbus, Nebraska, USA
I made my block out of white oak to punch the stock finial out. I also made a punch set out of corion to disassemble the center band so I can match it to the custom finial. I also keep the stock parts in case I want to swap out platings with other sets. It's little things like these that set the pens apart from others… and keeps it fun.
John, I am intrigued by your process of disassembling the center band to match it. Can you share a photo or two about your tools and process? I did a search on the forums for custom center bands and didn't turn up too much related to the Jr. Gent. I did find a cigar center band modification in the Resources by Dennis Cabell "soligen" that I might have to try out as Cigars are one of my favorite kit styles. - Dave
 

JohnU

Member
Joined
Jan 31, 2008
Messages
4,924
Location
Ottawa, Illinois
It's fairly simple as long as your hole dimensions are correct. I made them years ago out of corian scraps. One hole needs to fit over the bottom of the band but not the center ring which sticks out a bit, and the second hole needs to fit over thr small end of the center piece that goes in the brass tube.
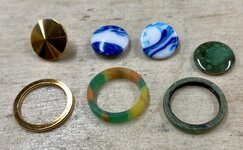
Remove the plastic thread piece and place thr center piece upside down on a solid surface. Place the corian larger hole over the top of the the center band bottom so that it rests on the middle ring and tap it with a hammer until it and the compression fit piece that holds it in place moves down where you can remove it.
After you make the new one, turn the center piece right side up, stack the piece in order on the piece and place the smaller hole corian over the assembly and tap it back in place.

The truck is to not make your center band too thin or tight so it doesn't break when you press it back in place. My old notes say I used 15/32 and 9/16 holes to make the pieces but you may want to use calipers to check against the center band pieces to be more exact. I remember having to sand the holes a little to get the smooth fit.
The replacement ring is turned on the lathe just like the finial. You have more options with the center band because you could also leave out the compression fit piece and make the band wider since it would be held in place between the pen barrel and end of the center piece.
I hope that's clear enough. Once you do one you'll see how easy it is.

I'll hopefully make another YouTube video with Mark Dreyer on his channel "10 Minutes to Bette Pen Making" of this process to go along with the custom finial one, after the holidays, when I get some free time.


Attachments

  • 38E93AF3-76DD-40D8-881A-DDFBA4B413BC.jpeg
    38E93AF3-76DD-40D8-881A-DDFBA4B413BC.jpeg
    256.8 KB · Views: 100
  • 5E13ED05-62A6-42B9-80AD-96BA7C094404.jpeg
    5E13ED05-62A6-42B9-80AD-96BA7C094404.jpeg
    196.3 KB · Views: 100
  • F91ADC6B-A36F-49E9-8FAA-CC2DE8A2FA95.jpeg
    F91ADC6B-A36F-49E9-8FAA-CC2DE8A2FA95.jpeg
    281.7 KB · Views: 105
  • 2A9C78A1-BDF8-4A12-851F-E52836E9B089.jpeg
    2A9C78A1-BDF8-4A12-851F-E52836E9B089.jpeg
    296.9 KB · Views: 107
Last edited:

Todd in PA

Member
Joined
Feb 16, 2021
Messages
645
Location
Port Matilda, PA
I watched John's video about custom finials when it was linked here a couple months ago. I bought some Junior gent kits and decided to give this a try.

That sucker is in there and I can't get the original finial out. I hammered on it like johns video as hard as I was comfortable, but it wouldn't budge.

I turned a cube like Egnald suggested from a scrap of Texas ebony (because it seems to be hard as hell). Shattered it. Am I doing it wrong?

882ADEE7-32A7-44F2-B7D6-D9DC623FBDD7.jpeg
 

egnald

Member
Joined
Jun 9, 2017
Messages
3,061
Location
Columbus, Nebraska, USA
I watched John's video about custom finials when it was linked here a couple months ago. I bought some Junior gent kits and decided to give this a try.

That sucker is in there and I can't get the original finial out. I hammered on it like johns video as hard as I was comfortable, but it wouldn't budge.

I turned a cube like Egnald suggested from a scrap of Texas ebony (because it seems to be hard as hell). Shattered it. Am I doing it wrong?

Hmmm, that's interesting. I just use a 5/32 pin punch and give it one good solid whack with a small 7 oz. hammer and they punch right out. Are you sure the small hole in your wood block is big enough?

I measured the finial with my calipers to be 0.40 inches (about 13/32 or 10.3mm) but the finial didn't fall all the way through after I punched it out so I went up by 1/64 to a 27/64 hole. Then I cut a chamfer by twisting in a countersink bit and sanding. I twisted the countersink by hand as my countersinks seem to chew up the wood unevenly if I do it under power.

I also went to the 5/32 Pin Punch because I didn't like smacking my Transfer Punch so hard with a hammer. For transferring holes and pen disassembly I only use a plastic, semi-soft faced mallet as I have ruined some punches before by mushrooming the end from striking them too hard.

Here is a thumbnail picture of the hickory block, pin punch, and stuff I use. The black circle right next to the hole is a finial that I glued to the block so I could get a caliper around it easier if I need to measure it again. The 3/4 inch dowels are what I hot glue the finial blank to for turning. - Dave

IMG_2399 Cropped.jpg

PS. I have found that turning the finial to10.0mm is undersized just enough that the finished finial drops in without being too snug while still providing a good fit with the cap. (The first few I made to 10.3mm to match my measurements for the factory finial I punched out, but I had to press them back into the cap which sometimes damaged the CA finish around the edge).
 

JohnU

Member
Joined
Jan 31, 2008
Messages
4,924
Location
Ottawa, Illinois
I've had some harder to get out than others, depending on how much they were compressed in place, but they all came out eventually. Maybe try using a larger punch rod to get the finial post level with the hole. Then switch to the smaller punch to finish pushing it out of the hole if needed. Once it moves a little it should come out.also like David said above, make sure there's room for the finial to fall out. There needs to be a hole below the cap for the insert to fall into.
 

egnald

Member
Joined
Jun 9, 2017
Messages
3,061
Location
Columbus, Nebraska, USA
Hello all. I just posted the pictures of the finished pen in the "Show Off Your Pens!" forum.
Thanks again to everyone that has helped me get through this.
Dave
 

Todd in PA

Member
Joined
Feb 16, 2021
Messages
645
Location
Port Matilda, PA
This thread has all the info a guy like me needs to start custom finials. I built a new cube and was able to tap out the finials with a hammer. (I don't know why that first one wouldn't budge!)
EF23604B-0F2F-4E53-AE4E-94B910717C3E.jpeg

Not bad for first attempts. I'll need to work on the finish for sure. These won't be shiny enough to match the rest of the pen. I might try taping off the metal and taking the buffer to it once the pen is assembled.
 
Top Bottom