Curly maple fountain pen (no glue!!!!)

Signed-In Members Don't See This Ad
See more from Fred Bruche

Fred Bruche

Member
Joined
Feb 11, 2018
Messages
972
Location
Philadelphia 19146
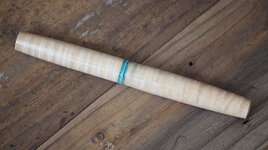
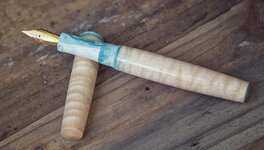
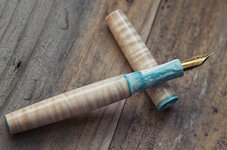
Another prototype for the "pour the resin in the blank" approach, not as wabi-sabi as the first attempt but a few details still need attention (i.e. resin is very very close to peaking through in some areas).
As I was working on it I also realized that this approach doesn't require any gluing, one less thing to buy or to worry about!
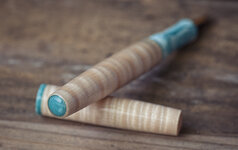
The chatoyance of the curly maple is strong but difficult to photograph.
Like last time, I feel there should be some contrasting ring to visually delineate the blank from the resin, that will get some attention on the next attempts :)
C&C welcome.

XC3Y7761.jpg XC3Y7766.jpg

XC3Y7769.jpg XC3Y7770.jpg
 
Signed-In Members Don't See This Ad

jalbert

Member
Joined
May 17, 2015
Messages
991
Location
Louisville, KY
Very good. I used this method once and got good results. It works great for eliminating the need to cut the liner thinner/bore out the sleeve more to accommodate glue and the air the glue displaces.
 

mark james

IAP Collection, Curator
Joined
Sep 6, 2012
Messages
12,720
Location
Medina, Ohio
Excellent progress. I agree that a ring(s) would be a nice visual element between the maple and resin. I'd go with metal, but I have no experience with the process of wood, metal, then casting. All my rings are simple segmenting, no casting. My thoughts are for the visual; consider slightly thicker resin showing - the resin is very attractive, but if possible, about double the thickness, and in equal proportions to the upper and lower. Yea, I know, picky, picky picky from one who has not done what you are doing! Hey, then add cabochon resin finials on each end, either as caps or imbedded... I'd better stop. 🤔

I love the process of having an inspiration and steadily refining it until personally satisfied.

Well done!
 

Fred Bruche

Member
Joined
Feb 11, 2018
Messages
972
Location
Philadelphia 19146
Very good. I used this method once and got good results. It works great for eliminating the need to cut the liner thinner/bore out the sleeve more to accommodate glue and the air the glue displaces.
Thanks John! I'm doing all this on a wood lathe and getting a thin liner/sleeve has been a real struggle, and I certainly don't have your level of control or precision. Thus the idea of this approach, I'm getting somewhere this way.
 

Fred Bruche

Member
Joined
Feb 11, 2018
Messages
972
Location
Philadelphia 19146
Excellent progress. I agree that a ring(s) would be a nice visual element between the maple and resin. I'd go with metal, but I have no experience with the process of wood, metal, then casting. All my rings are simple segmenting, no casting. My thoughts are for the visual; consider slightly thicker resin showing - the resin is very attractive, but if possible, about double the thickness, and in equal proportions to the upper and lower. Yea, I know, picky, picky picky from one who has not done what you are doing! Hey, then add cabochon resin finials on each end, either as caps or imbedded... I'd better stop. 🤔

I love the process of having an inspiration and steadily refining it until personally satisfied.

Well done!
Thanks Mark! Good to read I am not the only one realizing the potential of this approach. And please feel free to pick pick pick away any time and as much you want! 😅
Slightly thicker resin showing is definitely on my list. The idea of showing a small ring on this one was to create a "teaser" for what is inside after uncapping. Admittedly I need to get better at a stronger visually appealing section.
More appealing finials is on the list as well. How about a clip or roll stopper? And how about off-center turning to get to triangular finials?
Winter is coming ;) (which means more time on the shop for me 😅)
 

CjG78

Member
Joined
Feb 2, 2020
Messages
759
Location
Australia
That's a brilliant approach and great result! Getting the sleeves thin is tricky. I grinded some spanners to have a cutting edge and use them. As I work on a wood lathe also, getting them right is time consuming and tricky but I love a challenge.
Perhaps a way of eliminating the thin wall and the resin showing slightly, adjust the overall size of the pen. Sure it will have a bigger step down to the threads but that doesn't matter. By the way I think I see a finial cabochon on the barrel?
 

mark james

IAP Collection, Curator
Joined
Sep 6, 2012
Messages
12,720
Location
Medina, Ohio
That's a brilliant approach and great result! Getting the sleeves thin is tricky. I grinded some spanners to have a cutting edge and use them. As I work on a wood lathe also, getting them right is time consuming and tricky but I love a challenge.
Perhaps a way of eliminating the thin wall and the resin showing slightly, adjust the overall size of the pen. Sure it will have a bigger step down to the threads but that doesn't matter. By the way I think I see a finial cabochon on the barrel?
Sweet, I missed that! Nice save Casey. 🤣 🤣
 

Fred Bruche

Member
Joined
Feb 11, 2018
Messages
972
Location
Philadelphia 19146
That's a brilliant approach and great result! Getting the sleeves thin is tricky. I grinded some spanners to have a cutting edge and use them. As I work on a wood lathe also, getting them right is time consuming and tricky but I love a challenge.
Perhaps a way of eliminating the thin wall and the resin showing slightly, adjust the overall size of the pen. Sure it will have a bigger step down to the threads but that doesn't matter. By the way I think I see a finial cabochon on the barrel?
Thanks mate! I agree a slightly thicker wall would fix it, doesn't even have to be that much, 0.5mm would be plenty.
One of the problems is that the dude turning the pen is known to sometimes be too optimistic and have limited restrain. I think he should clearly write in big numbers all the dimensions right in front of his face when turning, maybe that constant reminder could help! 🙊🤣
 

mark james

IAP Collection, Curator
Joined
Sep 6, 2012
Messages
12,720
Location
Medina, Ohio
Thanks mate! I agree a slightly thicker wall would fix it, doesn't even have to be that much, 0.5mm would be plenty.
One of the problems is that the dude turning the pen is known to sometimes be too optimistic and have limited restrain. I think he should clearly write in big numbers all the dimensions right in front of his face when turning, maybe that constant reminder could help! 🙊🤣
OK... very slightly off-center and a bit recessed, but exactly what I was thinking! Very nice.
 

Fred Bruche

Member
Joined
Feb 11, 2018
Messages
972
Location
Philadelphia 19146
Very Nice. Thanks for the update on your progress. You gave everyone a new concept to improve our pen making skills.
Thank you Tim!
In case some are wondering, I used liquid diamonds epoxy resin for this one. I am getting crisp threads so I'll probably stick to that for now.
 

Fred Bruche

Member
Joined
Feb 11, 2018
Messages
972
Location
Philadelphia 19146
Thanks for sharing your process.
Did you get any shrinkage from the alumilite in the blank?
Thanks Richard.
I haven't done any stress testing but I haven't observed any issue so far. The resin is poured with the drilled blanks upright so it fills the voids and cures that way. The bond is pretty strong from what I can tell.
As a precaution for the resin not to sip in the wood I saturate the inner walls with thin CA before pouring the resin, but I'm not sure that's necessary (or it might depend on the wood structure).
 

RichAldrich

Member
Joined
Nov 26, 2007
Messages
1,040
Location
Colorado Springs, CO
Thanks Richard.
I haven't done any stress testing but I haven't observed any issue so far. The resin is poured with the drilled blanks upright so it fills the voids and cures that way. The bond is pretty strong from what I can tell.
As a precaution for the resin not to sip in the wood I saturate the inner walls with thin CA before pouring the resin, but I'm not sure that's necessary (or it might depend on the wood structure).
Thanks Fred.
 
Top Bottom