CROSS INLAY

Signed-In Members Don't See This Ad

wood128

Member
Joined
Sep 16, 2006
Messages
1,536
Location
Cocoa Beach, Fl, USA.
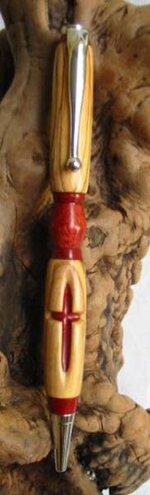
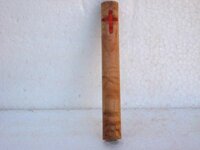
I am trying to find a relatively straight forward way to inlay a simple cross on a pen blank at the forward end. I have a drill press, dremel tool with cutters and small drill bits. Has anyone tried making a fixture to hold the pen blank for use with the drill press? It seems like one might start with a small driil and drill four holes at the ends of the cross , then use a small router bit to cut out the material between the drilled holes. Then fill the hole with a variety of materials.I am sure you guys have done this technique and most likely worked out a good procedure , which would save me time with trial and error. Any help would be appreciated.
Joe
 
Signed-In Members Don't See This Ad

workinforwood

Member
Joined
Mar 1, 2007
Messages
8,173
Location
Eaton Rapids, Michigan, USA.
Use a scroll saw to cut out the cross and use inlace to fill it. If you want the cross on only one side, use 3/8 or 1/2 thick wood. cut cross in one piece, laminate another on the back, then fill with inlace.
 

jimbob91577

Member
Joined
Aug 18, 2008
Messages
280
Have you considered

Taking your unfinished blank to a laser engraving place and having them engrave a cross in it, then back filling it with inlace or something of that nature? It may cost $5 or $10 bucks, but unless you are doing 20 it may be the most cost effective/best looking way to do it.
 

jkeithrussell

Member
Joined
Oct 20, 2008
Messages
1,277
Use a scroll saw to cut out the cross and use inlace to fill it. If you want the cross on only one side, use 3/8 or 1/2 thick wood. cut cross in one piece, laminate another on the back, then fill with inlace.

Would epoxy tinted with pigments or paint work as well? Using either method, how would you get out the air bubbles?
 

PaulDoug

Member
Joined
Mar 2, 2008
Messages
3,488
Location
Benton City, WA.
Would epoxy tinted with pigments or paint work as well? Using either method, how would you get out the air bubbles?

I've used epoxy/paint with success. I was able to get the bubbles out buy holding one of those little vibrating engraving tools against the blank (turned on) for a while. It vibrated the air out.
 

Tom McMillan

Member
Joined
Jan 1, 2004
Messages
1,598
Location
Washougal, WA, USA.
One of my very favorite things to do is to make pens with a Cross, which I've done some of for many years.

I'll share my favorite design for doing this. My IAP photos have disappeared when the website changeover took place and I'll try to recreate part of my album later. Here's a photo of a two layer pen with a cross which was carved out with a small wood rasp. The top layer of this pen is Bethlehem Olivewood with Bloodwood as the bottom layer. This particular pen placed in the Provo Pen contest several years ago.
 

Attachments

  • mcmillant016.jpg
    mcmillant016.jpg
    18.2 KB · Views: 991

wood128

Member
Joined
Sep 16, 2006
Messages
1,536
Location
Cocoa Beach, Fl, USA.
Tom, that is a great looking pen and I do like your idea. Maybe you can provide more details. I have not seen a pen with the cross on the lower part of the pen. Thanks again for sharing.
Joe
 

Tom McMillan

Member
Joined
Jan 1, 2004
Messages
1,598
Location
Washougal, WA, USA.
Thanks Joe!!

I've been a member from very early on, but have been fairly quiet for the last few years. I hope to get a little more active again.

To make this pen I turn down the first layer of wood evenly to a little over the bushings. Next, I drill out the wood to go over this layer (forgive me at this point I don't remember the exact drill size I normally use since it's been several years). Next I turn the pen to size leaving the top layer a tad proud of the lower layer. For this pen I tapered the ends down to the bushings on each end and used a parting tool to even out the top layer at junction of the bottom layer. Next I used a small wood rasp (actually a 1/8" bas tard file (space shown as not acceptible otherwise) to carve out the Cross---this is a bit of work but will speed up with experience (I've done a lot of 2 layer spiral pens also using this method).

Oops, forgot to add, I do sand the Cross by hand to about 1200 grit and apply CA by hand (while not turning) to the Cross area as well as to the rest of the pen while turning.

If there's more info you'd like feel free to ask, and I'll try to share what I can. I do think this style of pen is very attractive and I encourage all who wish to try a pen with a Cross to give this style a try!!
 
Last edited:

rej19

Member
Joined
Jul 19, 2008
Messages
821
Location
Indianapolis, IN
Man Tom that is nice! Not to steal a thread but I recommend anyone seeing this pen also check out Tom pictures he just reposted. This is way before the Pen Wizard! I'm new around here also and hadn't seen these before. Very impressive and some new inspiration was just received here. Thanks for sharing!
 

workinforwood

Member
Joined
Mar 1, 2007
Messages
8,173
Location
Eaton Rapids, Michigan, USA.
You can make a cross with a table saw too of course, but I prefer the scroll saw for just about anything. Epoxy is ok, but it's thicker than inlace and sets faster. It heats up when sanding and becomes a bit rubbery and could contaminate your blank surface. Inlace is made for this project. It's thinner, accepts a multitude of dyes and paints, doesn't melt or become rubbery during sanding. Inlace is not expensive..it is cheaper than epoxy. You pay a bit more up front, but if you sit down and look at the quantity between the two products you get more with inlace. It's less messy to work with too. Pour the product in the hole, and then give the wood a dozen hefty raps on the bench..that'll knock any bubbles out.

Toms pen is kicken..no doubt about it, but that's more work. That's a barrel turned to fit into another barrel..very ingenious indeed! I could cut, glue, and fill 10 crosses in an hour with a scroll saw...if time and effort are an issue.
 
Last edited:

jspencer

Member
Joined
Jan 20, 2009
Messages
26
Location
Houston
Great ideas everyone. I am defintely inspired. I have been looking for a way to incorporate the scroll saw.
 

jkeithrussell

Member
Joined
Oct 20, 2008
Messages
1,277
How long does it take the inlace to set up?

You can make a cross with a table saw too of course, but I prefer the scroll saw for just about anything. Epoxy is ok, but it's thicker than inlace and sets faster. It heats up when sanding and becomes a bit rubbery and could contaminate your blank surface. Inlace is made for this project. It's thinner, accepts a multitude of dyes and paints, doesn't melt or become rubbery during sanding. Inlace is not expensive..it is cheaper than epoxy. You pay a bit more up front, but if you sit down and look at the quantity between the two products you get more with inlace. It's less messy to work with too. Pour the product in the hole, and then give the wood a dozen hefty raps on the bench..that'll knock any bubbles out.

Toms pen is kicken..no doubt about it, but that's more work. That's a barrel turned to fit into another barrel..very ingenious indeed! I could cut, glue, and fill 10 crosses in an hour with a scroll saw...if time and effort are an issue.
 

workinforwood

Member
Joined
Mar 1, 2007
Messages
8,173
Location
Eaton Rapids, Michigan, USA.
4 hrs and you can spin it. I prefer to let it sit over night. If you inlay an acrylic, you don't even have to put a finish on the inlace. If you use wood, whatever you use as a finish will be fine over the inlace. The clear is thinner and better than the pre-colored. You can also add stone dust for a stone like appearance, or pearl packs for a pearlessent look. Thinner means it'll get into smaller zones, and air bubbles are easier to knock out by rapping it on a table.
I like the smell of inlace. Reminds me of grease dripping on a hot brake drum. You might have to be a trucker to understand that!
 

wood128

Member
Joined
Sep 16, 2006
Messages
1,536
Location
Cocoa Beach, Fl, USA.
Thanks for all the great ideas. I have a good scroll saw with a magnifer light, so will try that method .......but don't know if my eyesite is still good enough ! The cylinder within a cylinder method is really a super idea and those pen of yours Tom, are beautiful. Really inspires me to try it. I am at present building a rose engine lathe from plans provided by Jack Chick. Anyone built that machine ? Will keep IAP posted on my progress.
Joe
 

DurocShark

Member
Joined
Jul 26, 2008
Messages
3,622
Location
Anaheim, CA
I did this with my scrollsaw. Not great but I learned a lot doing it:

sharkinlay1.jpg


The shark inlay was filled with two part epoxy colored with blue Alumilite dye. I discovered to my chagrin that whipping the mixture like I do when gluing stuff together leaves bubbles that show up later. :(

I need to go back and try it again, smaller this time. And line the cutout with shellac to seal the wood so the colored epoxy doesn't soak into the wood and look like a smear.
 

fyrcaptn

Member
Joined
Apr 30, 2008
Messages
94
Location
Mills River, NC, USA.
pens

wow~
I hadn't seen the double blanks before either. They are quite striking.
Velentine's day is screaming for a heart pen, and I've been looking at a cross for quite a while. Lets see, posed to get to the 60's again today, I'm off, got inspiration, wood, kits... Thanks all - shop is calling!
 

GouletPens

Member
Joined
Nov 9, 2008
Messages
1,449
Location
Ashland, VA
Taking your unfinished blank to a laser engraving place and having them engrave a cross in it, then back filling it with inlace or something of that nature? It may cost $5 or $10 bucks, but unless you are doing 20 it may be the most cost effective/best looking way to do it.
A laser engraver will give you many options. With a rotary tool you can engrave all the way around the pen, or you can make two barrels from contrasting woods, cut them reverse from each other, and inlay them. That would look sweet.
 

workinforwood

Member
Joined
Mar 1, 2007
Messages
8,173
Location
Eaton Rapids, Michigan, USA.
Great looking shark Don. I like it. If you use the inlace you have less bleeding of color, faster set time and it's cheaper than epoxy. The clear inlace that you color yourself is pretty thin and mostly gets rid of it's own bubbles. The few bubbles that might remain are easily removed by rapping the wood hard on the table a couple times. Or..you can still use a pressure or vaccuum pot with inlace.
I find certain woods work better than others too. If a wood is more porous, it is tough to stop it from bleeding. Maple rarely bleeds, but oak usually does bleed. What I like most about scrolling pens is that you don't have to use fancy expensive lumber. Like segmentation, the artistry replaces the beauty of the wood.
 

garycrowe

Member
Joined
Jan 2, 2008
Messages
8
Location
Tomball, Texas, USA.
I made a plexiglass template. I start with a standard pen blank 3/4"x3/4" and on one side route the cross to a depth about 1/2 way through the blank. I fill this with one of two materials. Acrylic sheet the same width as the routed slots or colored epoxy resin. let it setup then drill for the sleeves and turn as normal. Sorry I don't have a pix to post.
 

AceMrFixIt

Member
Joined
Oct 1, 2008
Messages
625
Location
Jacksonville, FL
I think I will try the scroll saw method first then work on making a jig for the dremel or some other small tool. Thanks for the inspiration. Jeff, how do you do the cross on a table saw??
 
Last edited:

rej19

Member
Joined
Jul 19, 2008
Messages
821
Location
Indianapolis, IN
You can get Inlace from Craft Supplies. I just purchased some. It comes clear or colored. I bought the clear and plan to dye it with Pearl Ex.
 

Bob Hewson

Member
Joined
Nov 23, 2004
Messages
44
Location
London, Ontario, Canada.
A pen wizard would do the job, but its a big buck to do it compared to a laser job.

If you use a laser make a good clear drawing with as much detail and a convenient size for you. The laser engraver can most likely scan the drawing and scale it to fit your pen.

Bob
 

wood128

Member
Joined
Sep 16, 2006
Messages
1,536
Location
Cocoa Beach, Fl, USA.
My first cross inay

I had reasonable results with my first attempt at a cross inlay. I used a 1/8 " router bit on my drill press with a wood jig to guide the cut for the vertical part of the cross ( the blank was square ) then guided the horizontal cut by hand. Result!!.....my hand slipped and the cut was about 1/8 " long on one side. The next try I will drill 4 starter holes or make a plexiglass template. The depth of the cut was about 1/4 " with two passes......cuts like butter , even in hard maple. The routed cavity was filled with 3 small pieces of padauk glued with CA .THen the blank was turned and sanded. Not a bad first try for working with small pieces of wood !! Stay tuned for the next.
 

Attachments

  • IMG_0768A.jpg
    IMG_0768A.jpg
    39.8 KB · Views: 306
Top Bottom