Couple of bowls and a multi axis creamer

Signed-In Members Don't See This Ad
See more from holmqer

holmqer

Local Chapter Leader
Joined
Aug 3, 2007
Messages
1,662
Location
CT, USA.
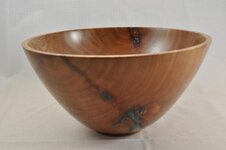
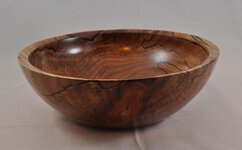
A pair of Avocado bowls, one of which has inclusion filled with Alumilite (tinted with mica powder). I posted this one earlier before buffing and not as good a photo. Both are finished with Waterlox.

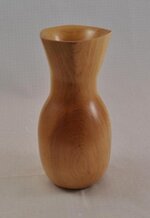
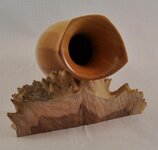
A multi-axis creamer made from Maple. Each arc of the rim is a different axis, so there are 5 axis for the rim and one for the body. Finished with Waterlox.
 

Attachments

  • Avocado Bowl LT01.jpg
    Avocado Bowl LT01.jpg
    26 KB · Views: 228
  • Avocado Bowl 02.jpg
    Avocado Bowl 02.jpg
    29.8 KB · Views: 230
  • Creamer 01.jpg
    Creamer 01.jpg
    14.6 KB · Views: 218
  • Creamer 02.jpg
    Creamer 02.jpg
    28.3 KB · Views: 257
Signed-In Members Don't See This Ad

nava1uni

Member
Joined
Mar 30, 2008
Messages
4,936
Location
San Francisco, CA, USA.
I love the bowls a lot. Where do you get avocado wood in CT? I think that the second bowl is really nice with the dark grain. The creamer has interesting lines.
 

holmqer

Local Chapter Leader
Joined
Aug 3, 2007
Messages
1,662
Location
CT, USA.
I love the bowls a lot. Where do you get avocado wood in CT? I think that the second bowl is really nice with the dark grain. The creamer has interesting lines.

Thanks

I have family in Santa Barbara and spend every Thanksgiving through New Years out there. Whilst out there I pick up some Avocado and send it home to CT. One year I showed up at the UPS store with a 100 lb Avocado log!

I love the look of Avocado, but it can be a chore to cut cleanly. It is fairly soft and when spalted gets a lot of punky spots so even with very sharp tools and careful technique, it's still a challange. The results are worth it. I have been trying to persuade some folks I know who sell Avocado for firewood to market bowl blanks on Ebay, but so far no success.

I suspect that if more folks knew how nice it looks, the demand would be good enough to make it worthwhile for folks to market large turning stock.
 

Fred

Member
Joined
Feb 18, 2007
Messages
3,557
Location
N.E. Atlanta, Georgia U.S.A.
I suspect that if more folks knew how nice it looks, the demand would be good enough to make it worthwhile for folks to market large turning stock.


The following are just a few found on Google ...
www.exoticwood.biz
Order custom-milled fruitwood from www.thorn-creek.com
www.thorn-creek.com

Pen Blanks : Forgotten Woods LLC , Ecologically Reclaimed Exotic ...

Since this wood is subject to being soft I would seriously consider having the blanks stabilized right from the beginning.


Very nice turnings of a particularly soft wood.
 

holmqer

Local Chapter Leader
Joined
Aug 3, 2007
Messages
1,662
Location
CT, USA.
The following are just a few found on Google ...
www.exoticwood.biz
Order custom-milled fruitwood from www.thorn-creek.com
www.thorn-creek.com

Pen Blanks : Forgotten Woods LLC , Ecologically Reclaimed Exotic ...

Since this wood is subject to being soft I would seriously consider having the blanks stabilized right from the beginning.


Very nice turnings of a particularly soft wood.

Unfortunately these guys only carry Avocado in pen blanks, not bowl blanks. I suspect that Avocado is a bit soft for pen blank use unless like you suggest one stabilizes it. Considering that I see Avocado going for $125 a cord delivered, I suspect that they could get a lot more if they set aside a few nice pieces and anchorsealed some half logs 8 to 10 inch in diameter.
 

CSue

Local Chapter Leader
Joined
Jan 16, 2007
Messages
2,368
Location
Laveen, AZ, USA.
The bowls are beautiful. Second is my favorite, too. But that creamer is out of this world nice!
 

holmqer

Local Chapter Leader
Joined
Aug 3, 2007
Messages
1,662
Location
CT, USA.
The bowls are beautiful. Second is my favorite, too. But that creamer is out of this world nice!

Thanks, if you want to see it in person, come to the AAW National Symposium in Hartford CT this June. It is part of our Chapter Collaborative.
 

Craftdiggity

Member
Joined
Mar 10, 2010
Messages
1,373
Location
Egg Harbor Township, NJ
A pair of Avocado bowls, one of which has inclusion filled with Alumilite (tinted with mica powder). I posted this one earlier before buffing and not as good a photo. Both are finished with Waterlox.

A multi-axis creamer made from Maple. Each arc of the rim is a different axis, so there are 5 axis for the rim and one for the body. Finished with Waterlox.


Beautiful. Nice work.

Chris
 

Tony Pridmore

Member
Joined
Oct 25, 2008
Messages
134
Location
Concord, NC
I like it all, with the creamer being my favorite. Our local club had a demonstration Tuesday on offset (multi-axis) turning by Barbara Dill. Interesting stuff!

Do tell more about the alumilite infill. Was it done in a single pour? Any tricks to the process?

One last question, for this post anyway.... How do you preserve the Waterlox. That stuff is expensive and has a very short shelf life unless you take extra precautions. I bought some recently but haven't opened it yet.

-Tony
 

holmqer

Local Chapter Leader
Joined
Aug 3, 2007
Messages
1,662
Location
CT, USA.
I like it all, with the creamer being my favorite. Our local club had a demonstration Tuesday on offset (multi-axis) turning by Barbara Dill. Interesting stuff!

Do tell more about the alumilite infill. Was it done in a single pour? Any tricks to the process?

One last question, for this post anyway.... How do you preserve the Waterlox. That stuff is expensive and has a very short shelf life unless you take extra precautions. I bought some recently but haven't opened it yet.

-Tony

Thanks, I am having a lot of fun with this multi axis stuff

Here is the process and underlying assumptions I used for the Alumilite infill

It takes multiple pours unless you are really lucky on void placement. In this case, the voids did always not go all the way through the piece and were at multiple locations around it. In theory, you might be able to build up some dams with playdough all over the place, but that might be more trouble than doing multiple pours.

I start with the piece turned thicker then intended (3/8" - 1/2")

For any given void, I clean it out as best I can with wire brush / dental pick to get the worst of the crumbaly stuff removed then stabalize the area with thin CA. I let the CA cure naturally to avoid any white crystals forming.

I next tape up all voids on the inside to prevent any flow through.

Depeding on the size of the void, I may build up a dam around it with tape and or playdough.

I mix up a small batch of Alumilite and pour it into a void and poke around with a toothpick to release any trapped bubbles. Any left over Alumilite is poured into a mold. I repeat this process untill all outer voids appear filled.

I let it cure over night then using light cuts clean up the Alumilite. Generally I am cutting light hair like shavings from the wood until I get smooth transitions from wood to resin. Now I go back and check to see if these cuts have revealed any new voids or bubbles. I make a judgement call on whether I should just cut away a little more material or fill the new spot with another pour.

Once I am satisfied with the outside, I do some light sanding and apply sanding sealer. I am not trying to get the outside completely done, just close and sealed. I am assuming that I will spill something on the outside while doing pours on the inside so there is no point at this time to spend a lot of effort perfecting the outside.

Now I repeat the pour process on the inside. Since you are dealing with a concave curve, you can skip the dams.

Next I turn the inside, sneaking up to final wall thickness, checking for newly revealed voids as I go. Any newly exposed voids are filled, and I continue to final thickness (3/16" to 1/4"). If I spilled anything on the outside, I clean that up, perhapse turning off any stains before I do the last few cuts on the inside.

At this point, it is ready for final sanding, tenon removal, and finishing.

Waterlox usage,

I don't have any real magic regarding Waterlox. I generally try to turn one or two pieces a week that I would use Waterlox on. Once I have two or three ready to finish I break out the Waterlox and pour some in a waxed cup. By experience I know how much to use for the pieces at hand and go a little proud of that. If I waste an 1/8" in the bottom of a small cup I can live with that. I don't pour anything back into the can.

By waiting untill I have a few pieces to finish at once, I reduce the number of times I need to open the can.

I usually have a stack of cut up paper towels that are around 2" square and I use one of those to apply the Waterlox to all the pieces. That way I'm not soaking a huge rag that wastes most of it.

I buy the Waterlox in the 1QT (~!L) cans and using the above method, I will pretty much finish off the can before it goes bad. I've experimented with pouring it into smaller containers to avoid opening the main can and never had success. The stuff in the smaller container always went bad on me. If I go through a lull in turning, the can may gel before I finish it.
 

Tony Pridmore

Member
Joined
Oct 25, 2008
Messages
134
Location
Concord, NC
Eric,

Thanks for the information. I roughed a bunch of sweet gum bowls. A couple cracked severely and would be great for trying the infill technique.

-Tony
 
Top Bottom