Contaminate or Void in Rod - How to Fix??

Signed-In Members Don't See This Ad

d_bondi

Member
Joined
Jun 19, 2023
Messages
1,132
Location
Utah
Hello Everyone.

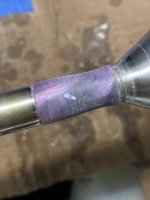
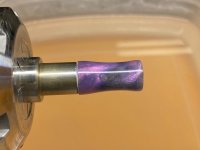
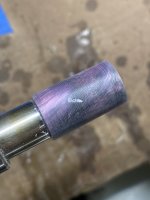
Here are two pictures of a kitless section that I am working on. At first, this looked like a void to me, but the rectangular shape has me doubting that. I did hit it with a little ultra thin CA between the two pictures and it feels solid when I run a fingernail or hobby knife blade over it.

Any suggestions on how to fix it?

I'm not sure that I want to try to dig it out and fill with CA, but maybe that would be best.

I can always make a new section from some other contrasting material, but I really want to keep the continuity of the gradient of the rod intact if possible.

Thanks in advance for your help!!
540A2F00-8E1F-4001-A214-B5DCA3846280_1_105_c.jpeg. C41AD24C-0564-4B25-A5A3-6C21427B48DF_1_105_c.jpeg
 
Signed-In Members Don't See This Ad
Can you turn it away? It appears you have a lot of finishing to do with the scratches going around the piece. Lite cuts with a skew. Dont think I'd try with carbide tools. Might make it worse.
 
Can you turn it away? It appears you have a lot of finishing to do with the scratches going around the piece. Lite cuts with a skew. Dont think I'd try with carbide tools. Might make it worse.

I already turned it down as far as I dare without making the section too small for the pen. The up close photo makes the scratches look pretty bad, but they will come out with 800 or 600 grit wet sanding.
 
The pix make it look like there's plenty of material to be removed before the section would be finished, but if you say it's close to the limit we'll have to believe you. (Although I like to make my sections "pinched at the waist", so I'd be turning more away.) The part that meets the barrel would remain the current dimension, but there'd be a smooth curve in and then back out at the open end where the nib housing fits in.

My tool of choice for this is not a skew, but a home-made rounded scraper with a slight bevel on the top surface as well as the normal bevel. (Which Stuart Batty calls a "negative rake scraper".) Note that it is essential to have a slight burr along the top edge - this makes sure that it removes a wispy shaving. Carbide "negative rake" inserts do not have a burr, and they simply don't give the same result. Might as well use the edge of a steel rule.

But - if there's nothing to take away, I guess your options are limited. Do you have a micro-motor tool or NSK Presto (air turbine, like a dental drill)? You might be able to remove the ugly spot then fill it with CA and sanding dust - I would only attempt that if all other options had been attempted or ruled out.

I sincerely appreciate the observations.

The first photo is before I started turning the pinch. The second one isn't at a very good angle. I like the pinch on my sections to be between the midpoint and the nib end. I have probably turned it a bit more after the second photo, the difference in diameter between where it meets the barrel tenon and the pinch is 1.4mm. Perhaps I'll tinker with the shape a bit more.

I don't have a dental drill, but I do have a rotary tool (Milwaukee version of a Dremel) and I have some pretty small diamond carving burrs. I guess I could try this.

The location of this imperfection is unfortunate, its midpoint is right at the end of the nib housing threads.

If I try to use a skew on this, I'll likely end up with shrapnel. :oops:

Thanks!
 
I've encountered blemishes and things in casts that didn't work for me. I've had success with taking a razor blade and scraping/scratching over the spot to lights remove the surface that I build back up with CA. Once the final CA finish is applied, you can't see where the surface was filled.
I've only used this technique on blanks with brass tubes so in your case it will all depend on how deep the spot is. Best of luck with the fix.
Thanks John!

Fix (combination of suggestions) is in process. I'll post the results when done.
 
The location of this imperfection is unfortunate, its midpoint is right at the end of the nib housing threads.
If you're unlucky and break trhough into the nib housing threads, you could maybe run the tap through again and chase out any CA that sneaks in. But I admit, the rabbit hole is getting deeper and deeper ... good luck!
 
Hi David - I bet this is one of the pens your trying to finish for the DC Show..... always when there is a time crunch, something weird shows up!

As a caster, it looks to me like there was probably some left over debris in the casting tube when this blank was poured and it got embedded in your blank. I just did a pour of clear resin for a demonstrator pen and I got two small slivers of blue resin from a previous pour in the clear rod - shame on me for not checking better! I am finding that as my silicone vertical molds are slowly breaking down, it's getting tougher to get them totally clean between pours (as well as getting the rods out), as the worn divets in the mold walls are holding some remaining resin gunk.

Similar to what JohnU said, I would scratch it back a bit with a razor and then try filling the divet with some UV curing resin vs CA. I think the UV resin would be a little more durable in the long run for this repair than the CA.

Good luck - see ya Friday at the show!

Kevin
 
If you're unlucky and break trhough into the nib housing threads, you could maybe run the tap through again and chase out any CA that sneaks in. But I admit, the rabbit hole is getting deeper and deeper ... good luck!

Thanks Duncan. I managed to stay out of the internal threads. I'll be polishing it later today and will post the results.
 
Hi David - I bet this is one of the pens your trying to finish for the DC Show..... always when there is a time crunch, something weird shows up!

As a caster, it looks to me like there was probably some left over debris in the casting tube when this blank was poured and it got embedded in your blank. I just did a pour of clear resin for a demonstrator pen and I got two small slivers of blue resin from a previous pour in the clear rod - shame on me for not checking better! I am finding that as my silicone vertical molds are slowly breaking down, it's getting tougher to get them totally clean between pours (as well as getting the rods out), as the worn divets in the mold walls are holding some remaining resin gunk.

Similar to what JohnU said, I would scratch it back a bit with a razor and then try filling the divet with some UV curing resin vs CA. I think the UV resin would be a little more durable in the long run for this repair than the CA.

Good luck - see ya Friday at the show!

Kevin

Exactly This!!

Yes, working on three pens. All the same pour, but different orientations/cuts for the Cap/Section/Barrel from the rod that has a color gradient from one end to the other. It is a new formulation I have been working on with a caster. I can't wait to get them polished today. I think they are going to be awesome!

See you in a few days! Travel Safe!

David
 
Similar to what JohnU said, I would scratch it back a bit with a razor and then try filling the divet with some UV curing resin vs CA. I think the UV resin would be a little more durable in the long run for this repair than the ca.
Actually it's just the opposite. The issue with UV resin is it continues to harden in day light and sun, getting brittle and yellowish. A quality CA like Gluboost Fill n Finish will outlast the resin in normal use. It's more flexible and durable compared to resins which is why it's such a good finish for pens.
 
Actually it's just the opposite. The issue with UV resin is it continues to harden in day light and sun, getting brittle and yellowish. A quality CA like Gluboost Fill n Finish will outlast the resin in normal use. It's more flexible and durable compared to resins which is why it's such a good finish for pens.

Thanks John. I didn't have any UV resin, but I do have GluBoost which is what I used!
 
Thanks again for everyone's encouragement!

I knew I was going to have to "dig" out the inclusion and you guys gave me what I needed to just do it. Here it is after the repair and after wet sanding with Zona papers (1-6). It isn't polished yet, but looks pretty good all things considered.

EDIT: And as luck would have it, the repair is on the bottom side of the section (feed side of the nib), so that helps!

IMG_6820.jpeg

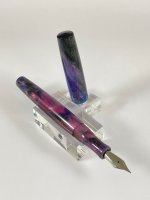
And the finished pen. I think it was worth the effort to save the section!

IMG_6840.jpeg
 
Last edited:
Actually it's just the opposite. The issue with UV resin is it continues to harden in day light and sun, getting brittle and yellowish. A quality CA like Gluboost Fill n Finish will outlast the resin in normal use. It's more flexible and durable compared to resins which is why it's such a good finish for pens.
John - I am not sure I fully understand your statement on the UV resin. Every resin we use - with Alumilite at the top of the list - yellows over time from UV exposure. Some yellow faster, some slower, but all will yellow. Lots of label casters and ring turners use UV resin without die or coloring for their projects and they would all be subject to UV light - but I don't see many complaints posted about unexpected yellowing. The only resin I know that has some pretty good UV inhibitors in it is the McKenzie Penworks Diamondcast Urethane Resin Blanks @McKenzie Penworks made with ThermoSet Solutions resin which has a more stable UV resistance, but it too will yellow with time, just much slower. I am not a rep for any of these products, so my opinion is purely from my own experiences and research, so take it for what it is.

IMHO, I try and use some amount of color in my castings to account for the eventual yellowing, and I try always to use the Thermoset resin for clear parts so they last longer, but I would be surprised if the cured UV resin would yellow faster than the base alumilite resin already used in David's blank.

Kevin
 
No problem Kevin, I was merely commenting on the mentioned durability, comparing the UV resin to Gluboost for divot filling, pointing out that the UV resins will continue to harden in the sunlight, making them more brittle that the flexible CA finish over time. Yes, I agree, all resins will "yellow" over time. Colorants and the thinner thickness will help hide that especially compared to clear casts and light colored backgrounds. I think most of us have gotten used to the changes that occur with resins over longer periods of time. If it happened quick it would be more noticeable. I've used that ThermoSet resin and found it to be a little more brittle or chippy but that's just my opinion. Of all the resins I've tried over the past 20 years, the one with the best UV quality and prolonged yellowing that I've noticed is Alumilite's Deep Pour Epoxy, and I'm not a big fan of epoxy resin.
 
No problem Kevin, I was merely commenting on the mentioned durability, comparing the UV resin to Gluboost for divot filling, pointing out that the UV resins will continue to harden in the sunlight, making them more brittle that the flexible CA finish over time. Yes, I agree, all resins will "yellow" over time. Colorants and the thinner thickness will help hide that especially compared to clear casts and light colored backgrounds. I think most of us have gotten used to the changes that occur with resins over longer periods of time. If it happened quick it would be more noticeable. I've used that ThermoSet resin and found it to be a little more brittle or chippy but that's just my opinion. Of all the resins I've tried over the past 20 years, the one with the best UV quality and prolonged yellowing that I've noticed is Alumilite's Deep Pour Epoxy, and I'm not a big fan of epoxy resin.
Hi John - Agree with your comments on brittleness of UV resin and the Thermoset - both remind me of the challenges of early acrylic pen blanks. Controlling the cut and sharp tools are truly essential for both. I am a big time fan of GluBoost - love the fill and finish and the flexibility of the products vs standard CA, just wasn't sure of a divot of the depth David was speaking of would hold up with GluBoost, as I typically use the fill and finish for minor defects, versus something of size.

I wish that there was a nice short working time urethane with the quick setup like Alumilite Clear Slow and the UV resistance of deep pour stuff. Set-up time when using complex/multiple mica and dye vertical pours becomes a factor - need it to be slow enough to allow working but quick enough to keep things from settling out of the resin. Epoxy is a tough one with vertical pours with 9" blanks, get more settling than I like due to the slow setting time.

BTW - love your work - am a big fan, especially of your feather blanks! Appreciate your participation in these forums!!

Kevin
 
I wish that there was a nice short working time urethane with the quick setup like Alumilite Clear Slow and the UV resistance of deep pour stuff
Hi Kevin - have you asked Themoset Solutions? They have quite a range of resins I only know this because Tim McK's store is showing "sold out" of all sizes he sells and I looked around to see if anyone else sold it. Turns out they have their own online store and sell direct. They have an account on Instagram and responded very quickly when I asked a question through direct message.
 
Hi Kevin - have you asked Themoset Solutions? They have quite a range of resins I only know this because Tim McK's store is showing "sold out" of all sizes he sells and I looked around to see if anyone else sold it. Turns out they have their own online store and sell direct. They have an account on Instagram and responded very quickly when I asked a question through direct message.
Hi Duncan-
Yep, Tim said he is not going to sell the resin anymore. He was nice enough to bring some to me when we met at the 2025 MATE event in Manassas, VA where he told me that in the future, I'd need to buy it direct from them. Thermoset makes a bunch of differing resins, but the Clearset CSD2078-7 POLYOL resin is the one Tim and Thermoset co-developed. It has a slightly longer set time (about 14 minutes at 75 degrees) and more UV resistance than some of their others. It is a bit more difficult to work than Alumilite, and when pouring and casting, it is much more sensitive to moisture - so I de-gas the resin prior to mixing in a vacuum pot and also added a drier assembly to my compressor to get the moisture down when pressurizing the tanks. So far, I like it, but I have received some complaints from folks I sell blanks to that it is definitely 'chippier' than Alumilite Clear SLow.

I'm not sure my concern with yellowing is making a mountain out of a mole hill, as I have been told by many that it's not a big deal, but it bothers me that the colors I work hard to get out of a blank would be degraded by the resin yellowing.

Kevin
 
As a point of interest... the rod used for this pen is custom cast for me and the caster uses the ThermoSet resin. Is it a bit more chippy than Alumilite? Yes, but manageable and because it is harder I believe that it polishes up better.

Thanks again to everyone who provided moral support on this!
 
Back
Top Bottom