Connect pen blanks

Signed-In Members Don't See This Ad

Hblaisdell

Member
Joined
Feb 25, 2013
Messages
10
Location
Pittsburgh
i am trying to create a pen where I have to glue two pen blanks together. I am assuming I will have trouble connecting the two blanks together. I am not sure of the best way to make the two blanks smooth and accurate enough to connect smoothly together. I do not want a gap between the two blanks. I only have the basic tools nothing special.

Does anyone have a thought or suggesting on how to do this?

Harold
 
Signed-In Members Don't See This Ad
i am trying to create a pen where I have to glue two pen blanks together. I am assuming I will have trouble connecting the two blanks together. I am not sure of the best way to make the two blanks smooth and accurate enough to connect smoothly together. I do not want a gap between the two blanks. I only have the basic tools nothing special.

Does anyone have a thought or suggesting on how to do this?

Harold


Easiest thing to do is take some 400 grit sandpaper and adhere it to a flat surface such as a sheet of glass or flat tile. Home centers carry these. Take each blank and rub it on the sandpaper. Couldn't be any simplier. If gluing 2 woods i would use titebond II glue or any other carpenters yellow glue.
 
John T has it right if you are trying to fasten long grain to long grain. However if you are trying to go end to end to make the blank longer, that is an entirely different story. Unless you are using some type of reinforcement at the end grain joint, I can only wish you the very best of luck and use Epoxy, clamp well against a straight edge on two adjacent sides to keep it straight. Use clamps both long ways and along the sides. For what it is worth, I have never had great luck with end grain joints where any stress was put on the joint. Once more, wishing you the best of luck, which ever type joint you are using.
Charles
 
I will follow up on what Mr. Charles said because you , Harold did not supply us with enough info as to what you are doing. But it is needed to be noted that if doing end grain to end grain that the same procedure can be applied but as Charles noted the joint will not be as strong. To compensate for this and again I will have to take liberty because i do not know what you are doing or attempting, but you will increase the strength of that joint when mounted to a tube. What many people do, and if this is a segmented blank you are building and a basic one at that, people have a tendency to predrill each part and assemble the blank on the tube. This eliminates that stress on the joint of drilling. But this opens other concerns.

Maybe if you give us a better idea as to what you are doing, more assistance can be rendered.
 
Additional info

i am trying to create a pen where I have to glue two pen blanks together. I am assuming I will have trouble connecting the two blanks together. I am not sure of the best way to make the two blanks smooth and accurate enough to connect smoothly together. I do not want a gap between the two blanks. I only have the basic tools nothing special.

Does anyone have a thought or suggesting on how to do this?

Harold

what I am trying to do is make a psi military pen. One part being the stars on a flag and another being the stripes on the flag. So it would be end to end. It will also be acrylic.

Harold
 
If they are wood I use either Titebond II or wood glue and clamp them for a couple of hours. If they are acrylic I use 5 min 2 part epoxy and clamp for a couple of hours. the joint is very tight.
 
CA is all I've ever used when segmenting acrylic to acrylic... square & flat (unless you're doing curves and angles:biggrin:) but slightly roughed surface (400grit paper) and Medium CA is my method of choice...
 
i am trying to create a pen where I have to glue two pen blanks together. I am assuming I will have trouble connecting the two blanks together. I am not sure of the best way to make the two blanks smooth and accurate enough to connect smoothly together. I do not want a gap between the two blanks. I only have the basic tools nothing special.

Does anyone have a thought or suggesting on how to do this?

Harold

what I am trying to do is make a psi military pen. One part being the stars on a flag and another being the stripes on the flag. So it would be end to end. It will also be acrylic.

Harold


harold

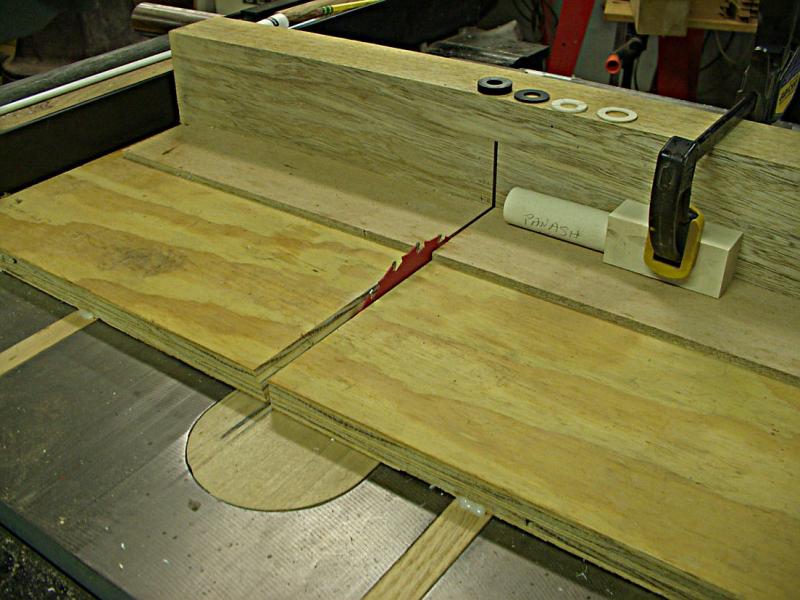
I assume this is a one piece blank needed for this kit. To be honest with you when I do segmenting like this I use my tablesaw only. If need to flatten the ends I do as I mentioned above. But I build my blank on the tube and it helps with not worrying about the joint failure when drilling. I predrill both blanks. I then cut approximately the size of the blanks needed (leaving a little extra for trueing later. If need be i flatten ends as mentioned and glue the tube in and also glue the blanks together. Not sure if this helps. here is an example and also the simple jig I use to cut my blanks to length. Using that simple jig I can cut as thin of a blank as I want. A good sharp blade is all that is needed.


If you are only going to glue two blanks together and want a perfectly straight joint, use a sled like the one John T has used above, and clamp one blank on each side of the saw blade. Run the sled and blanks into the saw, cutting a little off each blank at the same time. This will give you an even parallel surface on both blanks to glue. This is the same method used in woodworking to make perfect mitered corners on frames or boxes. I find thick or gap filling CA glue best to fill any small imperfections and make a solid blank. Anyone that has a table saw, band saw, or router should have a sled like John's in order to make straight, square, repeated, small, and ( safe ) cuts !!!!! By the way, thumb is healing well. Jim S
 
I think I know what you are trying to do, Harold. You want to glue a blank of the blue field with stars to a piece of stripes to make a blank like this one at PSI: Bald Eagle Insignia Flag Bolt Action Antique Pewter Pen Kit at Penn State Industries

I have done these a couple of ways (note: I use thick CA):

1. Cut a stars piece about 1/8-inch longer than 1/3 of the tube length and the stripes 1/8-inch longer than the remainder of the tube. You do need to get a good straight and square cut on both pieces on the ends that you will be joining together. Percentage of blue to stripes is up to you - I think the 1/3 blue to 2/3 stripes looks good to me but use what looks good to you - it doesn't make any difference.

2. Drill the blanks. Since the blanks are not the same size (at least the ones I got the blue were about 1/16-1/8 inch smaller than the stripes) it helps to insure you are drilling the centers on both.

3. Mark a pencil line around the tube where the blanks will join to each other. Put CA inside the short blank and insert the tube to the line - and give it a few minutes for the CA to setup. Then apply CA to the other end of the tube and on the end of the blank where the two will join and slide on the other blank. I put a clamp on the ends to make sure the joint is pressed tight.

The other way I have done them is to simply cut my blanks and CA glue the two together trying to center the smaller blank on the larger blank and put on a clamp to press the two together until the CA sets up. When I drill I put the larger size blank in the vise/drilling chuck and drill from the small blank end. I find that the slight difference in blank sizes isn't really that big of a deal to just eyeball it and glue the ends together before drilling. It's a lot faster and I've had no problem with the glue line breaking on me.

One other thing I have found is that the blue is translucent enough that you will want to paint the inside of the blank white. This works better than painting the tube white because it prevents the glue on the tube from showing thru.

Anyway, that's how I do these. Hope this helps you.
 
Last edited:
When I made a pen like this, I cut both pieces, sanded one end smooth and flat on bloth halves, drilled the blanks, then glued the blanks onto the tube using epozy (and put a clamp on it to squeeze the two cut blanks together), then the next day, removed the clamp, used a barrel trimmer to square the blank ends, and turned it like any other acrylic blank. It turned out nice.
 
Back
Top Bottom