robutacion
Member
Hi Folks,
Some weeks back, I was requested to make 10 calligraphy pens from a young guy from Adelaide area that started making these pens some time ago.
He contacted me in the beginning because he wanted to make these pens with my Resifills that would need to be longer than pen blanks so, I cast a couple of dozens blanks for him to work with.
In the beginning, I have tried to convince him that, making such long and thin pens with Resifills was not going to be a good idea, they are not that strong when turned that thin with wood and resin in between but, he was ready for the challenge (so he said).
I sold him also a few long raw wood pen blanks for him to practice the shape and final lengths, that would give him a good idea to what he was getting into.
One of the problems was that he had no wood turning experience, he had just purchased a mini lathe and some tools but, he was short on many other stuff, to be able to make/turn these type pens.
He requested me to teach him what to do and what to use so, after a couple of weekends, he felt confident to try the Resifills, which he did...!
He seemed to be a quick learner and quite skilled and that was proven when he come over and shown me a couple of pens he made, some out of solid wood and one out of one of my Resifills.
You will see that pen with yellow resin in a pic attached that I used later on as the prototype of his pens.
I was pleasantly surprised with his well turned Resifill blank, it was perfect and straight something that, for someone just starting, was not be an easy task but, looking at his face, I knew that something wasn't right and that's when he told me, of the number of broken Resifills and days spent to get a single pen done without snapping.
He was a little disappointed that, I was right about my advice that, Resifills wouldn't be the most suitable blank to make these pens, not impossible but extremely difficult and the fact that, each blank made with different materials and structures would behave differently, making its turning a tough task.
The finish I advise was CA, that would strengthen the blanks so slightly but, a simple drop on the floor would snap the pen in 2 or 3 pieces after done, I was convinced.
This guy really wanted to make these type of pens out of my Resifills, that would be what would make them different from many others seen on sale, these are normally made of stabilized wood or hard/dense woods.
I explained to him that, the only way to get around the snapping problem was to try to use some smaller brass tubes as inserts, they would need to be very small because a good part of the pen has a diameter of about 5mm and the brass would show through on the resin sections.
I also adised that, his designs would need a little more thickness on that thin part, the whole pen would need to go a little fatter to allow a bigger ands stronger brass insert, the blanks are 8" long so, drill a small hole from end to end with so many hardnesses between different woods and Epoxy resin that, we would need to go as bigger as possible, I suggested the 4mm brass inserts and an average pen body increase of an extra 4 or 5mm however, and as well he pointed out, the diameter of the rea of the pen where the finger wrap arround/grab the pen, would make it too "fat", something like 14 to 16mm and that, we didn't want.
It was clear that this guy had a good/set idea on what his pens would like and feel in the hand so, increassing the insert size was out of question. After some more discussion and explaing a few facts from continuing with such thin pen design that, even if making them with Resifill would be possible that, transortation/shipping and customer's handling, would be considered very fragile, people will need to know how fragile it will be abd things to avoid.
He brough me 10 of the Resifill blanks I had made for him, he askeded me if I could help him making the pens, he had a few orders and he was very behind, he had spent a couple of months playing with it and only a single Resifill pen was finished, Resifills pens was what he had on order after he shown the pics of the blanks for people to select the blank they wanted their pen made with so, he was really in troubles.
His request was made not long after I was starting to feel a little better from 3 1/2 months of hell so, I know that I could help this fellow and get those 10 pens done so that he could complete the transactions with his customers.
I decided that, keeping them so thin would require very small brass inserts, considering the diameter of the thin part of the pens, I concluded that, the biggest inserts I could use would have to be 2mm OD so, I ordered a dozen of them froman UK supplier and then I had to order also some long 2mm drill bits.
It took a couple of weeks before I had those items here so, as soon as I could, I started drilling and gluing the inserts into the blanks. I use the lathe to drill them, it wasn't easy to match the hole centre because the drill bit wasn't long enough so, I had to drill from both ends.

Some of the difficult has come from some of the woods/pods that he wanted me to make his blanks with, he pratically selected some pen blanks I had on my web-store and request to have them made to match those, materials and colours. All woods and pods were stabilised but, I had some woods that had different densities after stabilized so, the drill bit would tend to follow the pass of least resistance and not always follow a straight line.
The flexibility of such thin drill bits have allowed some holes to start and come out at the blank's centre but, had a curve/bend between the 2 ends that, was going to play avoc when turning, I was sure.
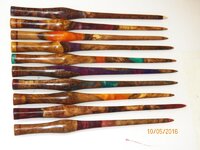
Well, after the drilling and tubbing was done, I put the blank's insert ends between centres and rounded the blanks to clean any wood out of centre, the pic bellow show the blank, inserts and drill bit sizes I was going to use.


The plastic bags you see above, are the contents bits of each blank, what I mean is, drilling the blanks from both ends, I would endup with the brass and holes showing at each end, that would spoil the look so, I knew that I would have to "cap" each blank on each end and to do it with matching materials, wood/resin/colours I had to cut about 10mm from each end, mark bottom and top on the pieces and keep everything from getting mixed up so, plastic bags were one of the solutions.
I used his only Resifill pen done as the prototype, he wanted his blanks to have those sizes and as you can image, turning between centres without having a solid grip from the lathe's headstock end, any press put into the tailstock would become a problem, as soon as the diameters started to reduce dramatically, such small brass insert is simply not solid enough to maintain its straightness under any sort of compression/sandwishing.
I have at the moment all 10 pens made, capped and coated with 2 coats of super thin CA, I've done that yesterday evening and today I was expecting to finish them today however, we are having some cyclonic winds and plenty of rain so, I stayed in the house and keep looking at the security cameras for any roof tins sheets or something else that the wind may want to rip apart so, I may not touch them today, I soon as I have them finished, I will take a pic and share with everyone here.
PS: I have my rain coat and a chainsaw ready, just in case someone near me get's a tree falling down on them, I don't have to worry with that at my place, all trees here are small and away from the house.
Cheers
George
Some weeks back, I was requested to make 10 calligraphy pens from a young guy from Adelaide area that started making these pens some time ago.
He contacted me in the beginning because he wanted to make these pens with my Resifills that would need to be longer than pen blanks so, I cast a couple of dozens blanks for him to work with.
In the beginning, I have tried to convince him that, making such long and thin pens with Resifills was not going to be a good idea, they are not that strong when turned that thin with wood and resin in between but, he was ready for the challenge (so he said).
I sold him also a few long raw wood pen blanks for him to practice the shape and final lengths, that would give him a good idea to what he was getting into.
One of the problems was that he had no wood turning experience, he had just purchased a mini lathe and some tools but, he was short on many other stuff, to be able to make/turn these type pens.
He requested me to teach him what to do and what to use so, after a couple of weekends, he felt confident to try the Resifills, which he did...!
He seemed to be a quick learner and quite skilled and that was proven when he come over and shown me a couple of pens he made, some out of solid wood and one out of one of my Resifills.
You will see that pen with yellow resin in a pic attached that I used later on as the prototype of his pens.
I was pleasantly surprised with his well turned Resifill blank, it was perfect and straight something that, for someone just starting, was not be an easy task but, looking at his face, I knew that something wasn't right and that's when he told me, of the number of broken Resifills and days spent to get a single pen done without snapping.
He was a little disappointed that, I was right about my advice that, Resifills wouldn't be the most suitable blank to make these pens, not impossible but extremely difficult and the fact that, each blank made with different materials and structures would behave differently, making its turning a tough task.
The finish I advise was CA, that would strengthen the blanks so slightly but, a simple drop on the floor would snap the pen in 2 or 3 pieces after done, I was convinced.
This guy really wanted to make these type of pens out of my Resifills, that would be what would make them different from many others seen on sale, these are normally made of stabilized wood or hard/dense woods.
I explained to him that, the only way to get around the snapping problem was to try to use some smaller brass tubes as inserts, they would need to be very small because a good part of the pen has a diameter of about 5mm and the brass would show through on the resin sections.
I also adised that, his designs would need a little more thickness on that thin part, the whole pen would need to go a little fatter to allow a bigger ands stronger brass insert, the blanks are 8" long so, drill a small hole from end to end with so many hardnesses between different woods and Epoxy resin that, we would need to go as bigger as possible, I suggested the 4mm brass inserts and an average pen body increase of an extra 4 or 5mm however, and as well he pointed out, the diameter of the rea of the pen where the finger wrap arround/grab the pen, would make it too "fat", something like 14 to 16mm and that, we didn't want.
It was clear that this guy had a good/set idea on what his pens would like and feel in the hand so, increassing the insert size was out of question. After some more discussion and explaing a few facts from continuing with such thin pen design that, even if making them with Resifill would be possible that, transortation/shipping and customer's handling, would be considered very fragile, people will need to know how fragile it will be abd things to avoid.
He brough me 10 of the Resifill blanks I had made for him, he askeded me if I could help him making the pens, he had a few orders and he was very behind, he had spent a couple of months playing with it and only a single Resifill pen was finished, Resifills pens was what he had on order after he shown the pics of the blanks for people to select the blank they wanted their pen made with so, he was really in troubles.
His request was made not long after I was starting to feel a little better from 3 1/2 months of hell so, I know that I could help this fellow and get those 10 pens done so that he could complete the transactions with his customers.
I decided that, keeping them so thin would require very small brass inserts, considering the diameter of the thin part of the pens, I concluded that, the biggest inserts I could use would have to be 2mm OD so, I ordered a dozen of them froman UK supplier and then I had to order also some long 2mm drill bits.
It took a couple of weeks before I had those items here so, as soon as I could, I started drilling and gluing the inserts into the blanks. I use the lathe to drill them, it wasn't easy to match the hole centre because the drill bit wasn't long enough so, I had to drill from both ends.
Some of the difficult has come from some of the woods/pods that he wanted me to make his blanks with, he pratically selected some pen blanks I had on my web-store and request to have them made to match those, materials and colours. All woods and pods were stabilised but, I had some woods that had different densities after stabilized so, the drill bit would tend to follow the pass of least resistance and not always follow a straight line.
The flexibility of such thin drill bits have allowed some holes to start and come out at the blank's centre but, had a curve/bend between the 2 ends that, was going to play avoc when turning, I was sure.
Well, after the drilling and tubbing was done, I put the blank's insert ends between centres and rounded the blanks to clean any wood out of centre, the pic bellow show the blank, inserts and drill bit sizes I was going to use.
The plastic bags you see above, are the contents bits of each blank, what I mean is, drilling the blanks from both ends, I would endup with the brass and holes showing at each end, that would spoil the look so, I knew that I would have to "cap" each blank on each end and to do it with matching materials, wood/resin/colours I had to cut about 10mm from each end, mark bottom and top on the pieces and keep everything from getting mixed up so, plastic bags were one of the solutions.
I used his only Resifill pen done as the prototype, he wanted his blanks to have those sizes and as you can image, turning between centres without having a solid grip from the lathe's headstock end, any press put into the tailstock would become a problem, as soon as the diameters started to reduce dramatically, such small brass insert is simply not solid enough to maintain its straightness under any sort of compression/sandwishing.
I have at the moment all 10 pens made, capped and coated with 2 coats of super thin CA, I've done that yesterday evening and today I was expecting to finish them today however, we are having some cyclonic winds and plenty of rain so, I stayed in the house and keep looking at the security cameras for any roof tins sheets or something else that the wind may want to rip apart so, I may not touch them today, I soon as I have them finished, I will take a pic and share with everyone here.
PS: I have my rain coat and a chainsaw ready, just in case someone near me get's a tree falling down on them, I don't have to worry with that at my place, all trees here are small and away from the house.
Cheers
George
 :frown: