
DrD
Member
After one of my initial posts about turning a one-piece Cigar, someone asked about how to do it. Mal @magpens has give an excellent step by step using a smaller tube than what comes with the kit; his is a great idea, allowing lots of extra material on the tube, strengthening the overall integrity of the finished tube, and the completed pen. As I discussed with Mal, there are a lot of machining steps in getting to that smaller tune, and for those of us lacking the means to perform those steps, I chose to go with using the tubes that come with the kit. Both ways work, and both ways can result in really nice pens.
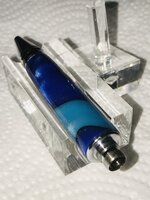
The only "machining" step in the way I use is the removal of the very large flange on what BHW calls the "Twist Holder." The unmodified component is shown in pic 1; it is the big shiny thing on the right-hand side of the completed lower tube. It serves as a demarcation between the upper and lower barrels in a standard Cigar pen.
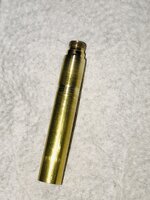
Pic 2 shows the "Twist Holder" with the flange removed and the lower brass tube attached. The way I removed the flange is dictated by the equipment I have in my shop. The easiest way I could see to remove the flange was to attach the lower tube to the Twist Holder (by pushing the Twist Holder into the tube). Then taking this assembly to my wood lathe, and mounting it between centers. The lathe was dialed down to approx 350rpms, and I uses a medium metal file to "grind" down the flange, flush with the attached brass tube. Caution and Care must be exercised here. Care - DO NOT let the file touch the exposed threads on the Twist Holder. One way to prevent this is to attach the twist mechanism - the transmission or tranny - to the threaded portion of the Twist Holder, and putting this between the centers on your lathe, being careful to tighten the tailstock ONLY tight enough to keep the Tube - Twist Holder - Tranny spinning while taking a file to remove the flange. CAUTION - there will be tiny slivers of brass resulting from the file removing material - USE Safety Goggles, and don't get too close. Be careful when dressing the filed down assembly, brass splinters hurt - DAMHIK!
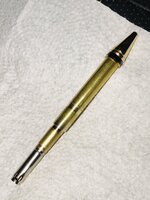
The product of your diligent filing is shown in pic 3. Pic 4 shows the completed "lower assembly" for your 1 piece Cigar pen.
The hardest task in this build is drilling the hole thru a long piece of acrylic, in this case, or whatever your choice of pen body happens to be. I chose Yellow acrylic with black swirls, BHW AA(28). Fortunately the piece I chose to use was "reasonably" rectilinear, measuring ~ 5/8" x 5/8" x 6". Having only a wood lathe available, I had to ensure the correct placement of the blank into my 4-jaw chuck. After much experimentation, I found the best - read happiest - results came NOT from tightening the jaws on the blank flats, but rather mounting the EDGES of the blank into the small recesses - groves - found on the inside ends of the jaws. I attached the original blank into the chuck. The 10mm drill bit was mounted in a Jacobs chuck with a MT2 taper - available from your local Harbor Freight. The drill bit was mounted, exposing a skosh more than 4 1/2" of the bit; this gave enough of the bit to ensure it would drill deeply enough for the needed blank. Drill SLOWLY; I drill acrylics at no more than 350 rpms, and back the bit out frequently to clean the bit and let the bit and blank cool. I have blown out more blanks drilling that I would like to remember, not to mentions the times I have had the bit seize due to MY impatience.
Following drilling I then cut to final length. Cutting to final length can be done any variety of ways, I use a bandsaw. That length is 4 1/2" + a smidgen for squaring off. SO, by drilling the un-cut blank, I reduced the risk of blowout as the bit exited the back side of the blank, and when I cut the drilled blank to 4 1/2". the hole is completely thru. Pic 5 shows the pen components in relationship to the drilled and cut blank (in this case African Blackwood).
The drilled blank is next turned to round by mounting between centers; this can be done with or without brass tubing. The reason for using brass tubes at this stage would be if the material being turned is soft, and turning between centers would "open" up the hole diameters at the point of contact with the dead and/or live center. If that is the case, brass minimizes the opening upset. Before the sanding steps, I square the body, with unglued tubes inserted.
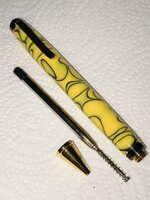
Pic 6 shows the blank turned round and profiled. I use a Negative Rake Magic Skew with a round cutter to turn the blank round. Profiling is done with a combination of carbide cutters and sandpaper. With acrylics, sanding is done wet, from 220 grit thru MM12000. Finishing is done with Meguiar's 105 and 205, followed by a coat of Ren Wax. It's your preference as to sanding on or off the lathe, sanding with the lathe spinning or not, sanding the blank from end to end, etc. At this point the "cap" tube is glued into the cap end of the acrylic body.
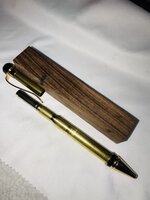
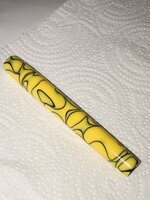
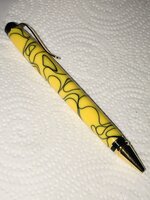
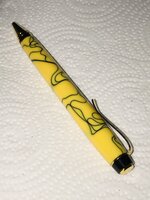
Pic 7 shows the finished pen components.
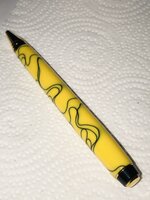
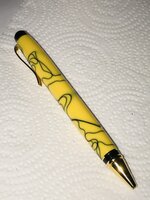
The remaining 4 pics show various sides of the completed pen.
I hope you enjoy the pics. Comments are appreciated.
DrD
The only "machining" step in the way I use is the removal of the very large flange on what BHW calls the "Twist Holder." The unmodified component is shown in pic 1; it is the big shiny thing on the right-hand side of the completed lower tube. It serves as a demarcation between the upper and lower barrels in a standard Cigar pen.
Pic 2 shows the "Twist Holder" with the flange removed and the lower brass tube attached. The way I removed the flange is dictated by the equipment I have in my shop. The easiest way I could see to remove the flange was to attach the lower tube to the Twist Holder (by pushing the Twist Holder into the tube). Then taking this assembly to my wood lathe, and mounting it between centers. The lathe was dialed down to approx 350rpms, and I uses a medium metal file to "grind" down the flange, flush with the attached brass tube. Caution and Care must be exercised here. Care - DO NOT let the file touch the exposed threads on the Twist Holder. One way to prevent this is to attach the twist mechanism - the transmission or tranny - to the threaded portion of the Twist Holder, and putting this between the centers on your lathe, being careful to tighten the tailstock ONLY tight enough to keep the Tube - Twist Holder - Tranny spinning while taking a file to remove the flange. CAUTION - there will be tiny slivers of brass resulting from the file removing material - USE Safety Goggles, and don't get too close. Be careful when dressing the filed down assembly, brass splinters hurt - DAMHIK!
The product of your diligent filing is shown in pic 3. Pic 4 shows the completed "lower assembly" for your 1 piece Cigar pen.
The hardest task in this build is drilling the hole thru a long piece of acrylic, in this case, or whatever your choice of pen body happens to be. I chose Yellow acrylic with black swirls, BHW AA(28). Fortunately the piece I chose to use was "reasonably" rectilinear, measuring ~ 5/8" x 5/8" x 6". Having only a wood lathe available, I had to ensure the correct placement of the blank into my 4-jaw chuck. After much experimentation, I found the best - read happiest - results came NOT from tightening the jaws on the blank flats, but rather mounting the EDGES of the blank into the small recesses - groves - found on the inside ends of the jaws. I attached the original blank into the chuck. The 10mm drill bit was mounted in a Jacobs chuck with a MT2 taper - available from your local Harbor Freight. The drill bit was mounted, exposing a skosh more than 4 1/2" of the bit; this gave enough of the bit to ensure it would drill deeply enough for the needed blank. Drill SLOWLY; I drill acrylics at no more than 350 rpms, and back the bit out frequently to clean the bit and let the bit and blank cool. I have blown out more blanks drilling that I would like to remember, not to mentions the times I have had the bit seize due to MY impatience.
Following drilling I then cut to final length. Cutting to final length can be done any variety of ways, I use a bandsaw. That length is 4 1/2" + a smidgen for squaring off. SO, by drilling the un-cut blank, I reduced the risk of blowout as the bit exited the back side of the blank, and when I cut the drilled blank to 4 1/2". the hole is completely thru. Pic 5 shows the pen components in relationship to the drilled and cut blank (in this case African Blackwood).
The drilled blank is next turned to round by mounting between centers; this can be done with or without brass tubing. The reason for using brass tubes at this stage would be if the material being turned is soft, and turning between centers would "open" up the hole diameters at the point of contact with the dead and/or live center. If that is the case, brass minimizes the opening upset. Before the sanding steps, I square the body, with unglued tubes inserted.
Pic 6 shows the blank turned round and profiled. I use a Negative Rake Magic Skew with a round cutter to turn the blank round. Profiling is done with a combination of carbide cutters and sandpaper. With acrylics, sanding is done wet, from 220 grit thru MM12000. Finishing is done with Meguiar's 105 and 205, followed by a coat of Ren Wax. It's your preference as to sanding on or off the lathe, sanding with the lathe spinning or not, sanding the blank from end to end, etc. At this point the "cap" tube is glued into the cap end of the acrylic body.
Pic 7 shows the finished pen components.
The remaining 4 pics show various sides of the completed pen.
I hope you enjoy the pics. Comments are appreciated.
DrD
Attachments
-
 1.jpg221 KB · Views: 408
 -
 2.jpg336.4 KB · Views: 423
 -
 3.jpg326.8 KB · Views: 385
 -
 4.jpg324.6 KB · Views: 380
 -
 1_pc_AfricanBlackwood1.jpg311.5 KB · Views: 373
 -
 5.jpg233.1 KB · Views: 394
 -
 6.jpg246.7 KB · Views: 374
 -
 Completed_pen1.jpg233.1 KB · Views: 398
 -
 Completed_pen2.jpg226.2 KB · Views: 369
 -
 Completed_pen3.jpg211.5 KB · Views: 357
 -
 Completed_pen4.jpg231.8 KB · Views: 418
