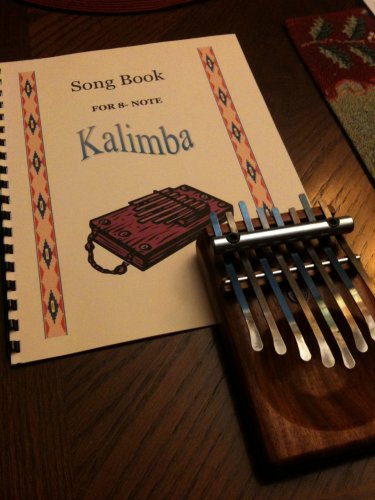
Details of the Build
I have had several request for more details of building the kalimba, so here you go.
I looked all over the internet for instructions to build them. In the end I would up using a calibaration from all of them. Most of the inspiration came from watching a video from colorado soundscapes.
http://www.youtube.com/watch?v=VcModMcylZ8 Their kalimbas sounded better then any other in my opinion. I went with a solid block instead of a box due to ease of build.
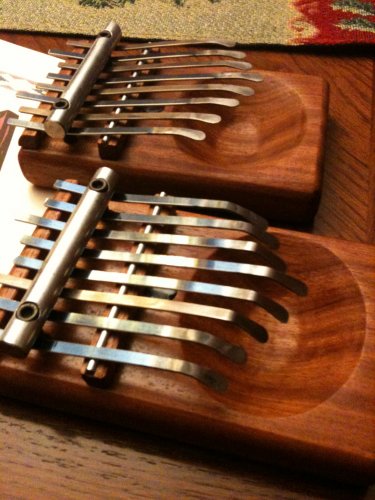
The Base
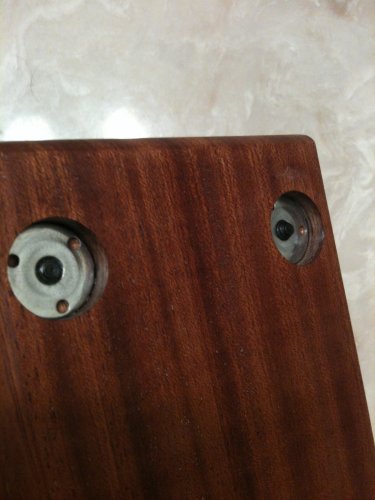
I built mine from a solid piece of wood to be 4" x 6" x 1". I used the hardest wood I had laying around, Jabota. The sound hole is 3/4" deep by 3-1/4" wide by 2-3/4" tall. I used a cnc router to make this rough cut and then sanded by hand. There are two holes drilled through the base for the clamp bar bolts, they are located 1-1/8" from the end and approx 5/8" from the side. They should be 2-3/4" apart (measured center to center). The through hole is 1/4" and there is a 3/4" counter sunk hole in the back to allow the 10-24 tee nuts to set in below the back surface.
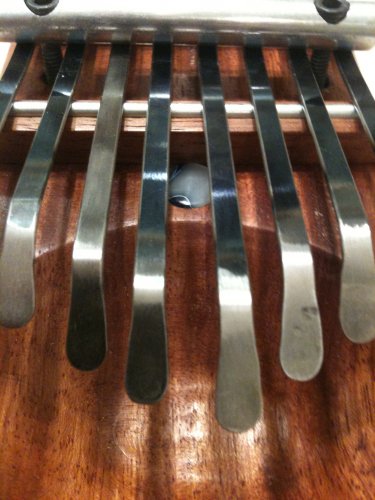
The Rear Bridge
The bridge for the tines is made from 2 pieces of Jabota and some steel. The piece closes to the end is cut like 1/4 round moulding. The flats on that piece are 1/4" tall. This piece is glued into place at the top of the kalimba.
Front Bridge
The front tine support is 1/4" by 3/8"tall. I inlayed a piece of 1/8" steel for the tines to resonate too. I picked up the steel from a 99cent sign support walmart sells. I cut a groove in the top of the piece with a 1/8 inch ball nose router bit and then glued the steel in with wood glue. This support is not attached to the kalimba ( it is free to slide around). I was not sure where to locate it, so I left it loose. The small color insert between this support and the sound hole is slightly higher then the surface and acted as a stop so the support didn't slide out (blind luck). If you don't have something for it to stop against I would attach it to the kalimba at 3/4"-1" inch from the center of the tine clamp bar.
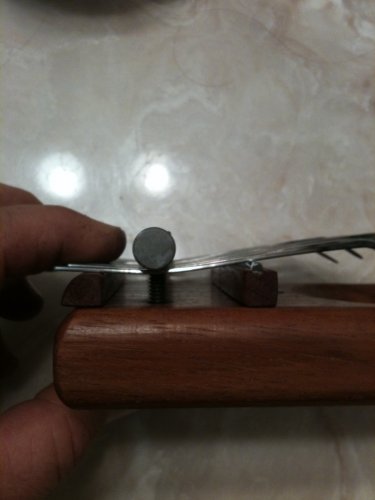
The Clamp Bar
The clamp bar was made from 3/8" round galvanised bar stock I picked up at Tractor Supply. It's 3-1/2" long and has two bolt holes drilled and counter sunk for a 10-24 x 1-1/2" machine screw (also picked up the hardware at Tractor Supply, but if I had it to do again I would have gotten the stainless steel bolts). The holes are 1/2" from the ends of the bar.
The Tines
I used spring steel that I puchased from Kalimbamagic.com for the tines. The steel comes blued and smooth. I cut it with a pair of linemen pliers and formed the end by heating it red hot and using a hammer and anvil to flatten and round (not sure this was needed). After the hammering was done I let them air cool, then ground the end round and sanded the sharp edges off with a belt sander and some hand sanding with 400 grit paper. I bent the end down at about a 45 degree angle to make it easier on the thumbs while playing. I played around trying to find the correct length for the tines. I decided on 4-1/2" for the longest and 3-3/4" for the shortest ( they turned out not to be straight accross the back once tuned to G diatonic).
The Assembly and Tuning
This is the easy part. I installed the nuts and bolts through the clamp bar and base. I left it up as high as I could and slide the tines in from the front. The longest tines in the middle and work to the shortest on either side. The end tines are out side of the clamp bar bolts. The front bridge is loose and about 1 " from the center of the clamp bar. Now tighten the bolts down until you get a nice bow under the clamp bar. Don't over tighten or they will bend. You just want a bow to allow them to resonate sound. I tuned mine by using a tuner app on my phone (I use ntrack tuner). I stated with the 4th. tine from the right. This is number 1 and is tuned to G. To tune the tine you slide it in and out (from front to back). It is hard to slide due to the pressure the clamp bar has on it, but if you use a hard scrap of wood it will move. There are some videos on utube of the tuning process.
Dan