China Berry: Empty Bowl #4

Signed-In Members Don't See This Ad
See more from Phillip Kelley

Joined
Apr 10, 2013
Messages
554
Location
Arkansas
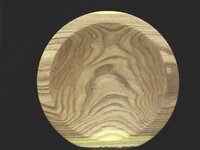
China Berry is fun to turn but very open grain & tends to tear. I kinda like the live edge look...:rolleyes: 
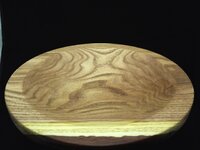
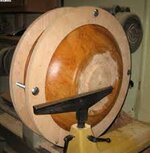
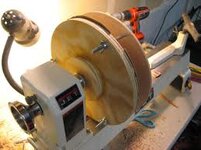
I have sealed it with 1 coat of MinWax's Polycrylic.
It won't fit on my large jaws so now I have to figure out how to finish the bottom! It is 9 1/8" DIA & lacks about 1/8" fitting on the jaws...might as well be an inch! lol I am going to try & tape it to the jaws & turn gently...
 

Attachments

  • DSC01730.JPG
    DSC01730.JPG
    182.7 KB · Views: 203
  • DSC01729.JPG
    DSC01729.JPG
    180 KB · Views: 158
  • DSC01731.JPG
    DSC01731.JPG
    182.6 KB · Views: 204
Signed-In Members Don't See This Ad

mark james

IAP Collection, Curator
Joined
Sep 6, 2012
Messages
12,752
Location
Medina, Ohio
Turn yourself a "domed" jam chuck for the headstock (tape also possibly), and use your tailstock with whatever you have and get the bottom close to form and finish the dimple by hand...

Check out Craft Supplies USA - Turners Select Bowl Chuckers Pad. I'm sure PSI and others vendors have similar, or a 4" x 4" from the garage...
 
Last edited:

plantman

Member
Joined
Jan 2, 2012
Messages
3,437
Location
Green Bay, Wi
Phillip; PSI, as well as others I believe, offers several universal and # 2 chuck flat jaw extension sets to increase you capacity to 14 inches. Depending on the swing capacity of your lathe you could also use this method I used on an oversized bowl at one time. I took a piece of 1/2 plywood and cut out the largest circle that would turn in my lathe. Mounted a face plate to the back and put it on the lathe and let it turn slowly as I marked the exact center, the outside rim so it would run true, and guide lines every 1/2 inch so I could center the bowl. Next I took the dick off the lathe and with a square marked it off into four equal parts drawing lines from rim to rim. Now figure out the range of objects you want to turn. Say you want to turn objects between 4 and 12 inches. use your guide lines to find those distances and place a mark at those points. Drill 5/16, holes at these points, and with a jig saw or scroll saw connect the points on your 4 90 degree lines. I used carrage bolts with a rubber hose over them to protect the project. Now you can slide your bolt up and down in the slots to hold your project. It doesn't even have to be perfectly round. Jim S
 

W.Y.

Member
Joined
Aug 10, 2008
Messages
1,656
Location
BC, Canada
Nice turning.
The color and grain structure and the way you describe it makes it seem a lot like some Catalpa wood I had a while back .
 
Top Bottom