Center Band Circles

Signed-In Members Don't See This Ad

Wmcullen

Member
Joined
Dec 1, 2020
Messages
397
Location
Fairfax, Virginia
I'm not sure if this process is right or wrong; unique or common. But it works for me and I want to share in case it's interesting.​
07: Center Band Circles
last post: 06: Broken Clips
g19.jpg

g18.jpg
I'm a big fan of switching out the standard slimline center bands with custom wooden ones. Using dowels to create circles can add visual contrast, create a pattern, and gives you a new design element to play with.

The Problem
Every time I drill holes free-hand, the pattern comes out looking haphazard, uneven and sloppy. So I put a jig together to keep the circles lined up properly.

Here's my process
(Not rocket surgery, just how I do it.)
Light wood dowels
1. I thought using round toothpicks would be a good (and thrifty) idea. But I found an equally inexpensive and better option in the craft section of Walmart. These thin dowels cost $1.30 for a 50 pack and fit perfectly into holes drilled with a 3/32" bit.
g1.jpg
Preparing the rough Center Bands
2. I cut a few pieces of dark wood (morado) about 1/3" thick, drilled 1/4" center holes, and separated them into squares.
g2.jpg
3. All the squares were mounted and turned round.
g3.jpg

g4.jpg

g5.jpg
Drilling holes for the dowels
Here's where I had some frustration/fun.
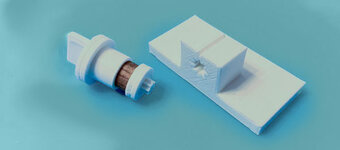
Drilling equally spaced holes in a straight line around the band was a challenge. So I built a jig to use in conjunction with a drill press.
This jig ensures all holes are drilled on the same line around the band's circumference and at 45 degree increments.
I'm sharing my 3d print file in case it's helpful to anyone.
g16.jpg
4. The wood center bands snap snuggly onto each side of the holder assembly.
g12.jpg

g24.jpg
5. The jig base is aligned and clamped to the drill press bed. The holder is "plugged" into the jig base and the wood is drilled. Unplug, rotate 45 degrees and repeat.
g13.jpg
Drilling at 45 degree increments is easy because of the "star" pattern.
g22.jpg
6. In an ideal world I could drill straight through the wood band and out the bottom.
But I'm not that confident in my setup and worry the bit will travel off course.
Drilling to the center also keeps any tear-out on the inside.
g21.jpg
7. Once all the holes are drilled, I glue the thin dowels into place with wood glue.
Each thin dowel is 6" long and has plenty of material for the band.
Sharp scissors cut through the dowel easily and keep the end unbroken and usable.
I push the dowels all the way through assuming I will need to re-drill the 1/4" center hole.
(Maybe I should put the center bands on an old mandrel before this step for easier re-drilling?? Hmmmm.)
g14.jpg
8. After re-drilling the 1/4" center hole, the band is mounted between blanks and shaped. I took those first cuts lightly.
g20.jpg

g19.jpg

g18.jpg
Summary
I'm sure there are better/simpler jigs to accomplish this. Or people are just been more careful while drilling. But this process works for me and it was, frankly, fun to put together.
Incorporating dowels into pen designs can be a great way to introduce unique elements found only in your pens.
g17.jpg

Jig Breakdown
g6.jpg

g15.jpg
Once printed, the two sides of each holder-assembly must be glued together.
- Glue Parts A&B together.
- Glue Parts C&D together.
g16.jpg
Part F: (NEW) The wood drilled better when there was support under Part B.
This sliding piece is kept intentionally loose to move where it's needed.
g9.jpg
I'm happy to share the model. It is the attached *.gcode file.
 

Attachments

  • g24.jpg
    g24.jpg
    15.8 KB · Views: 193
Signed-In Members Don't See This Ad

magpens

Member
Joined
Feb 2, 2011
Messages
15,913
Location
Canada
Outstanding !!!

I like this idea very much and it is something I have tried in a crude way, so I really appreciate the value of "printing" the plastic parts to make it happen in a very controlled, reproducible and MUCH MORE attractive way instead of my crude (unattractive) methodologies. . I guess my old brain will have to get used to the "mod cons" of 3D-printing and CNC ..... not to mention the unrelated (?) technologies of cell phones and apps which I have also been resisting.
 

magpens

Member
Joined
Feb 2, 2011
Messages
15,913
Location
Canada
Your presentation is incredibly well done, too !!! . Thank you for putting so much time, effort and skill into it !!!
 

Micky D

Member
Joined
Jan 16, 2021
Messages
28
Location
Lexington,NC
I have used dowels and colored pencils in my pens. Never thought about the center band. I really like how you made the center band. Great idea.
 

jttheclockman

Member
Joined
Feb 22, 2005
Messages
19,082
Location
NJ, USA.
I like it alot and you are correct dots like I like to call them are another segmenting concept as well as chevrons and thin lines running the length of the blank or even 90 degrees or any angle on the blank. I use dots all the time. I use a couple different ways of doing it and at times they could be challenging. I am currently working on a blank that I use 1/8" dowels and lots of them in a circle. The thing I found challenging and no matter what I do or what method I use if you look closely the dots do not follow a perfect circle and it is seen more so when so close to one another. This can happen for a multitude of reasons and one being the grain will divert a drill bit. One as small as 1/8" or 3/32" You did a great job with this and hope you use that detail in more of your blanks. It works well.


One thing I forgot to mention is set your drill press depth so it does not go all the way through. You only need a small amount of dowel if you are rounding the bands close to finished size. Then you do not have to redrill the tube hole.
 
Last edited:

TDahl

Member
Joined
Dec 11, 2019
Messages
1,889
Location
Brentwood
Great pen and great presentation. I agree with Duane. You should explore selling your jig to IAP members.
 

Roly

Member
Joined
Dec 24, 2017
Messages
108
Location
Batlow, Australia
I have done similar but not as well as you. Well done. Something I tried a while back was to drill a blank and glue in the tube. Then cut into appropriate width and sanded smooth by hand, trimmed the inside and slid it onto the tube. At the time I was using fragile timber and found this to be a good cure for collapsing centre bands. I do dearly like your set up.

Roly
 

dogcatcher

Member
Joined
Jul 4, 2007
Messages
2,359
Location
TX, NM or on the road
Raise one end about 30 to 45 degrees and your dowels will look like you inlaid ovals.

Another idea would be to look at the Sherline Indexing Attachment part #3200. A system like this can be built using hardwoods, a few bolts, a drill chuck, and a few hours of labor.
 

JBidinger

Member
Joined
Jan 1, 2021
Messages
48
Location
Minnesota USA
3D Print Model attached again as a zipped *.gcode file.
Just a heads up that the GCode likely contains instructions specific to the 3D printer that it was generated for. If you are so inclined to share it, the STL file can be sliced by the user for their specific printer, material choice and settings.

Side note. I really wish I wouldn't have sold my 3D printer. :-/
 

Wmcullen

Member
Joined
Dec 1, 2020
Messages
397
Location
Fairfax, Virginia
Thanks all!!
I sincerely appreciate the responses, ideas and encouragement.

My poor little 3D printer is sputtering and wheezing trying to keep up with some new ideas, improvements and experiments. I'll happily post anything I discover.
I like it a lot and you are correct dots as I like to call them...
John- Thanks for the verbiage assist: of course I should have called these "dots." I couldn't come up with the word. : )
Also, I appreciate the recommendation about not drilling all the way through the center band. I just get nervous I'll goof up, shave too much off, or tear out the dowel altogether if it's not inserted all the way. I suspect your way is better.

Raise one end about 30 to 45 degrees and your dowels will look like you inlaid ovals.
Ooooooooo... I like it. I might play with this idea sometime. Thank you!

Just a heads up that the GCode likely contains instructions specific to the 3D printer
Jon- That's good info. I've avoided stl files because everything I export looks super rough compared to the original geometry.
But I can produce a pretty nice obj file. Do you think people with 3d printers would be able to make use of them as easily? (New file attached.)

Also-- open question here -- if someone would like a print made for them, is there a service that does this?

Finally...
I may push these ideas a little further: maybe investigate making a setup that turns in 30 degree increments (left) and another than introduced an eccentricity into the revolution (right). If any of these ideas pan out I'll be sure to post and share.
g25.jpg
 

Attachments

  • centerBandJig.zip
    80.2 KB · Views: 185

eharri446

Member
Joined
Mar 17, 2016
Messages
1,035
Location
Marietta, GA
Just saw this post and wanted to say, that you code get some components including stepper motors which would allow you to turn the round blank by 1 degree at a time. I have one which has a 4 jaw chuck and end stock that I may replace the four jaw chuck with a three jaw chuck. Then add the electronics and software to rotate one or more steps at a time. I would then be able to mount it onto my drill press or my mini mill and drill any size hole that I wanted exactly where I want them.
 

jttheclockman

Member
Joined
Feb 22, 2005
Messages
19,082
Location
NJ, USA.
If I only had a 3D printer . . .
The you would have to know how to make the files. As I mentioned there are many ways to drill holes in a circle around a dowel. Indexing is the key word to get uniform distance between dots. There are crude ways that work well too.
 

Wmcullen

Member
Joined
Dec 1, 2020
Messages
397
Location
Fairfax, Virginia
Hank-
Thanks for the complimentary feedback. At the risk of bludgeoning you with reading, I wrote a follow-up with an updated jig. It can be found here.
Cullen
 
Top Bottom