Celtic cross or celtic knot? There is a difference.
Here's how I do a celtic know stopper. I start with a billet that is 1 1/2" on a side, and about 6" long. You will also need some laminating material in a contrasting color that is the same thickness as the width of the kerf cut by your table saw. I have a blade that cuts a 1/16" kerf, so I use 1/16" veneer.
Set the miter gage on the table saw to 45deg, and attach an auxiliary fence to the miter gage that just clears the blade on saw. Then attach a small stop block on the fence such that if the billet is placed against the fence, the blade will cut about 1/2" from the end of the billet.
Using a pencil, number the four sides of the billet in sequence: 1 - 2 - 3- 4. Start with side 1 - make a cut that is about 1/8" short of the thickness of the billet (ie, if the billet is 1 1/2", the table saw blade should be proud of the table about 1 3/8").
Cut a rectangular piece of laminate that will just fit inside the kerf (about 1 1/2 by 2"), apply glue on both sides. Also apply glue in the saw kerf and use a popsicle stick or bit of cardboard to spread the glue over both faces inside the kerf. Then slide the laminate rectangle into the saw kerf, and allow the glue to cure.
Trim off any excess laminate and glue using a chisel, and return the billet to the table saw. The next cut is on side 3. at the same end of the billet as the previous cut. Glue in another laminate rectangle, allow it to cure, trim the excess, and then repeat the process on side 2. The last cut is on face 4.
After the fourth inlay has been inserted and the glue has cured, trim the billet one last time. Remove the auxiliary fence from the miter gage, and set it for a 90 degree cut, and cut the end off of the billet. That will leave you with a stopper blank with four pieces of embedded wood. On each face you will see three of those pieces of wood - the fourth will be hidden behind the 1/8" bit of blank.
At this point, you drill the blank, thread the hole, and mount it on your mandrel and turn as you would any other bottle stopper. I also cut the blank so that the the space between the top of the blank and the top of the laminate inserts is a bit less than the space between the bottom of the blank and the bottom of the inserts - but if you start with a symmetrical blank (the same space top and bottom), you can always turn off more of the top to improve the appearance.
The only reason for starting with a longer billet is because that is safer when making the cuts at the table saw. Actually, if you want to go into 'production mode', you can make the same cuts at both ends of the longer billet, and build up the blanks simultaneously. Then cut off and turn both ends while saving the middle of the billet for another project.
It isn't absolutely necessary that the cuts come short of the thickness of the blank, but it certainly does make the glue-up easier.
The suggestion of a 45deg angle is a starting point - you can use other angles as long as all four cuts are at the same angle.
For the best results, it is important that the following conditions be met:
1. The cross section of the billet should be a square. That is, if the width of the billet is 1 1/2", the thickness must also be 1 1/2".
2. The billet must be in exactly the same position relative to the saw blades for all four cuts. Hence, it is important that the setting of the miter gage and the stop block on the auxiliary fence not change between cuts.
3. The thickness of the laminate insert must be exactly the same as the width of the saw kerf.
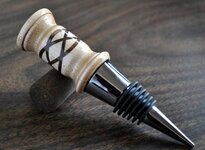
The picture shows a stopper made from maple with walnut inlays, and finished with about six coats of gloss wipe-on poly. The angle in this instance was 30 deg which caused the knot to be more shallow. Two observations about this. First, since making this one, I have found that the stopper looks better if I drill a recess about 1/16" deep and 1" in diameter at the bottom of the blank, and then drill the mounting hole at the center of this recess. That way, the metal portion of the stopper fits into the recess, and the seam between the wood and metal is covered.
Second, I have found that a simpler profile looks better that something more ornate.