Calling all veterans of the old school

Signed-In Members Don't See This Ad

MorganGrafixx

Member
Joined
Jan 20, 2009
Messages
290
Location
Snelville, GA
So recently I have taken a liking to woodworking with tools that lack power cords or batteries. I built myself a rock solid work bench using mostly hand tools. The bench is made up of 3 torsion boxes held together by 2 threaded steel rods 5/8" thick. Most things I was able to do with hand tools, but there were some that I had to use power tools for because I didn't have the right hand tool for that particular job. Used handsaws, screwdrivers, hammer and chisels, etc. But I digress...

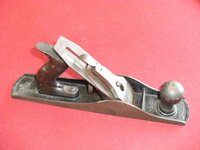
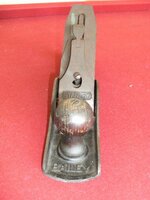
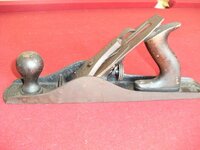
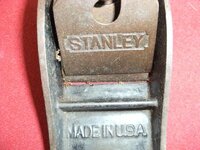
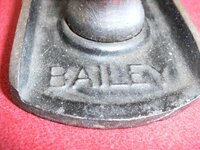
The main point of this post is to glean some info from my elders. A couple weeks ago, my wife and I spent 5 days running around the N, Georgia mountains visiting obscure antique shops and little hole in the wall eateries for our 11th anniversary. We came across one antique shop in Blue Ridge (i think) that had at least 3 of everything know to man. I stumbled on an area that was loaded with old, rusted, beaten hand tools. Well, this one bench plane caught my eye and I swear she was giving me that look...you know the look...the one you get from the lonely dog at the pound that could melt a hole through steel. So I picked her up and started going through the mental checklist of what you should look for. Missing pieces, broken this or that, dents, chips, cracks, etc. I couldn't really find anything that was bad enough to make me toss it back. The tag hanging off it said $45....I though that might be a bit more than I wanted to pay for an old plane...then I saw the "everything in this section 40% off" sign! Well, my decision was made by this point.

I decide I would try and restore it to it's former glory. I've watched just about every video I can find and gone through article after article by hand tool wizard Joe Schmoe, or plane expert What'sHisFace, but I wanted to post it to my fellow IAPers in hopes that someone has some advice on stuff to watch out for. Or simple fixes that make a big difference.

Also, if anyone out there knows the estimated value of this thing, that would be great too. After several days of researching, the closest I can come is that it is from the 1880s-1920s. Not sure how much truth there is to that, so maybe someone here can help me out with that too.
 

Attachments

  • DSCF6011.jpg
    DSCF6011.jpg
    53.6 KB · Views: 172
  • DSCF6013.jpg
    DSCF6013.jpg
    34.5 KB · Views: 165
  • DSCF6014.jpg
    DSCF6014.jpg
    54.6 KB · Views: 161
  • DSCF6016.jpg
    DSCF6016.jpg
    77.6 KB · Views: 160
  • DSCF6017.jpg
    DSCF6017.jpg
    80.5 KB · Views: 160
  • DSCF6018.jpg
    DSCF6018.jpg
    84.2 KB · Views: 166
  • DSCF6024.jpg
    DSCF6024.jpg
    48.1 KB · Views: 156
  • DSCF6025.jpg
    DSCF6025.jpg
    41.2 KB · Views: 159
Signed-In Members Don't See This Ad
Scot, from what I can see in the photos, I would have jumped all over her at the $45 price. That plane is in great shape for its age. If the base is not warped beyond repair, you have a cherry in hand. Take her apart, clean up and reassemble. Sharpen the iron and do the adjustments needed and that tool will serve you for many years to come. Congratulations on your find.
Charles
 
looks like a good servicable plane.

Take a piece of glass and tape a piece of fine grit sandpaper on it. slide the plane (without the blade) across it a couple times and look at the bottom. What you want to see is that the sandpaper was riding the outside edges or the entire sole. This means the sole is either flat, or slightly concave in the center. what you don't want to see is the sandpaper riding in the center without hitting a portion of the edges. Meaning the sole is slightly convex.

Some say that you need it completely flat, I disagree and say as long as it's hitting all the edges its good enough. If its convex at all, then you could be in for some hours of sliding on that sandpaper to flatten it.

Other than that. Learn to sharpen and set the blade and start making ribbons.

I have a Stanley Baily 5 and 8 myself as well as a Stanley 112 scrapperplane I think it is.
 
You might want to wander over to the Neanderthal Haven at Sawmill Creek. Those guys are really savy about planes and such. Lots of good info for non-power tools. (not me, I like an electric pencil sharpener!!)

Jeff in northern Wisconsin
 
I am addicted to stanley planes. Here is a great resource for dating them:

http://www.hyperkitten.com/tools/stanley_bench_plane/start_flowchart.php

Based on the pics, I would say Randywa is pretty close. Here is my rational
-raised ring under the knob
-kidney shaped hole in lever cap (that was added post 1933, IIRC)
-rib in the casting at the toe and heal

No 5 planes are pretty common, $45 is probably fair. Getting it for 40% off, and being in good condition was definitely a good deal!

Hand tools, especially old Stanley tools can be a slippery slope!

Congrats on the good find!
Chris
 
to flatten the sole (bottom) of the plane, buy yourself a 6 inch wide by 3 ft long piece of 1/4 or 3/8 plate glass. Then buy some adhesive backed wet use sandpapers starting at 320, 400, 600, 800, 1000.
place the grits on the glass, side by side, and use this to progressively flatten and polish the sole. do not advance to the next grit until the sole has the same sheen (consistent scratch pattern) accross at least 80 percent of the sole. Also, make sure that the toe (front of the bottom where the small handle is) is 100 percent abraded. The back 20 percent can be not fully covered, as it is a follower area, and the front is the most important part of the sole.
 
One of my prized possessions is a toolbox (about 1' X 1' X 4') that I inherited from my Grandfather through my Dad. In that box is almost all the tools my Grandfather used for building houses and cabins in the Houston area during and following the Great Depression. Among those tools is an old plane almost identical to the one pictured above.
 
One of the first things I did with it when I got it home was to test the sole for flatness. I colored the entire sole with my old black boot polish and slid it across a sheet of 600 grit sandpaper glued to glass. Applying as little pressure as possible I slid it back and forth only once. All areas showed signs of abrasion. About 5 more passes (10 up and back) there was no black left at all. No areas were overly shiny like they had more contact than others. Next, I put my square on it to make sure the sides were 90* to the sole. As far as I can tell everything was good.

I'll check out those websites listed tonight. I've poured through a site called blood and gore. http://www.supertool.com/stanleybg/stan0a.html
There is more info on every type, size, color, number, style and anything else to classify planes than a guy could go through in a week.

So looks like I'm going to go ahead and restore it as best I can and hopefully have a tool in my shop with some real history behind it! I'll keep posting pics of the progress as I go. Thanks for the advice everyone and if you come up with something more, let me know!
 
Well, tonight I got a good start on it. I started with the chip breaker, some WD-40 and a stack of wet/dry 220 grit paper. Moved up to 320, then 400. Broke out the Dremell and a 600 mini flapper wheel. Looks good so far. Did the same above for the knife as well, but it has some orange peel looking pitting that might take some light grinding. Figured I'd put it to you guys once again as to wether or not the grinder is a good idea.
 
Since your willingly stepping over the cliff and falling to the dark side I'll give you some more reading material.

http://www.cianperez.com/Wood/WoodDocs/Wood_How_To/INDEX_How_To_pages/Smalser_on_RehabbingPlanes.htm

A most excellent source of knuckle dragging Neanderthal type tools http://www.cianperez.com/Wood/WoodDocs/Wood_How_To/INDEX_How_To.htm

My own purely bias choice of planes are the type 9 Baileys(1902-1907 era) if for no other reason than its cool using 100 year old tools. That said there is a satisfaction to be had when you can slice off thin, and I do mean t-h-i-n amounts of material when you need to. Not to mention no saw dust floating in the air or noise to make your ears ring. A lot of folks will tell you to get a new Hock iron for it to make it work better and they are probably right but the original irons work pretty good themselves just learn to sharpen it correctly and you will be amazed. Its best to avoid wood with reversing grain directions or a lot of knots till you become reasonably good at managing your new toy or you will be pulling your hair out try to get rid of tear out.

That #5 is a great starting point. They can be set for very coarse flattening work of very fine work. Heres mine after I recently sharpened it. BTW- a little wax on the sole will help them slide a lot easier.
 

Attachments

  • 0227112000a.jpg
    0227112000a.jpg
    44.3 KB · Views: 158
  • 0227112001.jpg
    0227112001.jpg
    52.2 KB · Views: 142
Back
Top Bottom