southernclay
Member
Last night I did a test to find the thickness of CA finish in an effort to improve my fit, use of calipers etc. I feel like I need to challenge myself to improve, so things like this should help.
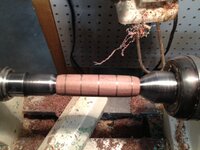
I set up the blank between centers, it's a random blank, unknown wood. It was already drilled out (no tube) in a box of blanks I had received so perfect piece to try something random out on. Turned it down pretty quick to close enough to even, sanded to 600 and put the five lines you see on it to give several test areas. I thought it would be better than just measuring one area...glad I did this.
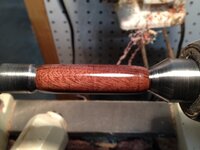
After that, CA finish which I am still learning but much happier with over last couple of attempts. 6 layers of thin followed by 6 layers of medium. Micro mesh dry to 12,000 and two coats of polish. I like the way it finished overall, it was a quick job, used accelerator every 3 coats, I was more interested in thickness results than finish results but wanted it to be accurate.
So from left to right as you face the blank here were my results.
Line #1 Before: .614 inches After .624 in = +.010 inch
Line #2 Before: .631 inches After .640 in = +.009 inch
Line #3 Before: .637 inches After .646 in = +.009 inch
Line #4 Before: .632 inches After .641 in = +.009 inch
Line #5 Before: .606 inches After .614 in = +.008 inch
Not as thick as I thought it was going to be. I'm sure different woods give different results as well and hopefully will be trying this out on other times but it was a good test to do and good practice for my finish too. Overall great knowledge to have for me so hopefully it can help someone.
The most interesting thing I found was the sliding scale from left to right which is the way I applied to CA. Not a huge difference measurement wise but 20% difference so that surprised me a bit. So maybe I need to rotate left to right and right to left or use more glue? I apply the glue straight to the paper towel and then the blank, I've tried right on the blank also this has seemed to work better for me. Open to feedback on this and all other items mentioned as well.
Thanks for looking.
Warren
I set up the blank between centers, it's a random blank, unknown wood. It was already drilled out (no tube) in a box of blanks I had received so perfect piece to try something random out on. Turned it down pretty quick to close enough to even, sanded to 600 and put the five lines you see on it to give several test areas. I thought it would be better than just measuring one area...glad I did this.
After that, CA finish which I am still learning but much happier with over last couple of attempts. 6 layers of thin followed by 6 layers of medium. Micro mesh dry to 12,000 and two coats of polish. I like the way it finished overall, it was a quick job, used accelerator every 3 coats, I was more interested in thickness results than finish results but wanted it to be accurate.
So from left to right as you face the blank here were my results.
Line #1 Before: .614 inches After .624 in = +.010 inch
Line #2 Before: .631 inches After .640 in = +.009 inch
Line #3 Before: .637 inches After .646 in = +.009 inch
Line #4 Before: .632 inches After .641 in = +.009 inch
Line #5 Before: .606 inches After .614 in = +.008 inch
Not as thick as I thought it was going to be. I'm sure different woods give different results as well and hopefully will be trying this out on other times but it was a good test to do and good practice for my finish too. Overall great knowledge to have for me so hopefully it can help someone.
The most interesting thing I found was the sliding scale from left to right which is the way I applied to CA. Not a huge difference measurement wise but 20% difference so that surprised me a bit. So maybe I need to rotate left to right and right to left or use more glue? I apply the glue straight to the paper towel and then the blank, I've tried right on the blank also this has seemed to work better for me. Open to feedback on this and all other items mentioned as well.
Thanks for looking.
Warren