Daniel
Member
I constantly see people either giving up on a CA finish or posting that they are working on it etc. I learned how to do a CA finish from the members of the Yahoo group years ago. one question, one answer and I went to the shop and did it. I have also never had BLO in my shop.
This is not meant to discourage experimenting to improve Ca finish, But in this case it seems development has resulted in a backward step. the process has gotten either more difficult or impossible for many.
So here is how I was originally told to do a CA finish.
Turn the blank to size and shape. Depending on the grain of the wood use 220 or 320 grit sandpaper, set the lathe to a slow speed and sand blanks in order to build up saw dust on the sandpaper. While holding the sandpaper under the blank, pour thin CA on the top of the blank. this will mix the CA with the saw dust making a slurry. You need to work fast and get this slurry to fill all voids etc in the grain, the CA will dry quickly. If you have problems with this Thicker CA cures more slowly. I like thin CA as the point here is not only to fill any voids and grain it is also getting some CA to absorb into the wood itself. At this point the blank is a real mess. DO not over do it with the build up of CA because it is hard to get sanded back off.
Set Lathe back to a high speed and using one grit lower sandpaper than you used for the slurry. If you did the slurry with 220 this means you will start sanding with 150, if you used 320 for the slurry you will start sanding with 220. now sand all the visible slurry and CA off the blank. once the blanks is all smooth and all Ca has been removed you need to stop the lathe and sand lengthwise to the blank to remove all sanding marks that run radially around the blank. what you just did was "seal" the blank as well as fill any small imperfections in the wood.
Now you need to build a foundation for your finish. continue to sand the blanks with your progression of grits stopping the lathe to sand length wise between each grit. I use 220, 320 and 400 grit sandpaper at that point I switch to micro mesh. I will sand lengthwise to the blank all the way up to the 3rd sheet of MM. after that I skip the lengthwise sanding. I do sand the blank all the way up to 12000 MM. for those of you that are concerned that the blank will be to smooth for the finish to adhere to, remember CA has already been applied to the wood and is very well adhered. that CA is still there.
Once the blank is sanding I inspect it very carefully for any marks etc. this is the last time you will come into contact with the actual wood so do not leave flaws. the wood itself should look fairly well polished at this time
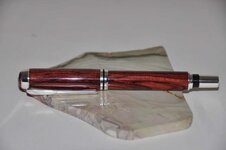
The CA finish
set the lathe to slow speed again and with a plastic bag that the parts come in apply a coat of CA, I like thick, to the blank. I actually use wax paper as an applicator for CA and find that I get it to go on the smoothest. let dry and repeat. you can apply as many coats as you want, I usually do two to three depending on how smoothly it is going on. Keep in mind it does not go on smooth, but the fewest ripples the better.
Turn the Lathe to high speed and start with 320 grit sandpaper. if the Ca is extra rough you can start with 220. This is the hardest part of this method and the danger is sanding through the CA. sand the blank just until you see scratches evenly across the blank. Just as you did before sand lengthwise with the blanks between each grit. Progress through the grits again as before. In my case this is to 12000 MM. only polishing to a lower grit, buffing or any other preferred method to "Polish" the pen should not be a problem. In the event you do sand through the CA you must sand the entire thing down removing all the coats of CA. CA cannot be patched.
Although CA is an extremely durable finish all on it's own I like to add a final coat of Hut crystal coat. Just keep in mind that at this point you are polishing plastic not wood and apply the final touches of your preference accordingly.
That is it, take it leave it whatever. I just know I did not hear nearly as many problems with doing a CA finish until I started hearing about BLO.
This is not meant to discourage experimenting to improve Ca finish, But in this case it seems development has resulted in a backward step. the process has gotten either more difficult or impossible for many.
So here is how I was originally told to do a CA finish.
Turn the blank to size and shape. Depending on the grain of the wood use 220 or 320 grit sandpaper, set the lathe to a slow speed and sand blanks in order to build up saw dust on the sandpaper. While holding the sandpaper under the blank, pour thin CA on the top of the blank. this will mix the CA with the saw dust making a slurry. You need to work fast and get this slurry to fill all voids etc in the grain, the CA will dry quickly. If you have problems with this Thicker CA cures more slowly. I like thin CA as the point here is not only to fill any voids and grain it is also getting some CA to absorb into the wood itself. At this point the blank is a real mess. DO not over do it with the build up of CA because it is hard to get sanded back off.
Set Lathe back to a high speed and using one grit lower sandpaper than you used for the slurry. If you did the slurry with 220 this means you will start sanding with 150, if you used 320 for the slurry you will start sanding with 220. now sand all the visible slurry and CA off the blank. once the blanks is all smooth and all Ca has been removed you need to stop the lathe and sand lengthwise to the blank to remove all sanding marks that run radially around the blank. what you just did was "seal" the blank as well as fill any small imperfections in the wood.
Now you need to build a foundation for your finish. continue to sand the blanks with your progression of grits stopping the lathe to sand length wise between each grit. I use 220, 320 and 400 grit sandpaper at that point I switch to micro mesh. I will sand lengthwise to the blank all the way up to the 3rd sheet of MM. after that I skip the lengthwise sanding. I do sand the blank all the way up to 12000 MM. for those of you that are concerned that the blank will be to smooth for the finish to adhere to, remember CA has already been applied to the wood and is very well adhered. that CA is still there.
Once the blank is sanding I inspect it very carefully for any marks etc. this is the last time you will come into contact with the actual wood so do not leave flaws. the wood itself should look fairly well polished at this time
The CA finish
set the lathe to slow speed again and with a plastic bag that the parts come in apply a coat of CA, I like thick, to the blank. I actually use wax paper as an applicator for CA and find that I get it to go on the smoothest. let dry and repeat. you can apply as many coats as you want, I usually do two to three depending on how smoothly it is going on. Keep in mind it does not go on smooth, but the fewest ripples the better.
Turn the Lathe to high speed and start with 320 grit sandpaper. if the Ca is extra rough you can start with 220. This is the hardest part of this method and the danger is sanding through the CA. sand the blank just until you see scratches evenly across the blank. Just as you did before sand lengthwise with the blanks between each grit. Progress through the grits again as before. In my case this is to 12000 MM. only polishing to a lower grit, buffing or any other preferred method to "Polish" the pen should not be a problem. In the event you do sand through the CA you must sand the entire thing down removing all the coats of CA. CA cannot be patched.
Although CA is an extremely durable finish all on it's own I like to add a final coat of Hut crystal coat. Just keep in mind that at this point you are polishing plastic not wood and apply the final touches of your preference accordingly.
That is it, take it leave it whatever. I just know I did not hear nearly as many problems with doing a CA finish until I started hearing about BLO.