Ca finish help

Signed-In Members Don't See This Ad

Taylorrock99

Member
Joined
Oct 28, 2019
Messages
5
Location
7706 spring valley ave
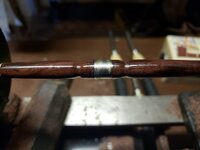
Picture not all that great, but I seem to have little streaks left behind. I did 4 layers of thin CA. With somewhere around 4 to 5 drops or so Each time, rubbing 2-3 seconds with papertowl. Then i wet micro meshed up to 12000 but are still there. Am I using to much glue or need to mesh longer? This is second try, which is much better than first. Sanded down back to wood really well before trying again.
 

Attachments

  • 20191102_142217.jpg
    20191102_142217.jpg
    123.6 KB · Views: 343
Signed-In Members Don't See This Ad

Dalecamino

Local Chapter Leader
Joined
Jan 2, 2008
Messages
14,572
Location
Indianapolis, In.
Looks like it was still wet when you applied another coat. Try waiting longer for the first, and every successful coat to dry before applying the next coat. Also, in my opinion, you need more coats. That is, either more coats of thin, or 4 coats of medium. I do two coats of thin, then six coats of medium before sanding. Hope this helps.
 

bsshog40

Member
Joined
Oct 2, 2018
Messages
2,375
Location
Omaha, Tx
Thin ca is exactly what it means, thin. With only 4 coats of thin, you hardly have any protection on the wood before sanding. You may be sanding right into the wood. As Dale mentioned, a few coats of thin ca and then follow up with a few coats of med. ca. The medium will help coat the wood better when it comes to sanding.
 

DrD

Member
Joined
Jun 26, 2019
Messages
1,104
Location
Columbus, Mississippi
I am currently working thru some similar issues with CA. As Bobby say above thin CA is really just a sealer and isn't a high build coating. Try one really good coat of thin using a lot of Ca on the towel and 3 or so drops as the tube is spinning, rubbing in thoroughly before it begins to set up. Spray accelerator, wait repeat, then go to medium - I personally apply 10 coats applied the same way as described for thin. Patience, don't rush.
 

leehljp

Member Liaison
Joined
Feb 6, 2005
Messages
9,330
Location
Tunica, Mississippi,
Everyone should use a good set of Calipers for measuring the thickness of finish and the size of the turned blank to match the fittings.

Turn the blank to match the size of the fittings, not in accordance to the bushing size. Bushings are consumables if you are not using calipers. THEN, with calipers, measure the turned & sanded blank. Then measure the CA build up of finish. That is when you know if you have enough.

No, you can't put too much CA on. If you build up too much, use the skew or scraper to turn it down a tad.

Water, Some people are good with wet sanding and a few have hit upon the right technique from the beginning, but far more people have both short term and long term problems with water and other liquids. If you do want to use water, use a very lightly damp cloth or paper towel to wipe the sanding dust off.
 

Woodchipper

Member
Joined
Mar 15, 2017
Messages
5,233
Location
Cleveland, TN
FWIW, I marked the mandrel and turn the headstockmanually, applying CA for two turns only. Any more, it starts to set up. After applying the CA, I hit the blank with a very short shot of accelerator.
 

magpens

Member
Joined
Feb 2, 2011
Messages
15,911
Location
Canada
I agree with the advice given above: apply more coats; wait longer between coats; lightly spray accelerator between coats; start with a few coats of thin CA and then switch to medium CA and apply at least 4 coats of the medium; measure your CA thickness with calipers before starting to sand.

Practice, practice, practice !!! . None of us got it right the first time ... or the second ... or the third ... ... !!!!!

What is the metal that I see in the center of the picture ?
Is it a bushing ?

You should not be applying CA over a bushing or any other metal.
 

SmokeGSU

Member
Joined
Apr 18, 2019
Messages
25
Location
Georgia
Maybe I missed it, but what is the wood? Is it oily? I have a redheart pen I turned yesterday that's pretty oily and I'm having the same issue with it right now, though the issue is the oil between the CA and the wood (or at least that's the conclusion I've drawn). That particular piece of wood I didn't work with DNA as much as the other three and its the only one that has the hazy finish in some places. I've got to sand the finish off and reapply.
 

jttheclockman

Member
Joined
Feb 22, 2005
Messages
19,148
Location
NJ, USA.
Maybe I missed it, but what is the wood? Is it oily? I have a redheart pen I turned yesterday that's pretty oily and I'm having the same issue with it right now, though the issue is the oil between the CA and the wood (or at least that's the conclusion I've drawn). That particular piece of wood I didn't work with DNA as much as the other three and its the only one that has the hazy finish in some places. I've got to sand the finish off and reapply.
I highly suggest you get yourself some acetone and skip the DNA. (DNA has water in it and will need to completely dry before adding any finish to a project) You can buy in quart cans at Home Depot. Sand the blank back. Wipe with acetone and let dry. Now your first coat of CA should always be thin to seal the wood if you are using CA as a finish. I am in the camp of 3 coats of thin and 4 to 5 coats of med checking my measurements with a good set of calipers. this will tell you if you need more than 4 to 5 coats. These are tried and true methods that I and many others here use. There are many other methods that work as well but I suggest you start from the basics and experiment on your own.
 

CaptainJane

Member
Joined
Sep 25, 2014
Messages
100
Location
Bayou Vista, Texas
When I start sanding the CA finish, I make sure that I first sand "the shiny" off. The shiny spots are low spots, most likely. So, ensure the sanded blank surface is completely dulled - that will ensure 100% surface has been sanded. I also use those teflon bushings, which keep you from glueing your blank to the bushings.
Good luck.
 

ramaroodle

Member
Joined
Feb 15, 2018
Messages
686
Location
Seattle
I know this is an older thread but....Didn't see where you sanded after applying the CA. If the streaks are there after the first rough grit of micromesh the smoother grits won't get them out. Try 400 and 600 until they are gone.
 
  • Like
Reactions: DrD

SmokeGSU

Member
Joined
Apr 18, 2019
Messages
25
Location
Georgia
I highly suggest you get yourself some acetone and skip the DNA. (DNA has water in it and will need to completely dry before adding any finish to a project) You can buy in quart cans at Home Depot. Sand the blank back. Wipe with acetone and let dry. Now your first coat of CA should always be thin to seal the wood if you are using CA as a finish. I am in the camp of 3 coats of thin and 4 to 5 coats of med checking my measurements with a good set of calipers. this will tell you if you need more than 4 to 5 coats. These are tried and true methods that I and many others here use. There are many other methods that work as well but I suggest you start from the basics and experiment on your own.

Thanks for the suggestion! I thought I had remembered someone mentioning acetone for oily woods instead of DNA, but couldn't remember. I was hesitant to use the acetone because of the CA finish I'd be applying later. I did manage to salvage the blank though... basically I sanded the CA off and back down to bare wood, then I used several thorough wipes with DNA and let it fully dry. After, I did my usually CA finish routine and the blank finished without any issues at all. I think the prior issue was simply from not doing enough prep work before applying the CA.
 
Top Bottom