Bucky-Ball

Signed-In Members Don't See This Ad
See more from plantman

plantman

Member
Joined
Jan 2, 2012
Messages
3,437
Location
Green Bay, Wi
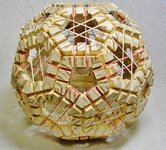
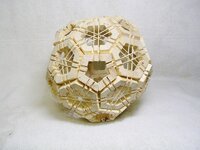
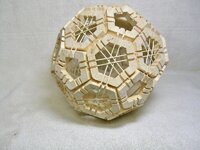
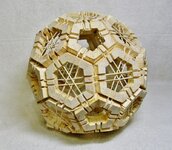
You can call it a Bucky-Ball, Geodesic Sphere, Truncated Icosahedron, Buckmisterfullerene, a Carbon 60 molecule, or just a 62 piece 3D puzzle that looks like a soccer ball when completed.. Whatever you call it, it was fun to make, but took me 3 days to but together in the form you see here. The puzzle contains 20-6 sided segmented octagons, 12-5 sided segmented pentagons, and 30 rubber bands. All 132 inside edges have a 20 degree bevel added. And the outside surfaces have 360 groves cut into them to hold the rubber bands in place. Assembly was like working in a room full of set mouse traps. Every miss-move had a chain reaction of catastrophic proportion, leading to starting over with pentagon # 1. You need to build the sphere in two halves, turn one over unto the other half and join the points together without loosing any of the rubber bands. As you connect the points the sphere gets more stable and easier to manipulate without everything scattering around the room. I did the final assembly in my office, because I was getting to tired from chasing parts around the work shop. If and when you finish this puzzle, you will have a very proud moment. You can now go and comb your hair if you have any left. My thanks go to pocket 83 for the videos on cutting and how to put the Bucky-Ball together, and to my cats who brought me back the rubber bands that went flying around the room. I hope some of you out there will test your skills and patience in building this project. Jim S
 

Attachments

  • DSCN0891 (800x600).jpg
    DSCN0891 (800x600).jpg
    267.2 KB · Views: 292
  • DSCN0892 (800x600).jpg
    DSCN0892 (800x600).jpg
    280.3 KB · Views: 264
  • DSCN0893 (800x701).jpg
    DSCN0893 (800x701).jpg
    380.3 KB · Views: 411
Last edited:
Signed-In Members Don't See This Ad

Mr Vic

Member
Joined
Aug 11, 2008
Messages
1,865
Location
Falcon, CO
Now that looks interesting. Did you glue up long tubes for the Octagons and Pentagons and then slice the sections? Can you add a link to the videos?
 

plantman

Member
Joined
Jan 2, 2012
Messages
3,437
Location
Green Bay, Wi
Now that looks interesting. Did you glue up long tubes for the Octagons and Pentagons and then slice the sections? Can you add a link to the videos?

I could put up links at one time, but forgot how I did it. Go to you tube and enter pocket 83. He has a very interesting website with many out of the norm projects. Yes I cut my staves first, glued them together, and than cut them into segments. There are two videos on his site for the Bucky- Ball, one for how to cut and grove the parts using jigs that are shown, and another on how to put it together. I made up a different jig to do the bevels using the belt sander instead of the table saw. It works much faster and avoids getting your fingers near a saw blade, and also does several squaring tasks that are not shown in the videos. I also used a different method for keeping the parts together after three days of starting over every time I tried to move the the 1/2 spheres around, and completed it in about a half hour. Let me know if you are interested. Jim S
 
Last edited:

plantman

Member
Joined
Jan 2, 2012
Messages
3,437
Location
Green Bay, Wi
My dad loved puzzles and math based objects like that.

I think I would have CA'd the pieces together and then added the rubber bands. :rolleyes:

Pete; That very thought :rolleyes: came to mind more than a few times as I was restarting the puzzle over again. Problem is you need the sphere together in order to properly seat the bevels at the correct angels. Once together it is amazingly ridged and strong, even with all the faces being end grain you can toss it on the floor and roll it around. Since I will be making several more Bucky-Balls for friends and family, I may glue this one together. But for now it sits on a turn table in a display case. Jim S
 

plantman

Member
Joined
Jan 2, 2012
Messages
3,437
Location
Green Bay, Wi
Hey Jim, I think you need to get a job Man!!!!!!!!!!!
Honestly, that is awesome, I would love to be able to make one of those.

Bob.

Thanks Bob; I used to have a job for over 50 years, but it interfered with my hobbies and other interests. Of course it also paid for those items. Now it's nice to have nothing to do and all day to do it. :tongue::tongue: The really nice thing about retirement, is the fact, you now have time to do the things you always wanted to do. Unfortunately, the mind wants to do things that the body can no longer do like it did 20 years ago !! Be well !! Jim S
 

Mr Vic

Member
Joined
Aug 11, 2008
Messages
1,865
Location
Falcon, CO
My dad loved puzzles and math based objects like that.

I think I would have CA'd the pieces together and then added the rubber bands. :rolleyes:

Pete; That very thought :rolleyes: came to mind more than a few times as I was restarting the puzzle over again. Problem is you need the sphere together in order to properly seat the bevels at the correct angels. Once together it is amazingly ridged and strong, even with all the faces being end grain you can toss it on the floor and roll it around. Since I will be making several more Bucky-Balls for friends and family, I may glue this one together. But for now it sits on a turn table in a display case. Jim S

What kind of refill does it take? Looks small enough for a mini Rollerball or stubby fountain pen converter..
 

plantman

Member
Joined
Jan 2, 2012
Messages
3,437
Location
Green Bay, Wi
My dad loved puzzles and math based objects like that.

I think I would have CA'd the pieces together and then added the rubber bands. :rolleyes:

Pete; That very thought :rolleyes: came to mind more than a few times as I was restarting the puzzle over again. Problem is you need the sphere together in order to properly seat the bevels at the correct angels. Once together it is amazingly ridged and strong, even with all the faces being end grain you can toss it on the floor and roll it around. Since I will be making several more Bucky-Balls for friends and family, I may glue this one together. But for now it sits on a turn table in a display case. Jim S

What kind of refill does it take? Looks small enough for a mini Rollerball or stubby fountain pen converter..

?????? :confused::confused: Not sure I understand the question Vic. Jim S
 

Drewboy22

Member
Joined
Aug 21, 2015
Messages
727
Location
San Antonio, Tx
My dad loved puzzles and math based objects like that.

I think I would have CA'd the pieces together and then added the rubber bands. :rolleyes:

Pete; That very thought :rolleyes: came to mind more than a few times as I was restarting the puzzle over again. Problem is you need the sphere together in order to properly seat the bevels at the correct angels. Once together it is amazingly ridged and strong, even with all the faces being end grain you can toss it on the floor and roll it around. Since I will be making several more Bucky-Balls for friends and family, I may glue this one together. But for now it sits on a turn table in a display case. Jim S

Jim, would you be willing to post measurements and whatnots for those of us that want to make one? Who did you make your jigs? Any methods I should avoid when attempting to make one?

Thanks :)
 

plantman

Member
Joined
Jan 2, 2012
Messages
3,437
Location
Green Bay, Wi
My dad loved puzzles and math based objects like that.

I think I would have CA'd the pieces together and then added the rubber bands. :rolleyes:

Pete; That very thought :rolleyes: came to mind more than a few times as I was restarting the puzzle over again. Problem is you need the sphere together in order to properly seat the bevels at the correct angels. Once together it is amazingly ridged and strong, even with all the faces being end grain you can toss it on the floor and roll it around. Since I will be making several more Bucky-Balls for friends and family, I may glue this one together. But for now it sits on a turn table in a display case. Jim S


Jim, would you be willing to post measurements and whatnots for those of us that want to make one? Who did you make your jigs? Any methods I should avoid when attempting to make one?

Thanks :)

There are just a few measurements that are required to make a Bucky-Ball. First you need at least a 20" piece of 2 X 4 lumber. Slice enough of the edge off each side to give you a 90 degree angle. Cut lengthwise into 6 strips .374" wide. Cut 6 of these strips into 12 inch lengths for the hexagons (20), leaving 8" pieces for the pentagons (12). Set your table saw at 30 degrees and cut one side of the 12" strips. Set your fence to cut the other side leaving 1 1/4" long edge to long edge. Set your saw to 36 degrees and do the same for the pentagons, except you will measure the width off of one side of the hexagon. Video explains this well. Glue up your staves and clamp. Cut your staves into .374" segments. Put a 20 degree bevel on all inside surfaces. I suggest you watch the videos on you tube that pencel 83 has made several times to see what jigs are needed and how to make them for cutting the grooves and putting the puzzle together. I used my belt sander with a piece of 2 X 4 cut to 20 degrees to put on the bevel as I thought, after cutting the first segment and having it shatter, that it was not the safest or fastest way to do this task. If you get this far and have trouble putting on the rubber bands the way they are done in the video, PM me and I will tell you the simpler way of doing it. Jim S
 
Last edited:

Drewboy22

Member
Joined
Aug 21, 2015
Messages
727
Location
San Antonio, Tx
My dad loved puzzles and math based objects like that.

I think I would have CA'd the pieces together and then added the rubber bands. :rolleyes:

Pete; That very thought :rolleyes: came to mind more than a few times as I was restarting the puzzle over again. Problem is you need the sphere together in order to properly seat the bevels at the correct angels. Once together it is amazingly ridged and strong, even with all the faces being end grain you can toss it on the floor and roll it around. Since I will be making several more Bucky-Balls for friends and family, I may glue this one together. But for now it sits on a turn table in a display case. Jim S


Jim, would you be willing to post measurements and whatnots for those of us that want to make one? Who did you make your jigs? Any methods I should avoid when attempting to make one?

Thanks :)

There are just a few measurements that are required to make a Bucky-Ball. First you need at least a 20" piece of 2 X 4 lumber. Slice enough of the edge off each side to give you a 90 degree angle. Cut lengthwise into 6 strips .374" wide. Cut 6 of these strips into 12 inch lengths for the hexagons (20), leaving 8" pieces for the pentagons (12). Set your table saw at 30 degrees and cut one side of the 12" strips. Set your fence to cut the other side leaving 1 1/4" long edge to long edge. Set your saw to 36 degrees and do the same for the pentagons, except you will measure the width off of one side of the hexagon. Video explains this well. Glue up your staves and clamp. Cut your staves into .374" segments. Put a 20 degree bevel on all inside surfaces. I suggest you watch the videos on you tube that pencel 83 has made several times to see what jigs are needed and how to make them for cutting the grooves and putting the puzzle together. I used my belt sander with a piece of 2 X 4 cut to 20 degrees to put on the bevel as I thought, after cutting the first segment and having it shatter, that it was not the safest or fastest way to do this task. If you get this far and have trouble putting on the rubber bands the way they are done in the video, PM me and I will tell you the simpler way of doing it. Jim S

Thanks Jim, I am going to get started on this this afternoon hopefullly :biggrin:
 

plantman

Member
Joined
Jan 2, 2012
Messages
3,437
Location
Green Bay, Wi
Here are a couple more Bucky-Balls I have put together. First one is sprayed with black and white lacquer to resemble a soccer ball using fluorescent green and orange rubber bands.. Second one is a Badger Bucky-Ball for my son, who graduated from UW Madison, using red and white rubber bands with a few blue ones thrown in. I put both of these together in less than an hour, compared to the three days it took me for the first one shown in the third photo. For those of you making these, I have a secret weapon of mass construction !! Masking tape !!!! On the back sides, when putting the first pentagon and the 2 octagons together, use a piece of masking tape to make a hinge between the flats. Turn the piece over, add the rubber bands, and use another piece of masking tape to keep the bands in their slots. Do not tape adjoining parts together on the face side as they have to flex quite a bit. As you add pieces tape them in the same manner until you have the 5 points of the star put together. From here on you no longer need to tape the inside parts only cover the slots holding the bands on the face sides. When you have the two halves put together you must turn one over and place the other half on top of it. I used two pieces of 1/4 plywood, one to slide one half off my desk, placed the other on top and turned it over, and slid it on top of the other half. Line up the pentagons with the octagons and start making the sphere as shown in the video. The masking tape will keep the parts from flying all over the place, and hold the bands in place even if some come loose. The more rubber bands you add, the more steady the ball becomes. Once completed and the angels are set, remove the tape over the bands. If you are going to put some kind of finish on your sphere, do it before you start to put it together and not over the rubber bands. My method may be unethical in the purest sense, but it works. If you run into any other problems let me know. Jim S
 

Attachments

  • DSCN0894 (800x788).jpg
    DSCN0894 (800x788).jpg
    408.6 KB · Views: 84
  • DSCN0895 (800x726).jpg
    DSCN0895 (800x726).jpg
    426.4 KB · Views: 112
  • DSCN0893 (800x701).jpg
    DSCN0893 (800x701).jpg
    380.3 KB · Views: 76
Last edited:
Top Bottom