Brick Segmented Pens

Signed-In Members Don't See This Ad
See more from Beesville

Beesville

Member
Joined
Apr 13, 2019
Messages
23
Location
Tomball, Texas
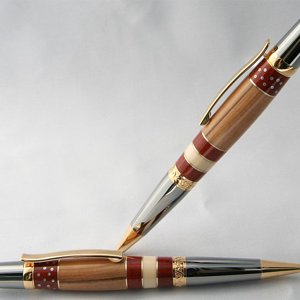
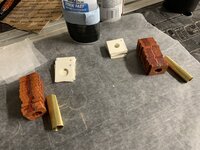
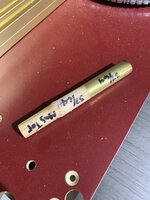
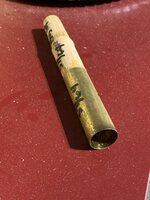
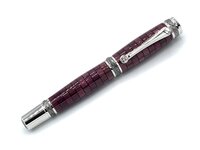
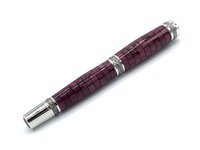
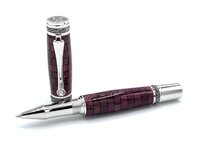
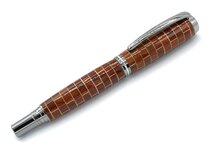
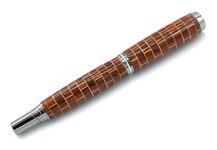
Purple Heart/dyed maple veneer and paduak/dyed maple veneer.

One of my favorite commissioned pieces to make. Any ideas on how to keep the paduak from bleeding to the white veneer when applying the CA finish?
 

Attachments

  • D1E2DBD8-4FD6-465F-9CAA-932EC1874475.jpeg
    D1E2DBD8-4FD6-465F-9CAA-932EC1874475.jpeg
    100.1 KB · Views: 233
  • C6F2C1D3-F032-44B8-BCFF-037717DEF6D4.jpeg
    C6F2C1D3-F032-44B8-BCFF-037717DEF6D4.jpeg
    96.8 KB · Views: 218
  • 88132914-D4D4-4F6B-A771-3FAE5C269523.jpeg
    88132914-D4D4-4F6B-A771-3FAE5C269523.jpeg
    108.5 KB · Views: 215
  • 2877AB97-3926-447D-AE49-15155C386A38.jpeg
    2877AB97-3926-447D-AE49-15155C386A38.jpeg
    116.7 KB · Views: 209
  • D9B829B0-1AC2-47ED-91C6-6976D5164491.jpeg
    D9B829B0-1AC2-47ED-91C6-6976D5164491.jpeg
    103 KB · Views: 218
  • 90155712-7965-4464-AA4E-0E9348FBEF92.jpeg
    90155712-7965-4464-AA4E-0E9348FBEF92.jpeg
    110.9 KB · Views: 210
Signed-In Members Don't See This Ad

magpens

Member
Joined
Feb 2, 2011
Messages
15,911
Location
Canada
I LOVE your brick segmentation !!!! . VERY NICELY and PRECISELY DONE !!! . What a lot of meticulous cutting to do !

I especially like the use of black veneer on that one pen !!!!

And, I don't see any bleeding of the color in those particular pens that you show.

Color bleeding is a difficult issue to deal with .... sorry no suggestions other than the old ones that have been around for a long time.
 

jttheclockman

Member
Joined
Feb 22, 2005
Messages
19,148
Location
NJ, USA.
My method and has worked well for me is to make my final pass with a sharp skew and use no sandpaper. Then thin Ca and just one wipe back and forth not rubbing too hard. This seals the woods. Have also used spray dewaxed shellac and a couple sprits and it is sealed and then finish as normal. To me you do not want to wipe with DNA or acetone after you finished turning because you will spread colors. My opinion.
 

penicillin

Member
Joined
Feb 27, 2019
Messages
1,036
These pens are great. Very nice work, very nice look!

Q: Y'know what I wish I could see?
A: What the pen blanks looked like before the turning started.
 

mark james

IAP Collection, Curator
Joined
Sep 6, 2012
Messages
12,752
Location
Medina, Ohio
Two great segmented pens - well done. Above comments are good. I am not proficient with a skew, but have several carbides and use a shear scrap cut, which gets pretty close to a skew finish cut. Some Mylands sanding sealer to prevent bleedout. You did an excellent job, and I would be proud of both!

Very well done.
 

leehljp

Member Liaison
Joined
Feb 6, 2005
Messages
9,330
Location
Tunica, Mississippi,
John Mentioned this, and it is not rocket science, with a little experience and sharp tools, you can make all the segments you want and it will be very smooth. Then apply the finish without sanding it. I am like Mark James - He uses carbide inserts and shear scrape cuts. That is what I use. The two caveats are: the tool must be sharp and take light cuts/touches.

You could make the worst smearing possible on a segmented blank, give it to me, or JohnT or Mark, and in less than a minute, it would look sharp with no smears.
I show the pen below because it was the one that I learned what a shear scraping cut could do. The little dots on the pen smear like black pencil lead when sanded. But with a sharp scraper for me, and Mark's carbide insert and John T's skew, the smear is gone. No sandpaper. Sandpaper SMEARS segments. Alcohol wipes are so-so at the very best. It is easier to prevent than to sand and clean up.


I did add a thick layer of CA and sanded the CA, but did NOT sand through to the wood. I have since learned that I can use the same scraping shear on a good thick layer of CA and get a very nice shine. I do polish after that.
 

Beesville

Member
Joined
Apr 13, 2019
Messages
23
Location
Tomball, Texas
Several great recommendations. Thanks to all that have replied. I think it's more the oil in the paduak when the thin CA hits it. Paduak is the only wood that gives me fits with the white veneer. I'll definitely give the thick a try first. Then try several more recommendations above. Thanks to all that replied.
 

leehljp

Member Liaison
Joined
Feb 6, 2005
Messages
9,330
Location
Tunica, Mississippi,
I forgot to mention in my previous post: IF one messes up a finish on many reddish blanks, such as Jeffery shows above - it is an old habit of cleaning a messed up CA finish with acetone. DON'T. Acetone will cause red-ish woods (and maybe others) to bleed onto other woods in a segmented blank. That can not be scrapped or turned off. There may be a few accelerators that will do the same. I may be wrong as it has been a long time, but lacquer thinners (alcohol based) can do the same.
 

Beesville

Member
Joined
Apr 13, 2019
Messages
23
Location
Tomball, Texas
My method and has worked well for me is to make my final pass with a sharp skew and use no sandpaper. Then thin Ca and just one wipe back and forth not rubbing too hard. This seals the woods. Have also used spray dewaxed shellac and a couple sprits and it is sealed and then finish as normal. To me you do not want to wipe with DNA or acetone after you finished turning because you will spread colors. My opinion.
I'm thinking about trying this just have several questions. I've never used anything under the CA finish. Will the CA react with the dewaxed shellac? Dry time?
 

jttheclockman

Member
Joined
Feb 22, 2005
Messages
19,148
Location
NJ, USA.
I'm thinking about trying this just have several questions. I've never used anything under the CA finish. Will the CA react with the dewaxed shellac? Dry time?
No. Shellac dries in minutes. But I am always from the school of not being in a rush so I always do one step per day.
 

Jarod888

Member
Joined
Mar 11, 2012
Messages
467
Location
Brighton, Colorado
With the maple being so thin, you could preseal it before creating the blank.
I would place each maple blank on a silicone sheet. Then cover them in super thin ca. As long as it can soak in completely, it shouldn't alter the thickness or anything. Maybe try experimenting with "suspending" them say between a couple of push pins. It shouldn't take much "pressure" to hold them up.
As long as you use CA or epoxy for your final glueup, you shouldn't have any issues with bleed through or delamination. The ca will effectively prevent the oils from the paduk bleeding into the maple.
 

David350

Member
Joined
Sep 10, 2017
Messages
423
Location
Dallas, TX
I think the padauk looks great as it is. To me it looks like you tinted the brick "mortar" to a complementary color of the padauk. IMHO I'm not sure it would look better if it were white and you didn't have the color bleed...

I'm going to have to steal your idea on the purpleheart pen as that is one good looking pen as well...
 

Bats

Member
Joined
Oct 12, 2020
Messages
364
Location
W. Nowhere, CT
I'm a couple days late to the party, but I have to ask... how do you put the holes your veneer? I had a devil of a time with it - drills and punches would just tear or split the veneer. Eventually I ended up putting masking tape over the veneer, filing some teeth in the end of a pen tube, and then chucking that in the drill press, which seemed to work semi-reliably, but I'm curious to know what other people have come up with.
 

leehljp

Member Liaison
Joined
Feb 6, 2005
Messages
9,330
Location
Tunica, Mississippi,
I'm a couple days late to the party, but I have to ask... how do you put the holes your veneer? I had a devil of a time with it - drills and punches would just tear or split the veneer.
I am interested in this also. I have my way but I am interested in others methods.

For me with brass, copper or aluminum sheeting, I sandwich it between two 1/2 in thick pieces of dense plywood, screw the plywood sheets together and drill spaced holes; Next I cut roughly round washers. The sheet washers will distort, but I flatten on an anvil.

Veneer is another story.
 

jttheclockman

Member
Joined
Feb 22, 2005
Messages
19,148
Location
NJ, USA.
Why would cutting holes in veneer be that big of a problem?? Stack as many as you need and use a sacrificial piece on top and bottom and clamp tight and drill away with a sharp bit. The same for metals, acrylics, paper, cloth, you name it. Can be square and after you are done just take to sander and sand the entire gang. Now when I glued up my guitar pick pen blank I had to make a jig to hold everything straight and true and then clamped straight down. The pile needs to be 90 degrees. Or else the stacks will be on an angle no matter how you drill.

Copy of IMGP0524.JPG
Copy of IMGP0497.JPG
 

Beesville

Member
Joined
Apr 13, 2019
Messages
23
Location
Tomball, Texas
I am interested in this also. I have my way but I am interested in others methods.

For me with brass, copper or aluminum sheeting, I sandwich it between two 1/2 in thick pieces of dense plywood, screw the plywood sheets together and drill spaced holes; Next I cut roughly round washers. The sheet washers will distort, but I flatten on an anvil.

Veneer is another story.
Sorry for the late response. I've only ever used veneer for segmenting. I definitely want to try new materials.

As for the veneer, I start by cutting strips to width with a razor with the grain. Then mark square and plan on several more than needed. Next to the drill press and friction cut through the veneer, sacrificial ply under. I've been meaning to make a "better" friction bit but the one attached here works fine. Then back to the razor and slowly cut against the grain (several passes) and your done. Perfect fitting veneer. *I have a small collection of different size friction bits.
 

Attachments

  • F67E61DC-A227-4E9E-99B9-4131363DF890.jpeg
    F67E61DC-A227-4E9E-99B9-4131363DF890.jpeg
    292.7 KB · Views: 108
  • 8B250480-B597-459A-BA56-9BA72A2AF854.jpeg
    8B250480-B597-459A-BA56-9BA72A2AF854.jpeg
    306.5 KB · Views: 102

Beesville

Member
Joined
Apr 13, 2019
Messages
23
Location
Tomball, Texas
I think the padauk looks great as it is. To me it looks like you tinted the brick "mortar" to a complementary color of the padauk. IMHO I'm not sure it would look better if it were white and you didn't have the color bleed...

I'm going to have to steal your idea on the purpleheart pen as that is one good looking pen as well...
Thanks. Here's what they look like before the CA. Before sanding too. These were sold as blanks and finished turning by another pen maker. He experienced the same bleeding.
 

Attachments

  • 52712E1C-8928-415C-86EB-8449889E527F.jpeg
    52712E1C-8928-415C-86EB-8449889E527F.jpeg
    202.6 KB · Views: 124

leehljp

Member Liaison
Joined
Feb 6, 2005
Messages
9,330
Location
Tunica, Mississippi,
The difference between a "perfect alignment" vs "good enough" can be double the normal selling price on a consistent basis. I don't mean that the emphasis is on you being able to charge more, but on more that the "buyer" will be willing to pay for the perfection.

Very similar to what many have discovered and use in selling: Having one or two very high end, high priced quality fit & finished pens on display helps increase sales of mid level and mid priced pens. Perfection draws lookers, and increases sales.
 

Beesville

Member
Joined
Apr 13, 2019
Messages
23
Location
Tomball, Texas
The difference between a "perfect alignment" vs "good enough" can be double the normal selling price on a consistent basis. I don't mean that the emphasis is on you being able to charge more, but on more that the "buyer" will be willing to pay for the perfection.

Very similar to what many have discovered and use in selling: Having one or two very high end, high priced quality fit & finished pens on display helps increase sales of mid level and mid priced pens. Perfection draws lookers, and increases sales.
100% agree. The more the OD is reduced the harder it is to notice the alignment. That being said, the blank above is old, I seldom use a mandrel anymore. After an alignment issue on one of my cigar label pens I went to TBC bushings and haven't looked back. I've actually thrown out blanks when they drift when assembling.
 

jttheclockman

Member
Joined
Feb 22, 2005
Messages
19,148
Location
NJ, USA.
Alignment is actually very easy to do but can also be easy to mess up. One thing I like to do is use witness marks. I keep all pieces in the exact order I cut them and put a line or mark on them both vertical and horizontal. Even flipping the piece over can throw out of alignment. Just line up all marks and you should be dead on. Any imperfections on size should be decreased because all imperfections should line up if there are any. Just my tip that I use when stacking blanks like this.
 

leehljp

Member Liaison
Joined
Feb 6, 2005
Messages
9,330
Location
Tunica, Mississippi,
Alignment is actually very easy to do but can also be easy to mess up. One thing I like to do is use witness marks. I keep all pieces in the exact order I cut them and put a line or mark on them both vertical and horizontal. Even flipping the piece over can throw out of alignment. Just line up all marks and you should be dead on. Any imperfections on size should be decreased because all imperfections should line up if there are any. Just my tip that I use when stacking blanks like this.
Excellent! This should be in every Segmenter's Notebook! Thanks John.
 
Top Bottom