Bow Bread Knives

Signed-In Members Don't See This Ad
See more from mmayo

mmayo

Member
Joined
Jan 12, 2013
Messages
2,957
Location
Tehachapi, CA
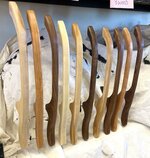
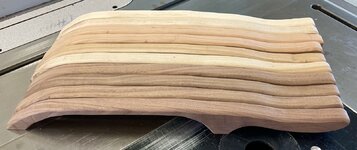
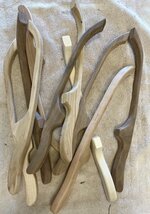
Last year I had 12 of these in stock and now I have 1. Today was the day to cut 10 new blanks, bandsaw the profile, drum sand it smooth and route the edges. The unpleasant job of sanding each is next.

The blades are like bandsaw blades but much sharper and have no set. I almost always get cut with the blades no matter how careful I am when drilling the holes for the screws and during assembly.
 

Attachments

  • 99594AF4-B52F-4F9C-A006-DEAC0FD2EBEA.jpeg
    99594AF4-B52F-4F9C-A006-DEAC0FD2EBEA.jpeg
    222.2 KB · Views: 196
Signed-In Members Don't See This Ad

jrista

Member
Joined
Aug 12, 2021
Messages
2,202
Location
Colorado
Interesting! So is the blade tensioned across the gap there?

BTW, to avoid getting cut with the blades...wrap them in masking tape, or blue tape, frogtape, etc. That way you can handle them without the teeth all exposed and bitey.
 

Woodchipper

Member
Joined
Mar 15, 2017
Messages
5,122
Location
Cleveland, TN
Go to a restaurant supply house or online and get a mesh glove. Got one after I cut my thumb to the tune of $310; $103.33 per stitch plus a penny for knowing how to stitch. I did get to keep the scissors for fly tying.
 

mmayo

Member
Joined
Jan 12, 2013
Messages
2,957
Location
Tehachapi, CA
Interesting! So is the blade tensioned across the gap there?

BTW, to avoid getting cut with the blades...wrap them in masking tape, or blue tape, frogtape, etc. That way you can handle them without the teeth all exposed and bitey.
When I drill the holes, I drive them a bit farther than the holes in the blade. I bow the wood to get the screws in. The blade is thus tensioned.
 

mmayo

Member
Joined
Jan 12, 2013
Messages
2,957
Location
Tehachapi, CA
If anyone is interested I'll transfer this jig to paper and mail you a copy.
 

Attachments

  • 9EACC367-FC55-4EA0-A9D5-4E50430C286C.jpeg
    9EACC367-FC55-4EA0-A9D5-4E50430C286C.jpeg
    143 KB · Views: 108

mmayo

Member
Joined
Jan 12, 2013
Messages
2,957
Location
Tehachapi, CA
I'll probably cover one with tape (yuk) and cover the rest during assembly with my card stock sleeves. Thanks
 

Alan Morrison

Member
Joined
Jan 15, 2019
Messages
3,051
Location
N Ireland
Nice job, Mark. I tried to find the blades for those knives a couple of years ago when I first saw them, but drew a blank ( in the UK )
Are the blades readily available for you ?

Alan
 

mmayo

Member
Joined
Jan 12, 2013
Messages
2,957
Location
Tehachapi, CA
Here are two PDFs with my pattern. Print them, tape them together and you have my pattern. I also included a PDF from a company that makes the blades. I do not use their pattern as it it heavier, but your mileage may vary.

I sell mine for $40 and wood prices may make that go up shortly.
 

Attachments

  • Breadknife scan.pdf
    39.9 KB · Views: 161
  • My Breadknife 1.pdf
    18.4 KB · Views: 154
  • My Breadknife 2.pdf
    25.7 KB · Views: 138

NJturner

Member
Joined
Dec 4, 2006
Messages
147
Location
New Jersey, USA.
I build these as well. To tension the knife blade, you just need to build a simple clamp jig that allows you to slightly bow the knife frame inward while attaching the blade. I use a flat board with two spacer blocks on it at either end and a block or a hole drilled into the board to allow the clamp to snug onto, then put a 'C' clamp in the inside middle of the knife frame and tighten the clamp slightly, causing an inward bow to the frame. The action of the clamps with the spacer block slightly shortens the length where the blade goes. Drill the screw holes and attach the blade, then release the clamp. Tight Blade with no cuts!!
 

mmayo

Member
Joined
Jan 12, 2013
Messages
2,957
Location
Tehachapi, CA
Coat two of oil bases Wipe on Poly. One more and a quick sand. The buffer is next.

Walnut, cherry, maple and alder woods.
 

Attachments

  • 5F0AA359-EF8B-4CFB-A292-217ADABFCE17.jpeg
    5F0AA359-EF8B-4CFB-A292-217ADABFCE17.jpeg
    370.6 KB · Views: 101
Last edited:
Top Bottom