Blanks in a Row

Signed-In Members Don't See This Ad

I have a few 3D printed jigs related to pen turning. Are they appropriate to post to this community?

  • Yes

    Votes: 10 100.0%
  • No

    Votes: 0 0.0%

  • Total voters
    10
  • Poll closed .

Wmcullen

Member
Joined
Dec 1, 2020
Messages
397
Location
Fairfax, Virginia
I'm not sure if this process is right or wrong; unique or common. But it works for me and I want to share in case it's interesting.
01-Blanks in a Row
a1.jpg
I like preparing my blanks ahead of time from larger boards of hardwood. This way, even if I only have a brief amount of time in the shop, I can immediately get turning.

Here's my start to finish process for prepping blanks
1. I buy 4'-6' long boards of interesting, or sale, hardwood from our local seller (Vienna Hardwoods in Fairfax, VA).
a2.jpg
2. Crosscut on the chopsaw into 2 1/8" strips. I have the length marked on my measuring guard in sharpie.
a3.jpg
3. Personally I like my blanks 3/4" wide.*
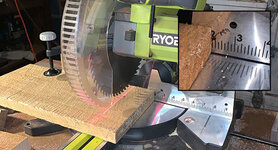
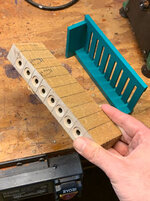
My son has access to a 3D printer at college and produced this measuring jig a couple of years ago. I love it. It saves me about a minute of tedium every time I use it. I mark lines on top and on one side.
a4.jpg
4. I cut holes in two passes using a drill press. The wood is long enough to hold securely in place by hand while drilling. I know many people prefer using vices and lathes to drill precisely centered holes. Recognizing my way smacks of "meatball surgery" I just eyeball it which lets me zip down the line.
a5.jpg
5. I glue all the tubes at once. The next time I'm in the shop I trim them down. I haven't bought sprays to expedite glue drying because my blanks are always ready to go when I am.

a6.jpg
6. When I want to make a pen I use the bandsaw to cut off a few prepped blanks, goggle-up, and do what we do.

Summary
This method ensures I always have a supply of blanks ready to go. In the long run I save a little money by using boards, even rough-hewn. And I save some time by combining tasks. For instance, I only switch my drill press from the 7mm bit to the trimming tool once for a whole batch of blanks.

As a hobbyist my main goals are fun and growth. "Efficiencies" are pursued only to a point. There's no use speeding when you're out for a nice drive.

But when I see some of the magnificent work you have all posted on this site, I get inspired and want to start turning without delay.

Note about my Measuring Jig
This basic design could be made lots of ways.
In case you have access to a 3D printer and would like to make your own, I'm including the zipped "stl file" below.
The model is 7" long and marks lines at 3/4" intervals.
a7.jpg

* I suspect folks using expensive woods will want to be more conservative, making their blanks as thin as possible. 3/4" leaves plenty of room for me to be imprecise while drilling center holes and move a little faster. Again, this is just my method.
 

Attachments

  • a3.jpg
    a3.jpg
    56.6 KB · Views: 201
  • a4.jpg
    a4.jpg
    30.6 KB · Views: 163
  • jig_7inLong.zip
    2.3 KB · Views: 173
Signed-In Members Don't See This Ad
Joined
Dec 22, 2017
Messages
3,036
Location
Wolf Creek Montana
I think that's pretty interesting and innovative for sure. It never even crossed my mind to do something like this. Probably makes storage a lot easier too without having a bunch of loose blanks in a storage box etc. The 3D jig is a great idea. Nice! Love the Moe, Larry and Curly on the Maple. They were my favorite show to watch when I was a kid.
 

jttheclockman

Member
Joined
Feb 22, 2005
Messages
19,082
Location
NJ, USA.
It is absolutely fine to post jigs and any other photos of methods you use to make pens. These help others that either are just starting out or even veteran pen makers if they can pick up an idea or two. We encourage others to do this as well. We are a community here that share ideas. That is what this site is all about. Thanks for posting and giving us an insight into your system. It is well thought out.
 

Charlie_W

Member
Joined
Nov 16, 2011
Messages
5,918
Location
Sterling, VA USA
Cool idea!
You can also check out Colonial Hardwoods in Springfield.
also, Dunlop Woodcraft in Chantilly. They both have a booth at the Woodworking Show....whenever they start up again.
 

magpens

Member
Joined
Feb 2, 2011
Messages
15,913
Location
Canada
I am grateful for this post ! . It is very appropriate.

It is great to "automate" repetitive processes for whatever reason including minimizing tool changes.

I don't do a lot of "assembly line" pen turning but I always like to get exposure to whatever ideas other pen turners come up with. . Every tip helps.

There seem to be a couple of segmented styles in the examples you show ; your time-saving method on these is well worthwhile.

Thanks again for posting and for the step-by-step details ..... very well done !
 

Wmcullen

Member
Joined
Dec 1, 2020
Messages
397
Location
Fairfax, Virginia
Thanks for the great feedback. Being new to this forum I appreciate it.
I drafted up about 7 small to medium-sized ideas I could post about. Maybe I'll tackle one a week and see if it resonates.
Yes, I put the Three Stooges joke in the second picture just for you all. ;)
 

DavidD

Member
Joined
Oct 4, 2017
Messages
299
Location
Boulder, Colorado
really great and thoughtful post. Seems obvious, but I'm sure many folks here have never thought about doing this! The photos of the process are great.
 

Grampy

Member
Joined
Dec 28, 2019
Messages
61
Location
Michigan
Nice assembly line.. You have an amazing "vision" for the craft, and a talent for efficient execution.
 
Top Bottom