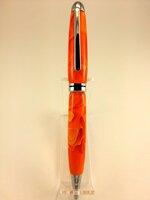
Blank a regretted buying...worked-out kinda nice

Signed-In Members Don't See This Ad
See more from TonyL

TonyL

Member
Joined
Mar 9, 2014
Messages
8,915
Location
Georgia
I bought some blanks that were basically transparent (not knowing just how transparent they were). The only way I was able to make it work was by reverse paying (inside of the barrels) with Testors (light orange) knowing that the tubes were going to be highly visible. Not confident in my success, I used an inexpensive Designer kit and Hobby Lobby's 5 minute - 20 minute full cure epoxy (I actually let it cure for 3 hours). Well, it all worked. I am still using a cell phone camera and MS Picture Manager, so you can't appreciate the transparency and how nicely the painted barrels complement the pen - but I was pleased. I don't see myself playing around with these blanks anymore, but they put on quite a show when it all works-out. Who ever buys this one will not have another one like it (at least made by be :)).

Thanks for looking!
 

Attachments

  • Orange Designer Chrome.jpg
    Orange Designer Chrome.jpg
    122.5 KB · Views: 439
Last edited:
Signed-In Members Don't See This Ad

TonyL

Member
Joined
Mar 9, 2014
Messages
8,915
Location
Georgia
Thank you. I tried painting both the tubes and the barrels and I couldn't fit the tubes in the barrels. When I just painted the tubes, I was able to see the outline of the clear epoxy. I must have experimented with 3 semi-transparent blanks (4 including this one). Even when just painting the inside with Testors and a Q-tip), I had to give it several coats to fully hide tube and the it was a struggle to get the tubes in (which risks scraping-off the the reverse painting). I also used spray paint with no success. I also used pre-painted white tubes and again. could see the outline of the clear epoxy. The only thing I didn't try was a few Hail Marys, a couple of Our Fathers and lighting a few candles. :). Oh yeah, I also tried CA.
 
Last edited:

plantman

Member
Joined
Jan 2, 2012
Messages
3,437
Location
Green Bay, Wi
Tony; If you think you are going to paint either the blanks, tubes, or both, go to the next size larger drill bit when drilling your blanks. It helps if you have the 115 piece bit set from Harbor Freight (least expensive) that contains standard, letter, and numbered bits, along with a chart that gives you both fractional and decimal numbers. Drill a few thousandths over. Use thick or gap filling CA and you shouldn't see any lines. Jim S
 

TonyL

Member
Joined
Mar 9, 2014
Messages
8,915
Location
Georgia
I will give that a try....I have 2 or three transparent blanks left. Thank you!
 

BSea

Member
Joined
Dec 28, 2009
Messages
4,628
Location
Little Rock, Arkansas
Tony; If you think you are going to paint either the blanks, tubes, or both, go to the next size larger drill bit when drilling your blanks. It helps if you have the 115 piece bit set from Harbor Freight (least expensive) that contains standard, letter, and numbered bits, along with a chart that gives you both fractional and decimal numbers. Drill a few thousandths over. Use thick or gap filling CA and you shouldn't see any lines. Jim S
In most cases this is true, but drill 1st with the recommended bit. Then see how much play you have. Some combinations have more gap than others. You can always make the hole bigger.

With that blank, you could have painted the tube red, or yellow to change the orange hue. Transparent blanks can really be fun.
 

Band Saw Box

Passed Away Dec 8, 2021
In Memoriam
Joined
Sep 21, 2013
Messages
3,670
Location
Hampton, VA 23666
Looks really nice Tony. At the last meeting of the Hampton Roads Penturners Fred (PTownSubbie) talk about painting blanks and tubes. He said to back paint the blanks sliver to make the blank color pop, and use exoxy as CA will eat tge the paint. He did cover some other colors but I cant remember just what they did. You could send him a pm and ask.
 

plantman

Member
Joined
Jan 2, 2012
Messages
3,437
Location
Green Bay, Wi
Tony; If you think you are going to paint either the blanks, tubes, or both, go to the next size larger drill bit when drilling your blanks. It helps if you have the 115 piece bit set from Harbor Freight (least expensive) that contains standard, letter, and numbered bits, along with a chart that gives you both fractional and decimal numbers. Drill a few thousandths over. Use thick or gap filling CA and you shouldn't see any lines. Jim S
In most cases this is true, but drill 1st with the recommended bit. Then see how much play you have. Some combinations have more gap than others. You can always make the hole bigger.

With that blank, you could have painted the tube red, or yellow to change the orange hue. Transparent blanks can really be fun.

That is a good point Bob !! I always measure my tubes with a calipers or run them through a drill bit guage to see what size drill bit to use. Many times I find that the recommended size makes a very sloppy fit and can make for an off centered barrel when turned, even if you turn between centers. Sometimes it is required to go down a size in order to get a better fit also. Jim S
 

TonyL

Member
Joined
Mar 9, 2014
Messages
8,915
Location
Georgia
Painting and gluing

Looks really nice Tony. At the last meeting of the Hampton Roads Penturners Fred (PTownSubbie) talk about painting blanks and tubes. He said to back paint the blanks sliver to make the blank color pop, and use epoxy as CA will eat tge the paint. He did cover some other colors but I cant remember just what they did. You could send him a pm and ask.

I have tried that, but have not enjoyed the success that others experience. Whenever I add the slightest amount of paint to the epoxy (and I tried 4 different types of epoxy and let it cure well beyond the recommended curing time), the tubes slid some during assembly. I know that I am in the minority. I then experimented further:

I mixed to quarter-sized batched of epoxy: to one batch I added one small drop of acrylic paint and to the other I didn't add anything. I didn't glue anything to the batches, just cure on a plastic surface.

I let both cure for days.

The batch with the paint added never hardened like the un-tinted batch; it remained slightly rubbery (not sticky, just slightly rubbery.....that doesn't mean it won't hold).

So in my small mind :), I tried. I am going to "stick" LOL with the process I just used. I was also pleasantly surprised that the 5 minute working time/20 minute full cure epoxy from Hobby Lobby worked great (I did let it cure 3 hours though). It was 6 dollars after the 40% off coupon.

Thanks for the feedback and enjoy the rest of the weekend!
 
Last edited:

CrimsonKeel

Member
Joined
Mar 1, 2013
Messages
495
Location
Royal oak, MI
Tony i had a pink one like that and painted silver and didnt like how it turned out. was kind of muddy looking. So i think your idea of painting the color of the blank would work better for these super transparent blanks.
 

BSea

Member
Joined
Dec 28, 2009
Messages
4,628
Location
Little Rock, Arkansas
I mixed to quarter-sized batched of epoxy: to one batch I added one small drop of acrylic paint and to the other I didn't add anything. I didn't glue anything to the batches, just cure on a plastic surface.
A drop is too much in my experience. I mix my epoxy on some wax paper. I put a drop of color next to it, and when I'm mixing it, I take a toothpick and get just a bit of the color (much less than a drop). All you want to do is tint the epoxy. I have noticed that using to much will affect the glue setting up. I've never had a failure, but like you said, it's rubbery.

Frankly, if you paint the inside of the blank thoroughly, I don't see a need to tint the epoxy. I pretty much have quit doing this step. But I've done it a lot i the past with great results.


Tony i had a pink one like that and painted silver and didnt like how it turned out. was kind of muddy looking. So i think your idea of painting the color of the blank would work better for these super transparent blanks.
I use a medium silver/gray. A bright silver is similar to white. In most cases it will dull the blank. And I only use silver if I have multiple colors that are translucent. If you have just 1 color that's translucent, do your best to match the color. And in most cases I go a shade darker. If in doubt, then use the medium silver.

What I was told a long time ago was to think of the paint as primer in car painting, only in reverse. If the blank is really clear, then it's basically a tinted clear coat. You can't put primer (silver) directly under that. Do a coat of a matching solid, then after that dries to the touch, put the silver/gray next. Depending on the hole size, you may need to drill a slightly larger hole, or sand the hole. If it's a really clear blank, sanding may be required anyway to get the drill marks out of the blank.

Some people don't want to spend the time doing this much prep work. But the results can be stunning.
 

TonyL

Member
Joined
Mar 9, 2014
Messages
8,915
Location
Georgia
I have several muddies one that I will eventually re-drill (when I am really bored LOL). However, as I mentioned I know many others that have success with the other techniques.
 

Dalepenkala

Member
Joined
Dec 11, 2012
Messages
1,642
Location
Auburn, Michigan
I bought some blanks that were basically transparent (not knowing just how transparent they were). The only way I was able to make it work was by reverse paying (inside of the barrels) with Testors (light orange) knowing that the tubes were going to be highly visible. Not confident in my success, I used an inexpensive Designer kit and Hobby Lobby's 5 minute - 20 minute full cure epoxy (I actually let it cure for 3 hours). Well, it all worked. I am still using a cell phone camera and MS Picture Manager, so you can't appreciate the transparency and how nicely the painted barrels complement the pen - but I was pleased. I don't see myself playing around with these blanks anymore, but they put on quite a show when it all works-out. Who ever buys this one will not have another one like it (at least made by be :)).

Thanks for looking!

Looks good Tony!
 

JasonC

Member
Joined
Apr 27, 2014
Messages
286
Location
Honolulu, Hawaii
Looks good!

I use Gorilla 5-minute epoxy, reverse paint the blanks with Pactra RC spray paint (intended for use on polycarbonate RC car bodies), let the paint cure overnight, then mix epoxy and spray a small, quick shot of the Pactra right onto the epoxy and mix it into the epoxy.
 

OZturner

Member
Joined
Aug 5, 2013
Messages
6,662
Location
Sydney. NSW. Australia
Beautiful Pen Tony,
Spectacular Blank,
I will pass commenting on the paint and epoxy question, as you have had some good advice already.
Great Fit and Finish,
Brian.
 
Top Bottom