robutacion
Member
Golden Wattle "transforming"...! Part-1 "the Fungi"
Hi everyone
Nothing new about trees dying, rotting away and becoming part of the soil nutrients chain again but, some species do go through some interesting processes and stages, making them some how, intriguing and at the same time amazing.
Here in SA of Australia, Wattle tree species have short life expectancy, some of the reasons are, the "grubs" eating it (should be sweet timber...!), being attacked by bacteria and high soil moisture (particularly here in the hills). Trees are normally attacked while alive, becoming brittle and weak, snapping easily with the wind, and in contact with the ground (soil), they rot away in no time.
Anyway, spalted wood is also nothing new, most timbers will go through that process in the right conditions, some though "produce" a spectacular "show" to be admired and utilized, and this is the reason for this thread.
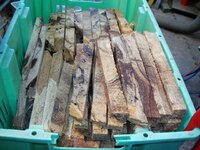
Last Year, I was given the opportunity to remove some half trees (the top half has been cut long ago) in a small block of land at the beginning of Town in the low part of the creek area where 2 water springs start and meet not far from the water source. This place has lots of trees, some native but mostly planted over the years, all do well as water is not problem...!
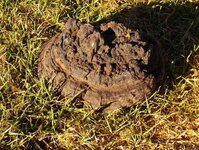
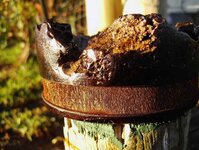
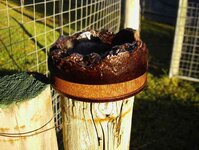
One particular tree butt (about 4 feet off the ground) did get my attention, as I could see something growing of the outer part of the bark, halfway up. This was an old Golden Wattle tree butt, that has been cut many years ago for some reason, that I'm not sure of, nor I have asked. This butt was very dark from age, and some how, of larger diameter than most Golden Wattles I've seen around, with these four (4) "mushrooms" 2 quite large, growing on it. These were obviously not mushrooms, but oversize tree fungus of some kind, hard"ish" shell and pretty solid construction for a fungus. A quick search has identified them as Fomes fomentarius "Hoof Fungus", this is my conclusion based on the author description of the fungi, and from some of his pics.
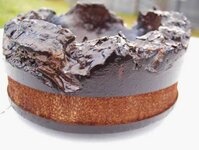
I wasn't sure what to do with them, nor of their toxicity so I put some rubber gloves on and removed the largest one as soon as I got home. At closer inspection, I started to think if it could be turned, one side was very smooth (like velvet), the other was looking like cork, indeed the whole thing, had pretty much, similar texture and feeling (weight) as natural cork. Again, unsure of the toxicity, I used a good breading mask and other safety precautions while turning and sanding it.
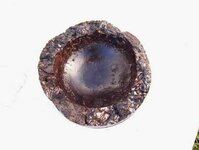
I can't say that was the hardest thing to turn, but it did require some sharp tools and gentle cuts, very similar to would be to turn a block of natural cork (rubbery but brittle). One of the problems that I had with the finish was that, anything I would put on it, including clear water, would make it very dark brown, spoiling the great look this stuff has as natural. The problem was that I needed to "seal" this fungi material, not only for durability but also for protection from hands contact, etc.
After a couple of quick coats of the tough floorseal coating, and some other tests after the piece was totally dry, I decided that would be quite safe to put it back in the lathe and remove a strip of the varnish from the outside, allowing the natural colour and texture to appear. The shape, well... its a natural edge piece with whatever the shape I found possible at the time to use the material shape and construction I had to work with for the first time!
I was/am quite please with the way it did turn up, when I didn't even knew if was workable or not, 12 months later, it hasn't changed anything at all, is exactly as I finish it a year ago, and that was also a non-factor.
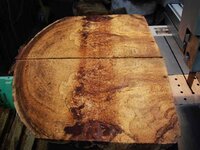
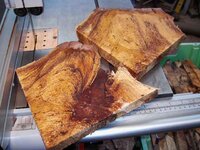
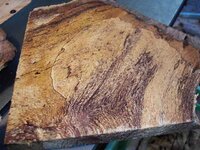
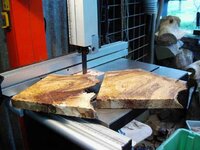
Interestingly, and the reason why I decided to "revive" the subject today (story and working process was posted on the Aussie forum, then!), is due to the fact that only today I decided to work on the whole removed butt, that has been getting lots of rain and all sorts of weather over it, since transported to the storage paddock. And yes, the other 3 mushrooms were still there, which I removed carefully, before I started slicing this butt/log into pieces (originally cut into 4 pieces for easy handling).
The slicing of today's timber, was also interesting, reserving a few surprises that I will talk about,and show the pics on part-2 of this thread, soon...!
Cheers
George
Hi everyone
Nothing new about trees dying, rotting away and becoming part of the soil nutrients chain again but, some species do go through some interesting processes and stages, making them some how, intriguing and at the same time amazing.
Here in SA of Australia, Wattle tree species have short life expectancy, some of the reasons are, the "grubs" eating it (should be sweet timber...!), being attacked by bacteria and high soil moisture (particularly here in the hills). Trees are normally attacked while alive, becoming brittle and weak, snapping easily with the wind, and in contact with the ground (soil), they rot away in no time.
Anyway, spalted wood is also nothing new, most timbers will go through that process in the right conditions, some though "produce" a spectacular "show" to be admired and utilized, and this is the reason for this thread.
Last Year, I was given the opportunity to remove some half trees (the top half has been cut long ago) in a small block of land at the beginning of Town in the low part of the creek area where 2 water springs start and meet not far from the water source. This place has lots of trees, some native but mostly planted over the years, all do well as water is not problem...!
One particular tree butt (about 4 feet off the ground) did get my attention, as I could see something growing of the outer part of the bark, halfway up. This was an old Golden Wattle tree butt, that has been cut many years ago for some reason, that I'm not sure of, nor I have asked. This butt was very dark from age, and some how, of larger diameter than most Golden Wattles I've seen around, with these four (4) "mushrooms" 2 quite large, growing on it. These were obviously not mushrooms, but oversize tree fungus of some kind, hard"ish" shell and pretty solid construction for a fungus. A quick search has identified them as Fomes fomentarius "Hoof Fungus", this is my conclusion based on the author description of the fungi, and from some of his pics.
I wasn't sure what to do with them, nor of their toxicity so I put some rubber gloves on and removed the largest one as soon as I got home. At closer inspection, I started to think if it could be turned, one side was very smooth (like velvet), the other was looking like cork, indeed the whole thing, had pretty much, similar texture and feeling (weight) as natural cork. Again, unsure of the toxicity, I used a good breading mask and other safety precautions while turning and sanding it.
I can't say that was the hardest thing to turn, but it did require some sharp tools and gentle cuts, very similar to would be to turn a block of natural cork (rubbery but brittle). One of the problems that I had with the finish was that, anything I would put on it, including clear water, would make it very dark brown, spoiling the great look this stuff has as natural. The problem was that I needed to "seal" this fungi material, not only for durability but also for protection from hands contact, etc.
After a couple of quick coats of the tough floorseal coating, and some other tests after the piece was totally dry, I decided that would be quite safe to put it back in the lathe and remove a strip of the varnish from the outside, allowing the natural colour and texture to appear. The shape, well... its a natural edge piece with whatever the shape I found possible at the time to use the material shape and construction I had to work with for the first time!
I was/am quite please with the way it did turn up, when I didn't even knew if was workable or not, 12 months later, it hasn't changed anything at all, is exactly as I finish it a year ago, and that was also a non-factor.
Interestingly, and the reason why I decided to "revive" the subject today (story and working process was posted on the Aussie forum, then!), is due to the fact that only today I decided to work on the whole removed butt, that has been getting lots of rain and all sorts of weather over it, since transported to the storage paddock. And yes, the other 3 mushrooms were still there, which I removed carefully, before I started slicing this butt/log into pieces (originally cut into 4 pieces for easy handling).
The slicing of today's timber, was also interesting, reserving a few surprises that I will talk about,and show the pics on part-2 of this thread, soon...!
Cheers
George
Attachments
-
 Timbers preparation 009_(1)_(1).jpg99.3 KB · Views: 277
 -
 Timbers preparation 014_(3).jpg99.7 KB · Views: 270
 -
 Timbers preparartion 008_(1).jpg49.3 KB · Views: 258
 -
 Timbers preparartion 015_(1).jpg67.9 KB · Views: 255
 -
 Timbers preparartion 013_(1).jpg67.2 KB · Views: 253
 -
 Timbers preparartion 002_(1).jpg35.4 KB · Views: 245
Last edited: