Bic sticks?

Signed-In Members Don't See This Ad

sorcerertd

Member
Joined
Sep 30, 2019
Messages
2,655
Location
North Carolina, USA
I've seen a few pictures of converted Bic pens out there. Basically someone turned and drilled a piece of wood and put a bic "cartridge" in it. Some even have made holders to stick on the fridge like this pic I found on pinterest. I was thinking of trying a few. Obviously, most people here make higher end pens, but has anyone made these? Any knowledge to share on them?

Hand turned pen and fridge magnet combos.jpg
 
Signed-In Members Don't See This Ad

monophoto

Member
Joined
Mar 13, 2010
Messages
2,542
Location
Saratoga Springs, NY
I've done many of these - they are great giveaway pens for store clerks, waitresses, bartenders, etc. And they are skill builders for the turner - very good projects to practice skew work.

The idea is to turn a spindle with an on-axis hole to receive a Bic refill. I've never seen the refills on sale by themselves, but you can buy clear plastic Bic Stick pens by the dozen in big box stores (I get them at Target) for about 12 cents each - pull the refill out of the plastic sleeve that you then throw away, and make a nice wooden covering. The refill has a plastic nib that is retained as part of the finished produce - that nib has a 5/32" diameter that fits into a matching hole in the end of the turning.

Here's my approach:
1. Mount a 5 1/2" - 6" long scrap of wood between centers, and turn to round, Turn a tenon on one end.
2. Grip the tenon in a chuck. I prefer a collet chuck, but a scroll chuck works also.
3. Carefully drill a 5" deep 9/64" hole in the blank. I start with a center bit, and then advance to a jobber-length 9/64" bit that I grip in the tailstock mounted jacobs chuck so that only 1/2" or so of the bit is exposed. The objective is to start this very thin hole exactly on-axis with no wobble at all. After drilling the first 1/2" with the jobber bit, I switch to a 9/64" 'aircraft' bit that is about 6" long to drill the rest of the hole, pausing frequently to back the bit out and clear the swarf. This step is critical - if swarf builds up in the flutes of the bit, friction will cause the blank to overheat and potentially crack. DAKHIKT
4. Once the bit has reached the full 5" depth required to receive the refill, leaving the bit in the hole, I remount the jacobs chuck in the headstock (with a drawbar) so that the drill bit effectively becomes a mandrel to support the blank as it is being turned. I bring the tailstock up to support the end, and finish turning the body.
5. One of my quirks is that I then use a #65 wire gauge drill bit held in a pin vise to drill a hole near the end of the pen, from the outside of the pen body into the inside cavity. This hole serves as a breather - as the pen is used and ink is depleted, it allows air to enter the pen body to displace the ink. If the breather hole were not there, it is possible for depletion of the ink to draw a vacuum inside the pen body that could interfere with ink flow. As I say, this is a personal quirk - it's probably not necessary, but I do it.
6. Finally, part off the end leaving the pen about 5 1/4" long (that is, leaving about 1/4" of solid wood at the end of the pen). Sand and finish using a quick friction polish.
7. Pull the pen body off the 9/64" drill bit/mandrel, mount a 5/32" jobber bit in the jacobs chuck, and then redrill the end of the bit to the larger diameter.

Note the use of a 9/64" bit to drill the cavity in the pen body. Most instructions suggest drilling the body using a 5/32" bit to match the diameter of the nib of the Bic refill, but I found that the process of turning the pen causes that hole to become enlarged enough that the Bic refill no longer fits snugly into the hole. A solution to this problem suggested by the Australian turner Brendan Stemp is to wrap a couple of layers of PTFE tape (plumber's tape) around the nib before inserting it into the wooden body. But I found that drilling the cavity with a 9/64" bit, and then redrilling the first 1/2" of the hole with a 5/32" bit after completing the pen works just as well and avoids the potential problem of that little bit of white teflon tape showing at the end of the pen.
 

DrD

Member
Joined
Jun 26, 2019
Messages
1,104
Location
Columbus, Mississippi
Todd, those look like they would be just the ticket at a craft show - if they ever come back; or stocking stuffers at Christmas. I like them!
 

Dale Parrott

Member
Joined
Feb 22, 2012
Messages
286
Location
Goshen, Indiana
Todd, I like your simple and clean design, very nice!

I've made a few of those also. Most of the ones I've seen are closed end and turned on a mandrel of some sort. In looking at you photo it looks to me that you've turned between centers and plugged the end. Is that correct? Just courious, if you plugged the end what did you use for that?
 

sorcerertd

Member
Joined
Sep 30, 2019
Messages
2,655
Location
North Carolina, USA
Todd, I like your simple and clean design, very nice!

I've made a few of those also. Most of the ones I've seen are closed end and turned on a mandrel of some sort. In looking at you photo it looks to me that you've turned between centers and plugged the end. Is that correct? Just courious, if you plugged the end what did you use for that?

These aren't mine. I just grabbed the pic off pinterest to use as an example of what I was asking about here. I made one of these, my first pen actually, but It was a lot shorter and I cut off the ink tube to fit. Wasn't even a bic "cartridge". Writes worse than it looks. LOL.

Sounds like my trouble here will be that I have a Jet 1015 and an 8" drill press, neither of which gives me enough room to drill that length. I'm pretty sure I can find a way to make something work, probably not with much precision. Cap'n Eddie has a monster of a lathe there.
 

monophoto

Member
Joined
Mar 13, 2010
Messages
2,542
Location
Saratoga Springs, NY
Todd

I understand the concern - a lathe with a 10" bed doesn't give you a lot of room to drill in the conventional fashion when to take into account the headstock chuck holding the blank, the length of the jacobs chuck, and the length of the drill bit. But let me suggest at least trying before giving up.

I mentioned Brendon Stemp - he has a video on Bic sticks in which he takes a non-conventional approach to drilling. Instead of mounting the drill bit in jacobs chuck in the tail stock, he starts by putting a center dimple on the end of the blank (spin the blank, and then use a skew to cut the dimple in the exact center of the blank). Then, he uses a hand-held bit to drill the hole. Because he starts with a dimple in the exact center, and by advancing the drill bit slowly, it will usually remain on axis. The bit required for Bic sticks is very small and I would not recommend trying to hand-hold one - I think vice grips would be a better option.

It is critical that the bit drill a straight hole. If you try to force the bit into the wood, it can follow the boundary between hard wood (winter growth) and softer wood (summer growth) and veer off to one side. Then, when you try to turn the body of the pen, you find that the hole comes out the side. DAMHIKT. The secret is to have the lathe running fast enough for the leading edge of the bit to cut a hole in the wood, while advancing the bit slowly enough that it isn't being forced, but rather smoothly flows into the hole cut by the leading edge of the bit. Takes a bit of finesse. Lubricating the bit can help - Brendan also uses linseed oil as a lubricant on the bit. I've not tried that, but I do occasionally wipe a little paraffin on the bit (the ordinary canning variety from the supermarket).
 
Last edited:

darrin1200

Member
Joined
Mar 17, 2010
Messages
1,835
Location
Lyn, Ontario, Canada
These aren't mine. I just grabbed the pic off pinterest to use as an example of what I was asking about here. I made one of these, my first pen actually, but It was a lot shorter and I cut off the ink tube to fit. Wasn't even a bic "cartridge". Writes worse than it looks. LOL.

Sounds like my trouble here will be that I have a Jet 1015 and an 8" drill press, neither of which gives me enough room to drill that length. I'm pretty sure I can find a way to make something work, probably not with much precision. Cap'n Eddie has a monster of a lathe there.

Not sure what the sized of the through hole on the Jet headstock spindle is. But I am guessing almost 3/4"
If you pick up a Collet Chuck, you can do what I do. If you turn the blank round first, you can push it through the collet chuck, all the way through the head stock. This will leave lots of room for drilling, and it keeps the end of the blank close to the chuck for lots of support.
This will also work with a normal chuck, if it has a large enough hole through the center.
 

monophoto

Member
Joined
Mar 13, 2010
Messages
2,542
Location
Saratoga Springs, NY
Not sure what the sized of the through hole on the Jet headstock spindle is. But I am guessing almost 3/4"
If you pick up a Collet Chuck, you can do what I do. If you turn the blank round first, you can push it through the collet chuck, all the way through the head stock. This will leave lots of room for drilling, and it keeps the end of the blank close to the chuck for lots of support.
This will also work with a normal chuck, if it has a large enough hole through the center.

I was initially confused by this post, but I think what Darrin is saying is that he turns the blank round, and then mounts it in a collet chuck with most of the blank inside the headstock spindle. As a result, the length of the blank doesn't subtract from the working length of the lathe bedways.

Unfortunately, I'm not sure this is a good ideal. For this to work, the blank has to be turned to a diameter that is less than the bore of the headstock, and that could be an obstacle with many lathes. Remember that there is a morse taper at the end of the bore, and the internal diameter of a standared MT2 taper at its small end is 0.572", so that is the maximum diameter of a blank that will fit inside the bore. So the maximum diameter that the blank could have is only slightly more than 1/2" - and that's risky because a thin blank is far more likely to crack due to heating from swarf buildup in the drill bit flutes.

The other concern here is that my experience is that drilling the very small hole required for Bic sticks is tricky. Small diameter drill bits can flex, and its not uncommon for the bit to wander off axis and out of the side of the blank. That's not a good thing, but at least if the full length of the blank is visible, you can tell when it happens and stop drilling. But there would be no way to know if that happens if the blank is contained within the headstock bore, possibly causing damage to the headstock.

Sadly, Brendan Stemp appears to have taken down all of his YouTube videos including the one on Bic pens. I did find this video by Phil Cooke in which he demonstrates drilling using a hand-held drill bit. He uses a 1/8" inch bit for the body cavity rather than the 9/64" bit that I use -1/8" is large enough to contain the Bic refill, and many hardware stores will have 1/8" x 6" bits in stock, while a 9/64" bit will usually have to be ordered from a specialty supplier (or Amazon). But as I said in the previous post, I suggest drilling the entire hole at either 1/8" or 9/64", turning the pen body, and then redrilling the first 1/2" or so of the hole with a 5/32" bit after the pen has been completed. But all of this constitute variations on the theme of how the cat can be skinned. Phil didn't mention the hole depth - the Bic refill is 4 7/8' long, so I make the hole 5" deep.

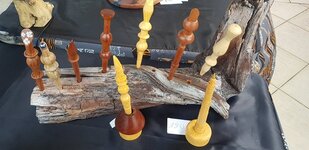
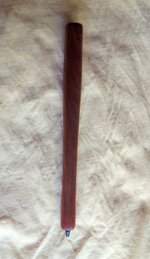
Two additional points - first, I prefer to keep the design of the pen simple - I like to taper the body from the nib to the end of the pen, with a slightly narrowed section (basically, a very long, very shallow cove) about 1 1/2" back from the nib - I think this makes the pen more comfortable to hold. The optimum diameter of the body is somewhere between 3/8" and 1/2" - any thinner and the pen becomes too fragile and hard to hold, and any thicker and it's too bulky. And I make the overall length between 5 1/4" and 5 1/2", and apply minor creative treatments only at the end - grooves, domes, flats, etc. And if possible, I hide the 'breather hole' I discussed earlier in a groove so that it is almost completely invisible.

Second, and this is a real nuance - my experience is that if the nib-end of the pen is too thin, the stress of inserting the refill into the 5/32" hole can cause the wood to split - and the risk tends to vary depending on the timber being used. So I try to make the taper very shallow, and round the shoulder at the nib so that the wood is just a bit thicker at that point of stress.
 
Last edited:

sorcerertd

Member
Joined
Sep 30, 2019
Messages
2,655
Location
North Carolina, USA
I can see where the collet chuck thing would work, but I don't have one yet, so I'll hold off on trying that for a bit. Theoretically, I could turn a taper and stick it right in the mt2 headstock, but I don't want a wandering drill bit to put any gouges in there.

I suppose I could segment/stack pieces, too. That would allow for shorter pieces to drill. Probably not much trickier than some of the other options.
 

eteska

Member
Joined
Oct 29, 2019
Messages
261
Location
Wisconsin
Finished my first bic sticks. Finished with ob shine juice. Left two are cherry and the one in the right is Apple. I had to cut the "refill" in half because of the short drill bit I had on hand.

Fun project. I'll definitely be making more. Ordered an appropriate length drill bit and box of bics tonight.
IMG_3713.JPG


Sent from my iPhone using Penturners.org mobile app
 

Attachments

  • IMG_3718.JPG
    IMG_3718.JPG
    264.9 KB · Views: 176

monophoto

Member
Joined
Mar 13, 2010
Messages
2,542
Location
Saratoga Springs, NY
I got the latest PSI catalog in the mail yesterday, and noticed that they now offer a kit that uses Bic refills (called the Icon). I actually quite like a lot of PSI products, so I'm not part of the anti-PSI crowd. That said, some of their pen kits are a bit too gaudy for my taste.

But that started me thinking - Bic sticks are sometimes referred to as '12 cent pens' because the refills can be purchased for as little as 12 cents in some of the big box stores. But that's not the actual cost of the pens, and I was wondering exactly how much went into making one of these in the traditional fashion (ie, not using a PSI kit). Here's my analysis:

  • Refill - 12 cents when bought in bulk and when the price is right, but a more conservative number might be 15 to 20 cents.
  • Wood - depends on the timber. The blank required is about 0.042 board feet, and with a good domestic hardwood at $25 per board foot, that comes out to about $1.04 cents.
  • Shop consumables - abrasives, finishes, etc. This is a hard number to determine but given the size of the pen, 10 cents might be a conservative estimate.
  • Depreciation on tools - another very hard number to know (and probably not relevant for those of us who do this as a hobby), but 5 cents might be a reasonable number.
  • Labor - another irrelevant number for those of us who are hobbyists, but in a business setting this could be the dominant component of cost since it takes upwards of 30 minutes to make a pen. If you assess the base labor cost at $20 per hour, that's $10 to each pen.

So the bottom line is that a conservative estimate of the cost built into each of these pens is about $1.34 cents when done as a hobby, or $11.84 when done as a business.

For what it's worth - - -
 

sorcerertd

Member
Joined
Sep 30, 2019
Messages
2,655
Location
North Carolina, USA
I got the latest PSI catalog in the mail yesterday, and noticed that they now offer a kit that uses Bic refills (called the Icon). I actually quite like a lot of PSI products, so I'm not part of the anti-PSI crowd. That said, some of their pen kits are a bit too gaudy for my taste.

That's actually pretty cool. I was wondering how I could make caps for them. It would certainly be easy to drill those with my Fisch bit.

FWIW, I like a lot of the PSI kits, too. The only real problems I've had were with the "antique" finishes. They seem hit and miss, easily scratched and sometimes with stuff stuck in the finish right from the factory.
 

Danny 2021

Member
Joined
Feb 25, 2021
Messages
7
Location
South Africa
I've done many of these - they are great giveaway pens for store clerks, waitresses, bartenders, etc. And they are skill builders for the turner - very good projects to practice skew work.

The idea is to turn a spindle with an on-axis hole to receive a Bic refill. I've never seen the refills on sale by themselves, but you can buy clear plastic Bic Stick pens by the dozen in big box stores (I get them at Target) for about 12 cents each - pull the refill out of the plastic sleeve that you then throw away, and make a nice wooden covering. The refill has a plastic nib that is retained as part of the finished produce - that nib has a 5/32" diameter that fits into a matching hole in the end of the turning.

Here's my approach:
1. Mount a 5 1/2" - 6" long scrap of wood between centers, and turn to round, Turn a tenon on one end.
2. Grip the tenon in a chuck. I prefer a collet chuck, but a scroll chuck works also.
3. Carefully drill a 5" deep 9/64" hole in the blank. I start with a center bit, and then advance to a jobber-length 9/64" bit that I grip in the tailstock mounted jacobs chuck so that only 1/2" or so of the bit is exposed. The objective is to start this very thin hole exactly on-axis with no wobble at all. After drilling the first 1/2" with the jobber bit, I switch to a 9/64" 'aircraft' bit that is about 6" long to drill the rest of the hole, pausing frequently to back the bit out and clear the swarf. This step is critical - if swarf builds up in the flutes of the bit, friction will cause the blank to overheat and potentially crack. DAKHIKT
4. Once the bit has reached the full 5" depth required to receive the refill, leaving the bit in the hole, I remount the jacobs chuck in the headstock (with a drawbar) so that the drill bit effectively becomes a mandrel to support the blank as it is being turned. I bring the tailstock up to support the end, and finish turning the body.
5. One of my quirks is that I then use a #65 wire gauge drill bit held in a pin vise to drill a hole near the end of the pen, from the outside of the pen body into the inside cavity. This hole serves as a breather - as the pen is used and ink is depleted, it allows air to enter the pen body to displace the ink. If the breather hole were not there, it is possible for depletion of the ink to draw a vacuum inside the pen body that could interfere with ink flow. As I say, this is a personal quirk - it's probably not necessary, but I do it.
6. Finally, part off the end leaving the pen about 5 1/4" long (that is, leaving about 1/4" of solid wood at the end of the pen). Sand and finish using a quick friction polish.
7. Pull the pen body off the 9/64" drill bit/mandrel, mount a 5/32" jobber bit in the jacobs chuck, and then redrill the end of the bit to the larger diameter.

Note the use of a 9/64" bit to drill the cavity in the pen body. Most instructions suggest drilling the body using a 5/32" bit to match the diameter of the nib of the Bic refill, but I found that the process of turning the pen causes that hole to become enlarged enough that the Bic refill no longer fits snugly into the hole. A solution to this problem suggested by the Australian turner Brendan Stemp is to wrap a couple of layers of PTFE tape (plumber's tape) around the nib before inserting it into the wooden body. But I found that drilling the cavity with a 9/64" bit, and then redrilling the first 1/2" of the hole with a 5/32" bit after completing the pen works just as well and avoids the potential problem of that little bit of white teflon tape showing at the end of the pen.
I have a slightly different approach, but with similarities. I drill the hole through, so my pens are open on both sides. I used to use a 3.5mm (very close to your 9/64") drill and enlarge the two ends with a 4mm (ca 5/32) drill. When the 3.5mm drill broke, I replaced it with a 4mm drill and now drill a 4mm hole straight through. However, since (as you mention) you can only drill about 4 x diameter at a time, the repeated entering of the drill tends to make the hole slightly oversize, so if I need to replace a drill again, I will go back to 3.5mm. I order a 220mm (about 8 1/2") jobber drill online since they are not available in South Africa, where I live. (We only get 6mm and thicker in longer lengths).

I initially had issues with the wood splitting along the hole when turning between centres. I sorted this issue by putting a 4mm pop rivet (aluminium) in the hole before placing it in the lathe.

My biggest issue used to be getting the hole through the length of wood without going out the side. Before I managed to get hold of a long drill, I tried drilling from both sides and ended up losing up to half my attempts. I now tend to start with thicker pieces of wood, and it the hole is not completely centre, I still have enough wood left to turn a pen. To get the hole as straight in as possible, I put a 3.5mm standard drill bit in a chuck on the drive end of the lathe. I then put the piece of wood to be drilled between the drill and the live centre and drill a guide hole. I then complete the hole by hand drilling it the rest of the way.

I use all kinds of wood, whatever I can lay my hands on. Part of the fun is to use wood that is not quite your normal woodworking wood. Some of the woods are impossible to drill through the length of the wood. One example would be Rhodesian teak, which is very hard. Somehow, the drill bit would overheat, get stuck in the wood and break. Once a bit got stuck in the wood, the only way to remove it is to split the wood, and even that sometimes cannot save the bit. For these woods, I laminated two pieces of wood after cutting grooves in each half of the laminate. I then just finish the hole after glueing the two pieces and turn it as normal. The picture is an example of one of these pens. Rhodesian teak is such a beautiful wood, I love working it even if I have to sharpen my tools after turning one or two of them.
 

Attachments

  • Rhod teak 01 002.jpg
    Rhod teak 01 002.jpg
    216.5 KB · Views: 138

monophoto

Member
Joined
Mar 13, 2010
Messages
2,542
Location
Saratoga Springs, NY
Danny -

Thanks for your feedback.

Some more details on my approach - I only drill from one end of the blank. My experience is that a small drill can flex and drift a bit, and if I try to drill from both ends, the holes don't always meet in the middle. Whoops.

But there are two key but subtle points. First, I advance the drill very slowly to try to minimize drift. I want the end of the bit to cut a hole and then have the bit move into that hole as it advances. If I advance the bit too quickly, I end up forcing the bit into the wood before a hole has been cut, and that increases the risk that the bit will wander off axis. That's especially true with timbers that have a pronounced grain pattern with alternating layers of hard (winter growth) and soft (summer growth) wood - in that situation, the bit wants to drift along the grain lines to stay in the softer wood. So advance the bit slowly, and withdraw it frequently to clear the swarf.

Second, I use the drill bit as a mandrel to support the blank as I turn the outside shape. If I just center the tailstock on the original measured center of the blank, it is possible that a drifting bit could have cause the hole to deviate from the ideal axis through the center of the blank, and when I turn the outside, its not unusual to find that the hole has gone through the side of the blank. Another whoops. To minimize that risk, I assume that the bit has drifted somewhat, so I start the lathe spinning slowly with the blank on the bit/mandrel, and then bring the tailstock up to capture the actual center of rotation of the end of the mandrel. If the hole is straight, then when I turn the outside to a true spindle, there will be about the same amount of material all around the hole for the full length of the pen.
 
Top Bottom