awwww man.

Signed-In Members Don't See This Ad

RAdams

Banned
Joined
Apr 5, 2009
Messages
2,983
I am kinda bummed. It is an hour drive to a decent sized town that would have fancy stuff like Baltic Birch plywood.

I was recently in town and found myself in the market for some said plywood. Needing a piece at least 30" X 18 " to make a table saw frame miter sled, i was excited to find a 30X24. I brought it home with me, and just stacked it in my shop.

Tonight, i went back to the website with the sled building directions. It said that the 30" measurement is critical. So, out of curiosity, i grabbed a tape and measured the plywood hunk. 29 11/16" by 23 3/4". I really expected the measurements to be correct. Granted, this is the first piece of plywood i have bought from this source. I have bought hunks of solid exotics there that were always correct on the measurements. What a bummer. Now i will either have to drive an hur one way to get a different piece of wood, or try to make it work which would mean figuring out all the measurements all over.


Moral of the story... Carry a tape measure when you plan to buy pieces of plywood.
 
Signed-In Members Don't See This Ad
I am kinda bummed. It is an hour drive to a decent sized town that would have fancy stuff like Baltic Birch plywood.

I was recently in town and found myself in the market for some said plywood. Needing a piece at least 30" X 18 " to make a table saw frame miter sled, i was excited to find a 30X24. I brought it home with me, and just stacked it in my shop.

Tonight, i went back to the website with the sled building directions. It said that the 30" measurement is critical. So, out of curiosity, i grabbed a tape and measured the plywood hunk. 29 11/16" by 23 3/4". I really expected the measurements to be correct. Granted, this is the first piece of plywood i have bought from this source. I have bought hunks of solid exotics there that were always correct on the measurements. What a bummer. Now i will either have to drive an hur one way to get a different piece of wood, or try to make it work which would mean figuring out all the measurements all over.


Moral of the story... Carry a tape measure when you plan to buy pieces of plywood.


I cant see why a sled frame needs such critical measurements but you can always add a borderframe around it in contrasting wood. It would make a classy sled.
 
Tonight, i went back to the website with the sled building directions. It said that the 30" measurement is critical. So, out of curiosity, i grabbed a tape and measured the plywood hunk. 29 11/16" by 23 3/4".

Baltic birch plywood is sold in metric sized sheets. The sheets are about 5' x 5', and the thickness isn't an imperial thickness either. 8mm, 12mm, and 18mm are the most common thicknesses.

That said, I can't believe the measurement is that critical. Just reduce the sizes of everything by the same 5/16" x 1/4"
 
The store i bought this piece from sells pieces as well as whole boards. I was trying to save a few bucks considering the "30 by 24" was $20. The 18 inch measurement called for in the instructions isn't critical, but the 30 inch measurement is critical for using the supplied measurements to get to the needed angles for segments, or at least close to them. If i use a smaller sled, the measurements for where to clamp the other end of the fence will be wrong. I am liking the border idea. I have enough Brazilian Cherry to do a slick border i think. Just wish i had a planer. Thanks for the brainstorm guys!!! This might turn out to be a really cool save!
 
Last edited:
Just move the runner over 5/16". The size of the sled shouldn't make a difference in segments, it's the angles that are important.
 
Having built my share of tablesaw crosscut sleds, I cannot understand why the width is critical. As long as you centered the board on the blade, you will have equal amounts of board to each side of the blade. Just out of curiosity, what plan are you working with? I would like to take a look at it. I built one recently from a plan developed by John Nixon who operates a woodworking blog called "Eagle Lake Woodworking". After I built it, I sent him shots of the improvements I added to his design, which he eventually published along with his plan.

Bob McCormick
 
http://www.turnedwood.com/framesled.html


I don't know the owner of this wbsite, and have no idea if what he is saying is accurate, but i do know he has some amazing segmented pieces on his site, and his sled looks pretty straight forward. He says that the 30" measurement is important to make all of the other angle measurements accurate, which makes sense to me. This will be my first attempt at making a sled, and segmenting, so i would like to start with something that is going to work. I don't want to have to waste a bunch of material figuring out the correct angles, or worse get aggravated and give up.


I dont remember where i found these instructions from. I have a very basic woodworking shop. So basic in fact, I will be buying my first ever set of clamps tomorrow. This sled appealed to me because it doesn't have all of the fancy stuff to buy. a sled with two runners, and a fence.

It also appealed to me because all of the math is done for the most part. I don't even know what tool you would use to determine exact angle measurements, let alone own one of em, so knowing the right place to set the fence out of the gate is pretty cool.
 
Thanks for the link to the miter sled article. Found it very interesting. I see now why the 30" dimension is so critical. He based all his math calculations on this dimension. In order to utilize the table he supplies for dimension "A", you have to measure down from a point that doesn't exist on the sheet goods you bought. As someone suggeted earlier, probably best fix is to add an edge strip to the left side of board.
 
http://www.turnedwood.com/framesled.html
It also appealed to me because all of the math is done for the most part. I don't even know what tool you would use to determine exact angle measurements, let alone own one of em, so knowing the right place to set the fence out of the gate is pretty cool.

Ron; You have to use either Math or Measurement to get the angle correct, and even at that, you will have to fine tune the fence.
When doing segmented work, the usual process is to get as close as possible, assemble the segments into a two half rings and then sand the two half rings flat, glue the two rings together. This is true even with one of the high dollar fences like Incra.

The math for the side cut angle is fairly straight forward. Multiply the number of sides by 2 and and divide that into 360 degrees. ie for a 12 sided figure 12 x 2 = 24
360 divided by 24 = 15 degrees.

I looked at the math formula he gives, and I'm not sure it is correct. His results are super though!
 
Have not made that one, and suspect a dimensioning error -- the 3 inchs should be to the center of the bolt instead of the end of the board to provide consistent measurements -- that corner shown rotates and moves --

Take the error out of the 2 inch dimension from the right edge of the ply -- best detailing in the drawing would measure from the center of the pivot bolt as the control point -- Good practical layout - and only an engineer, draftsman, or machinist would be picking grit on the dimensioning --

Think it through with the bolt being the control and you can make it work!!!
 
Randy, I have tape measures, and rulers, so measuring is no problem. I also own several calculators so the math part shouldn't be too big a deal. It would be much easier for me to measure to find the angles than to try to devise some sort of guage to figure out what the approx. angle is.

In the directions for the sled, He mentions that you will have to get the fence close, and fine tune from there. In fact, with his version, i don't think he sands the two half circles. If he does, he doesn't mention it. I also remember reading from a friend a while back that doing the half circles, and then sanding the ends actually does more harm than good. Unless you don't mind that your pattern isn't near perfect anymore, And i flat out trust that source more than anyone on this site (no offense intended. This guy sells segmented pieces for THOUSANDS of dollars each, and they are worth it! He is a Generational woodworker.)

I am sure there are WAY better sleds out there, but i want to start with this one. It is Uber cheap, and looks really easy to use.
 
After going to the website and looking at Figure 5, you have an opportunity for improvement in the sled. Measurement C which he has fixed in the calculations at 3" actually varies as you move the sled fence up and down to change Measurement A. Thus the calculations are wrong and get very complex to correct if you use his measurement points. However if you change the measurement reference points the calculations are easier and you can use the plywood you brought.
I would suggest the following changes:
(Side "A" left side of Website diagram, Leading edge is top of Website diagram)

  • Center the Right-hand runner precisely 27.00" from Side "A".

  • Precisely place the pivot hole such that it is centered on the Right-hand runner and the edge of the sled fence is 3.00" from the leading edge.
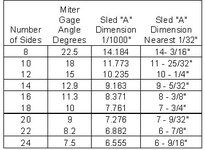
Now using the Excel spreadsheet referenced in Fig. 5 of the website and plugging 27" in for "B" you get the following table

moz-screenshot.png


Hopefully these changes make sense.
 

Attachments

  • Sled.jpg
    Sled.jpg
    57.3 KB · Views: 137
Since you seem to be interested in segmented work, you might be interested in the MiterSet which is a very simple item that gives you perfect miters for a reasonable cost. This item has been talked about in this forum previously. The link to their website follows:
Here are links to previous forum articles on the MiterSet tool:
 
Last edited:
Since you seem to be interested in segmented work, you might be interested in the MiterSet which is a very simple item that gives you perfect miters for a reasonable cost. This item has been talked about in this forum previously. The link to their website follows:
Here are links to previous forum articles on the MiterSet tool:

I purchased one of these and it works awesome!! I use it all the time. For the cost of one piece of plywood you can buy one of these and use scrap wood on your miter gage and get accurate cuts without building a fancy sled.

The right cut every time!!
 
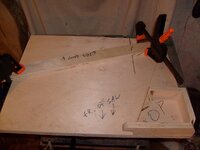
well here is my starter version. Equipped with a little box built right on the top, with a built in push block as well. When i eventually saw through the fence like i know i will, I am going to move it back more toward the "box" a few inches. I am also going to add a couple of those little quick release clamp thingies to hold the material while i cut. I also think i am going to get some keystock to use as the runners. I think that would offer a much more accurate fit.
 

Attachments

  • 1_miter_sled.JPG
    1_miter_sled.JPG
    80.8 KB · Views: 180
Back
Top Bottom