Arbor Press?

Signed-In Members Don't See This Ad

Todd in PA

Member
Joined
Feb 16, 2021
Messages
645
Location
Port Matilda, PA
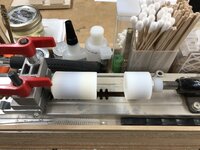
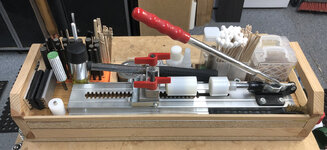
To get started, I bought a PSI package that included this pen press.

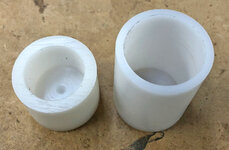
I'm getting frustrated by cracks appearing in my finished work when using this.
60E2F7CB-8E61-4841-AF8C-C14F750E6295.jpeg

I bought some reamers to widen the tubes prior to assembly. But I'm really thinking that I shouldn't have to ream every tube, especially on solid, relatively thick wood like this one (wenge).

I think the problem may be with the alignment of the part going in crooked, which is tough to see looking straight down and using my chubby fingers to hold part and blank with one hand.

So I'm thinking about an arbor press. How many of you use one? Has it improved your success rate?

Thanks!
 
Signed-In Members Don't See This Ad

KenB259

Member
Joined
Dec 24, 2017
Messages
3,537
Location
Michigan
I have an arbor press and to be honest, you'll probably crack more using an arbor press, if you're having trouble getting things lined up initially. You can apply much more force with an arbor press than that PSI assembly press. I use the spring loaded, lathe mounted one that PSI sells, I love it. It's easy to see all around the blank and you can apply pressure very gradually to make sure things are aligning nicely.
 

wrjones224

Member
Joined
Mar 15, 2020
Messages
156
Location
Kentucky
I use a simple arbor press from Harbor Freight. I crack a pen here and there but otherwise have much success with it. I have never used a the pen press above so I don't know how it compares.
 

keithbyrd

Member
Joined
Sep 2, 2011
Messages
2,492
Location
Mount Wolf, PA
I use a Milescraft Penpress and mount it upright. I find it much easier to hold the parts in alignment as Start pressing than when it is horizontal. I probably haven't cracked a blank in the last 5 years. But Before I assemble I always use an exact knife to ensure the tube opening is clean, a reamer to ensure there is no burr and a bore cleaning brush to remove any dust, particles etc inside the tube.
 

monophoto

Member
Joined
Mar 13, 2010
Messages
2,542
Location
Saratoga Springs, NY
I just use my drill press. I measured across the corners of a bolt, and then used a forstner bit to drill a hole about 1/8" deep in end-grain in a scrap of wood (actually, a cutoff from a pen blank). and then glued the head of the bolt into that hole using epoxy. To use, I mount the bolt in the chuck of the drill press so that the small scrap of wood serves as a cushion on one end of the press, and put a scrap of wood on the table, line up the pieces, and rotate the handle. So essentially the drill press is acting as an arbor press.

But the key issue remains the same regardless of what kind of tool you use to press the pieces together - if you don't line up the components correctly, pressing them together will distort the end of the tube and cause the turning to split.
 

NJturner

Member
Joined
Dec 4, 2006
Messages
155
Location
New Jersey, USA.
I have both an arbor press and a pen press that I bought years ago. The issue with either is ensuring that the parts are really prepared and lined up well before applying pressure. The arbor press, due to its beefy structure, doesn't change angles, but it is more difficult to get everything set up perfectly to ensure that all is aligned. The pen press has a lot more slop in the movement causing possible issues, and depending on the design, it can flex as more pressure is applied causing even more issues.

Lately, I have been moving more to Ken B's choice of using the lathe to do the work. It provides the greatest sightlines for alignment, is very controllable, and there is lots of clearance to hold everything where it needs to be.

I don't experience much in the way of cracking with any of these solutions however - but I can say that I spend a lot of time beforehand making sure there is no remaining glue in the tubes, that everything is clean and ends are reamed. I think the added prep work delivers more value than the actual device used.
 

egnald

Member
Joined
Jun 9, 2017
Messages
3,061
Location
Columbus, Nebraska, USA
Greetings from Nebraska.

I use same press from PSI with a slight modification. I didn't like the hard aluminum piston and the UHMW piece with the tapered hole in the center. I found that the taper (presumed to be for the tip) was denting the tips ever so slightly, but the reflection in the plating made the deformation very obvious. So, I pressed offset from center until I had the tools and stuff to make a couple of HDPE sleeves for the pistons on the press. The softer (and flat) HDPE sleeves have been working great for me.

I used to crack pens like in your picture. Sometimes the wood species was a contributing factor. I don't know how prone to cracking Wenge is, but it is relatively soft compared to the Ebony's, Lignum Vitae, and such so I thought it would be less likely to crack.

As a standard part of my regimen, I use a small hand reamer to give the brass a very light de-burr and/or lead in. I also use a chainsaw file in the tubes just to make sure there isn't any glue residue in there that could make things press too tightly. And finally, I use a cotton swab to put a light (very light) bit of microcrystaline wax (Renaissance Wax) on the inside edges of the tube. Sure it is probably not necessary and is most likely overkill, but I think it provides just a touch of lubrication when I am pressing the parts together. These couple of things has really reduced the occurrence of cracking related to pressing for me.

The other thing I did was to mount the press to a tote that is filled with heavy stuff (like my transfer punches, and stuff) and I put the non-slip HoldFast Grips on the bottom to give it some real traction on my workbench. This gives my press a lot more stability and it just doesn't move around when I am pressing.

Don't give up. I'm sure you will find something that works for you.

Regards,
Dave
 

Attachments

  • IMG_2008.JPG
    IMG_2008.JPG
    295.7 KB · Views: 97
  • IMG_2456 Cropped.jpg
    IMG_2456 Cropped.jpg
    242.8 KB · Views: 101
  • IMG_2349 Cropped.jpg
    IMG_2349 Cropped.jpg
    262.7 KB · Views: 100
Last edited:

Kenny Durrant

Member
Joined
Sep 11, 2012
Messages
2,480
Location
Sachse Tx. 75048
I've never used an arbor press but I have the PSI you listed. I like the PSI press because of the disassembly feature. I've noticed at times my pen mill will leave a small rim inside the tube. I'm thinking it's getting dull. I use a rat tail file and clean up the inside of the tube. I reuse tubes so there could be a small ding on the edge or glue or paint inside. If you turn the file counter clockwise it won't try to bite or wedge inside the tube and will do a great job without the extra hassle of reamers.
 

jttheclockman

Member
Joined
Feb 22, 2005
Messages
19,082
Location
NJ, USA.
When pushing components in, a couple things are happening and you need to be able to feel and be aware of. Some have more plating material on them than others and it can cause a tight fit. But you should be able to feel this right away. I always rat tail file out the tubes ever so slightly. I ream the ends. Then I use some Vaseline on the parts to help with the friction portion of fitting parts in. There is friction the entire way when they get pressed in. I use PSI pen press with dimple. I find it useful to find centers. You just need to keep parts square when pressing.
 

Todd in PA

Member
Joined
Feb 16, 2021
Messages
645
Location
Port Matilda, PA
I have a burr removal tool to be sure there is no lip on the brass tube. I also use a rat tail file to remove any glue. I further sand the tube a bit on the ends with a drill and slotted dowel, and now have a set of adjustable reamers to widen the tube even further. Then I clean the tube with DNA. Safe to say it's not dirty tubes that are my issue (though I obviously chased that line of thinking for quite some time).

I'm still cracking about 1 in 5 pens which is super discouraging.

I have narrowed it down to my press equipment/technique. Both Ken and David suggest the dimpled foot of the press I'm using isn't ideal. I'll try making sleeves to cover both ends, and try mounting my press vertically at eye level as Keith does. The between-centers press that ken posted is certainly an affordable upgrade if changing my technique with the press doesn't rapidly improve my success rate.

Thanks everyone for your feedback!
 

Sly Dog

Member
Joined
Nov 16, 2018
Messages
417
Location
Boise, Idaho
I use that same PSI press mounted to a board with dowels that fit my bench dog holes for stability. I'll make the first press with a bushing inserted on one end of the blank. I've had very few crack, but some materials are just less forgiving than others (wait till you try pressing a tru-stone blank, if you haven't already), and the parts to some kits are just tighter fits than others. But I like the PSI press and disassembly feature, as previously mentioned.B47A1B72-13D0-402B-8231-013C6F73D1B9.jpeg974741D8-F3EC-4601-9440-DFF92D0FA2EE.jpeg
 

KenB259

Member
Joined
Dec 24, 2017
Messages
3,537
Location
Michigan
I have a burr removal tool to be sure there is no lip on the brass tube. I also use a rat tail file to remove any glue. I further sand the tube a bit on the ends with a drill and slotted dowel, and now have a set of adjustable reamers to widen the tube even further. Then I clean the tube with DNA. Safe to say it's not dirty tubes that are my issue (though I obviously chased that line of thinking for quite some time).

I'm still cracking about 1 in 5 pens which is super discouraging.

I have narrowed it down to my press equipment/technique. Both Ken and David suggest the dimpled foot of the press I'm using isn't ideal. I'll try making sleeves to cover both ends, and try mounting my press vertically at eye level as Keith does. The between-centers press that ken posted is certainly an affordable upgrade if changing my technique with the press doesn't rapidly improve my success rate.

Thanks everyone for your feedback!
I don't think the dimple causes the cracking. I don't like it because it has caused slight denting and or marking on some nibs.
 

Jans husband

Member
Joined
May 4, 2020
Messages
273
Location
Doncaster England
As an addition to the above, I use a countersink bit with a small battery screwdriver to make a small chamfer on the tube entrance, and I find that even if things aren't squared up properly, with the initial soft push the parts align and the tube accepts the part without any cracking.
Works for me

Mike
 

KenB259

Member
Joined
Dec 24, 2017
Messages
3,537
Location
Michigan
As an addition to the above, I use a countersink bit with a small battery screwdriver to make a small chamfer on the tube entrance, and I find that even if things aren't squared up properly, with the initial soft push the parts align and the tube accepts the part without any cracking.
Works for me

Mike
I use one of these, works well for me. I got it at Harbor Freight.
reamer.jpg
 

Todd in PA

Member
Joined
Feb 16, 2021
Messages
645
Location
Port Matilda, PA
I have the tapered reamer that Ken mentioned, but don't use it since getting the deburring tool. This cuts a tiny chamfer of brass off the inside corner of the tube in two quick twists.
Deburring tool.jpg
 

wouldentu2?

Member
Joined
Jan 27, 2011
Messages
897
Location
Oak Creek WI
I have used a quick grip squeeze clamp for over a thousand pens with no problems, I get a good feel with it.

Someone mentioned waxing it and I do notice a reduction in the amount of force required.
 

boatemp

Member
Joined
Sep 22, 2015
Messages
223
Location
NoCal
A number of years ago I built an upright press. When I go to the shop I;ll take photos. It can be used either horizontally or vertically. It's all wood except 1 piece. I can't remember where I got the idea from but it works great and you can control the pressure easily.
 

Mach4

Member
Joined
Dec 13, 2016
Messages
96
Location
Boise, Idaho
When I make pens out of gemstones e.g. Jasper, Agate, Petrified wood, etc, I use a Dremel and a burr to open up the brass tube to a provide a slip fit of the kit components and then glue it together with super glue. Stone will tolerate no expansion and I suspect many woods don't either. In pressing parts together something has to give. Alternately I sometimes file the edge of the pen component to provide the slip fit though the risk of slipping and scratching the piece makes this method hardly worth it.
 

jttheclockman

Member
Joined
Feb 22, 2005
Messages
19,082
Location
NJ, USA.
When I make pens out of gemstones e.g. Jasper, Agate, Petrified wood, etc, I use a Dremel and a burr to open up the brass tube to a provide a slip fit of the kit components and then glue it together with super glue. Stone will tolerate no expansion and I suspect many woods don't either. In pressing parts together something has to give. Alternately I sometimes file the edge of the pen component to provide the slip fit though the risk of slipping and scratching the piece makes this method hardly worth it.
When doing stone I always make sure the hole drilled is abit over sized. This allows epoxy glue to expand some of need be when glued in. This also helps with the cracking that everyone is talking about. When using CA to glue tubes in it is a hard adhesive that has no flexibility. All this comes into play when using materials that are prone to crack. I am a big believer in using epoxy as the adhesive for tubes.
 

penicillin

Member
Joined
Feb 27, 2019
Messages
1,036
I think your problems may be getting the alignment right. I think you figured that out for yourself.

Like several of the people above, I use the lathe for pen assembly. I use and recommend the Sawdust Bros. lathe pen press adapters. Those pen press adapters are small. I keep them with the drive spurs and live centers in a little basket tucked under the end of the lathe bed. It doesn't get more convenient than that.
https://www.woodcraft.com/products/lathe-pen-press-adapters-2-mt

Frankly, any lathe-based pen press would be equally good, including whatever you might make for yourself. You could turn tapers and come up with something similar to those Sawdust Bros adapters. I bet that a couple of right-size dowels with small flat boards would probably work fine as long as they fit snug and straight in the headstock and tailstock.

What makes a lathe-based pen press work so well for me is the sense of fine, slow, precise control during assembly. Small partial rotations of the tailstock crank result in an even smaller movement of the tailstock quill (spindle). If the parts begin to angle out of alignment, you sense it immediately. You can stop and fix the problem before damage occurs.

Not Recommended:
I have used various pen assembly tools, including the "lever type" sold by Penn State and others. The lever type never gave me the same sense of fine control during assembly. The Rockler pen press / drilling jig has a screw crank that works similar to a lathe. The Rockler pen press is very expensive (read: way overpriced!), and I see no reason to duplicate a function that already exists on my lathe.

Those lever type pen presses are useful for disassembly. It might be reasonable to own one if you do a lot of disassembly and want a tool that can do two jobs - assembly and disassembly.

My need for disassembly dropped a lot once I switched to using a lathe for assembly. Just sayin'.
 

Woodchipper

Member
Joined
Mar 15, 2017
Messages
5,138
Location
Cleveland, TN
As an addition to the above, I use a countersink bit with a small battery screwdriver to make a small chamfer on the tube entrance, and I find that even if things aren't squared up properly, with the initial soft push the parts align and the tube accepts the part without any cracking.
Works for me

Mike
I use a deburring/chamfering tool that goes with my reloading stuff. I clean up the inside and outside with a couple of light turns. I aquired an assembly press several years; think the name is Good Hand but hard to read the last word. I don't do the number of pens as many of you but, so far, haven't had any cracked blanks.
 

boatemp

Member
Joined
Sep 22, 2015
Messages
223
Location
NoCal
A number of years ago I built an upright press. When I go to the shop I;ll take photos. It can be used either horizontally or vertically. It's all wood except 1 piece. I can't remember where I got the idea from but it works great and you can control the pressure easily.
Here are a couple of photos of my endeavor. Feather touch pressure and light handling. Vertical or horizontal. Sorry for the mess behind the press. I have several cylinders for different operations.
20220226_140532.jpg
20220226_140513.jpg
20220226_140456.jpg
20220226_140456.jpg
 

Attachments

  • 20220226_140550.jpg
    20220226_140550.jpg
    388.8 KB · Views: 80

Pens

Member
Joined
May 7, 2015
Messages
2
Location
Provo, Utah
I take a rotary file and deburr the end of the copper tube and then sand in the tube with a 320 grit sand paper and then inverted the pen press on a 2x4 with screws. I then steadied the stand on the bottom so it stands erect. I then bored a hole in a round piece of wood to fit the face of the reamer so as to give it cushion but bored a hole in the center of that for cuplers of the pen to fit into. I also made a leather pillow to center the hole and cushion the butt end of the pens as they were pressed down as to give a smooth transition during assembly. But the other end I took a plastic block and made a small hole in it to place the pen head in.
 

randyrls

Member
Joined
Feb 2, 2006
Messages
4,821
Location
Harrisburg, PA 17112
When doing stone I always make sure the hole drilled is abit over sized. This allows epoxy glue to expand some of need be when glued in. This also helps with the cracking that everyone is talking about. When using CA to glue tubes in it is a hard adhesive that has no flexibility. All this comes into play when using materials that are prone to crack. I am a big believer in using epoxy as the adhesive for tubes.
To join the Thread; With Corian and some Tru-stones, I insert a near sized transfer punch 1/4" into the empty brass tube and spin the punch in an arc to expand the end of the tube until the fitting is a slip fit. I then glue the fitting into the tube with loc-tite. As John said you may have to drill the blank slightly oversize to insert the brass tube into the blank.
 

Todd in PA

Member
Joined
Feb 16, 2021
Messages
645
Location
Port Matilda, PA
Just to follow up. I started pressing my pens on the lathe, and have not had one crack since, including 3 pens with end-capped barrels.

TBH, I think I was not regarding pen assembly as a skill that warranted my learning attention. I thought that as long as I removed the burr and cleaned the tube, I deserved the parts to go together. I've also rediscovered the T-Handle Reamer tool as part of my arsenal of pre-press preparation. I'm taking additional care at this critical step.

Thanks all for your help and suggestions.
 
Top Bottom