@egnald: Thanks for the feedback and the video link. I'll take a look at that this evening.
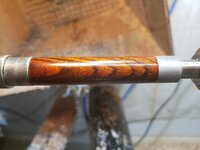
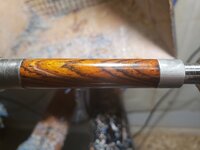
My sanding technique is to sand with the lathe spinning, followed by longitudinal sanding (lathe off) for each grit. The final sanding is done longitudinally. Thus, I didn't think it was scratch marks. When I apply the Pens Plus, I can see the lines forming as I'm moving the paper towel back and forth. So my thinking is that the shellac is drying as I'm polishing, and the paper towel is causing the lines. Below are a couple of photos; not sure if you can see what I'm referring to.
That is Paddock. Those radial lines are the cells of paddock wood, which has large enough cells to be visible to the naked eye. My description might not be technically correct, but in the vernacular, that is a part of the wood grain that you are seeing. Quite common to see those in paddauck-or padauck-or paddock?
That is one aspect that I really like about paddock, the fact that you can see the granular cells. My first complete and well finished pen was paddauk some 17 years ago and I was intrigued to see those cells.
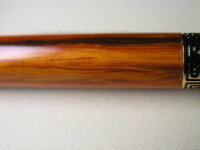
Click on the picture below taken in March 2005, you can see the lines in it too, even though that was not a good photograph.
Your finish is just fine, enjoy it!

So, I wanted to respond to this. While Hank is correct, that some of the striations in the wood are a NATURAL characteristic...I see something else in this particular photo as well:
I see the striations in teh wood, the radial lines....but, I ALSO see streaking in the finish. Look at teh brightest parts of the highlight, above and below it, a bit to the left of center. You can see the streaks in the finish there. Those streaks do not line up with the natural lines in the wood. The similar streaks at the other end of the other highlight also do not line up with the lines in the wood.
So I think there are two things going on here. Yes, there IS a natural striation or grain line in the paduke wood. I've seen it myself, and I wondered about it myself the first few times, until I realized its a natural thing.
That said, personally, I can also see NON-natural streaks that appear to be in the finish itself.
Those streaks, when its with Pens Plus, are often the result of lingering too long while friction-polishing the finish in. If you spend too much time, and the finish solidifies, the point at which the paper towel touches the finish is often hot enough to melt the finish again. But only momentarily. That can cause streaking just like what you see here.
Friction polishing is a bit of an art. You need to spend the right amount of time on it. Not too little, or with too little heat, that you don't cure the finish properly...but also not too long that you start melting the cured finish once its done. With Pens Plus, "build up" is also a cause of streaking problems. This is not a finish you want to build up. I read a LOT of people's techniques with Pens Plus when I first started using it...I guess about 9 months or so ago now. Most of the techniques required "layer" after "layer" to be build up over and over until you achieved a consistent "response" to the finishing process.
I ended up developing my own process, and in the end I realized that Pens Plus is NOT a finish you want to build up! If you do things just right, you could technically get away with a single coat, but in practice, usually, you apply one fairly liberal coat with some initial rub-in with the lathe off first, then turn the lathe on and friction polish it to a shine. Once you let that sit for a bit and settle in, if, IF, you see dry or dull spots, then you might need to apply a VERY, VERY THIN additional layer or two, just until you fully coat every part of the blank with that nice, super shiny, super crystal clear finish. I usually don't apply more than 2-3 coats these days, maybe 4 on a wood that is more porous (however, if you use enough initial coats of pure walnut oil first, and fill in the grain and pores with oil, and give those coats of oil a good friction polishing before you apply the Pens Plus, then you should have minimal drinking of the PP itself once applied.)
Too many coats, and the wax builds up too much (well, really, wax and shellac), and streaking becomes pretty much inevitable. I used to use 8-10 coats, when I first started, based on other people's techniques. It was pretty hard to keep that thick finish looking clear and shiny, and it picked up streaks easily. IT was also softer...and was not as durable as the finishes I get now with just a few coats. Pens Plus is a friction polish, basically a walnut oil version of OB Shine Juice (which is BLO, DNA, and shellac), but with the Cosmolloid 80H (i.e. Renaissance Wax!!) synthetic microcrystalline wax in it. The was is a hardening wax that provides the outer coating, which, thanks to being a regularized microcrystalline structure, gives you the ultra clear, super shiny finish. The shellac coats the wood with a film. The oil penetrates the wood to seal it. The DNA acts as a thinner and a volatile to evaporate and help it all dry and cure, especially under heat.
You want the finish to be THIN, not thick and built up, and you want it to cure properly. So, seal the wood with walnut oil first, then start with a liberal coat of PP, then after that, use just the tiniest amount (like, lentil sized dot) to apply any additional coats to clean up the finish and make it glossy shiny all around, no dull or dry spots.