
You are using an out of date browser. It may not display this or other websites correctly.
You should upgrade or use an alternative browser.
You should upgrade or use an alternative browser.
Apollo 180
- Thread starter KenB259
- Start date
Signed-In Members Don't See This Ad
See more from KenB259


Yeah, I know, Ken. . . but isn't there an inconsistency between the parts photos shown and the instructions ?
But I have a problem with the instruction sheet . . . seems incomplete to me . . . but maybe I am missing something.
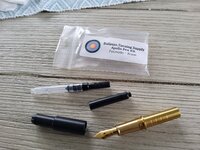
Kit - nib and section of brass are in the body. Pump and ink cartridge are provided. Black plastic is cap insert.
Triple diameter drill is in body, double in cap.
Kevin

So after ripping my whole lathe apart, recalibration it, cleaning it, ruining a really nice blank in the process - I figured out the issue was human error. I guess I needed more coffee....lol.
The kits LOOK similar. The instructions are similar. But that one fine detail between the two is critical. Oh well......you have been warned!

I wasn't sure about using the bocote with the pen because the color was good, but matching the lines and coloring of the grain between the cap and body is always a large challenge. These kits do not have triple start threads on the cap/body connection - they are single start, so the match became much simpler!
Kevin
Signed-In Members Don't See This Ad
moke
Member
Love it! Simple and elegant.....nice shop buddy!
mark james
IAP Collection, Curator
That's very purty! 
jjjaworski
Member
Nice looking pen and a great looking shop helper.
Is that the pen kit from Bullseye ( FP version ) ?
 bullseyeturningsupply.com
Apollo Pen Kit - Original (Retired)
This high-quality pen kit gives you the creative freedom and look of a bespoke pen without needing expensive equipment to achieve it! Made with the finest 304 Stainless Steel & Lead-Free Brass, these pens will be sure to turn heads with your customers. The fountain pen variety uses a Bock 180...
bullseyeturningsupply.com
KMCloonan
Member
Great pen Ken! Nice shop helper. Does he/she help drill blanks on the Laguna? On a side note, did you make the larger hand wheel on the headstock? I am still trying to get used to the stock handle on the Laguna, and I think a larger diameter would be nice.
That would be Zoey, a 16 month old beagle lab mix, better known as beagadors.VERY nice pen !!!!! . . . . and dog !!!
What's your dog's name ?
Yes, that's the one. Very fun pen to make. I bought the roller ball ones though.Is that the pen kit from Bullseye ( FP version ) ?
Apollo Pen Kit - Original (Retired)
This high-quality pen kit gives you the creative freedom and look of a bespoke pen without needing expensive equipment to achieve it! Made with the finest 304 Stainless Steel & Lead-Free Brass, these pens will be sure to turn heads with your customers. The fountain pen variety uses a Bock 180...
Last edited:
Yes, that stock handle was the only thing I didn't care for on the Laguna, so I just used a faceplate and made my own.Great pen Ken! Nice shop helper. Does he/she help drill blanks on the Laguna? On a side note, did you make the larger hand wheel on the headstock? I am still trying to get used to the stock handle on the Laguna, and I think a larger diameter would be nice.
Very nicely done! I love using those kits.
Not much on the coffee, but she's an expert at grabbing a pen blank and getting me to chase her all over the house and yard to get it back.Great Pen and a nice tidy Workshop. How's your helper at making coffee.
NJturner
Member
Very Nice Pen Ken! I bought the fountain pen version of this and have been having a few issues. Following the drilling instructions and drill sizes given resulted in a very sloppy fit of the inserts (yes, I checked my drills and alignments). I've since abandoned the instructions and switched to measuring my drills closer to actual diameters of the parts. I found that my measurements reduced the drill sizes a fair amount over the instruction listing. Curious if you or anyone else found similar things. I do like the pen kits - nicely made and as your pen shows, make a nice piece...... I was not expecting the instruction issues.
I have not run into any issues. The fits are so good, I have to drill a small air relief hole in the bottom of the threaded insert. I believe that is in their tips sheet. Are your holes for other kits on the sloppy side?Very Nice Pen Ken! I bought the fountain pen version of this and have been having a few issues. Following the drilling instructions and drill sizes given resulted in a very sloppy fit of the inserts (yes, I checked my drills and alignments). I've since abandoned the instructions and switched to measuring my drills closer to actual diameters of the parts. I found that my measurements reduced the drill sizes a fair amount over the instruction listing. Curious if you or anyone else found similar things. I do like the pen kits - nicely made and as your pen shows, make a nice piece...... I was not expecting the instruction issues.
moke
Member
Hey Ken, I was starting to wonder if you really made that pen, as your shop is so clean, then I noticed some, what I call acrylic guts on the legs of your legs and felt so much better. LOL
How do you like the laguna? I have it's bigger brother, 18/36 but I heard the new smaller ones like yours are more refined.....speed control, tool holder, etc. Mine works fine now, but had to do some modifying initially.
Zoey looks like a good shop companion! For one thing, she's awake, my shop dogs sleep the whole day....
I have no experience with the bigger ones. I have had no issues with the 1216, other than I didn't like the standard hand wheel.Hey Ken, I was starting to wonder if you really made that pen, as your shop is so clean, then I noticed some, what I call acrylic guts on the legs of your legs and felt so much better. LOL
How do you like the laguna? I have it's bigger brother, 18/36 but I heard the new smaller ones like yours are more refined.....speed control, tool holder, etc. Mine works fine now, but had to do some modifying initially.
Zoey looks like a good shop companion! For one thing, she's awake, my shop dogs sleep the whole day....
KateHarrow
Member
Love it!! Remind me and I'll send you a sticker of Keebo the Shop Dog on your next order!View attachment 320769View attachment 320770View attachment 320771View attachment 320772Stabilized maple, Gabon ebony, aluminum spacer Glu Boost finish and my shop helper.
NJturner
Member
Hi Ken - glad to hear your kits were spot on with measurements. I really think these kits are quality, so I am going to keep at it. I'm thinking either a foible in my setup or something, because I am drilling lots of other kits without issue.I have not run into any issues. The fits are so good, I have to drill a small air relief hole in the bottom of the threaded insert. I believe that is in their tips sheet. Are your holes for other kits on the sloppy side?
@Kate623, @KenB259, @NJturner
**** QUESTION ABOUT THE APOLLO 180 INSTRUCTION SHEET ****
I have not yet bought any of these kits, but I am planning to do so - trying to understand the instructions.
I'm mainly interested in the fountain pen version of the kit.
There are pictures of the "cap sleeve" . . . But I don't see any picture of the "body sleeve".
There are references to both sleeves in the text of the instructions.
Also, there is reference to "body hardware" but I don't see "body hardware" pictured . . unless it is screwed onto the back of the section.
The relevant portions of the instruction text are quoted below . . . .
Under "Gluing the components" . . it says
"3. Press the body sleeve into the body blank."
And then it says . .
"4. Thread the cap insert onto the body hardware." . . This is an important step to ensure alignment of cap and body.
I assume that the "body sleeve" is provided with the kit and is black "plastic" of some sort, similar to the "cap sleeve" which is pictured.
I assume also that the "body" hardware is also provided and is a metal piece separate from the section for the fountain pen version.
Just want to get the instructions clarified before I place my order.
Thanks for any comments
Mal, one side is black plastic, one side is metal, one gets glued into the cap, the other into the body, very simple design to make. I have only made the rollerball version, I am assuming they assemble the same way. I'm sure Kate can answer you in full detail.
Mal, one side is black plastic, one side is metal, one gets glued into the cap, the other into the body, very simple design to make. I have only made the rollerball version, I am assuming they assemble the same way. I'm sure Kate can answer you in full detail
Yeah, I know, Ken. . . but isn't there an inconsistency between the parts photos shown and the instructions ?
But I have a problem with the instruction sheet . . . seems incomplete to me . . . but maybe I am missing something.
NJturner
Member
Mal -Yeah, I know, Ken. . . but isn't there an inconsistency between the parts photos shown and the instructions ?
But I have a problem with the instruction sheet . . . seems incomplete to me . . . but maybe I am missing something.
Kit - nib and section of brass are in the body. Pump and ink cartridge are provided. Black plastic is cap insert.
Triple diameter drill is in body, double in cap.
Kevin
Attachments
NJturner
Member
And here is the thread of cap section into body section per instructions. Pump in place. Shows three diameter drilling requirement in body and two in cap pretty easily.
Kevin

Kevin
rixstix
Member
Mal, you may be overthinking things.
"Press", as in, push with your fingers. For me, the drill sizes and depths were spot on. I have had to drill the teeny, vent hole in all of the half dozen plus that I've turned. I did use a sacrificial blank to test the sizes & depths.
One thing not mentioned in the tips pdf is that trapped air in the cap can/will push the cap sleeve out of the blank if you just glue it & set it aside. DAMHIKT & I didnt remember that fact after the 1st one.
I wouldn't consider this to be a beginner kit.
BTW, our move from North Idaho to South Dakota hasnt been quite as smooth as hoped. I'm just now getting the shop unpacked from the June/July move. Unpacked with nowhere to put it, that is.
NJturner
Member
Mal - I wasn't sure of the instructions until I got the actual parts in the mail. Was hoping the pics would bring that 'ah hah' moment to you too. I agree with Rick, this is NOT a kit for beginner's, even though it seems really simple, so I think the instructions are appropriate for the skill level. I am still looking into my drill size issues. More to come.....@NJturner
Thank you, Kevin. . . . I might contact you again. . . I actually thought, based on instruction sheet, that I had to make the cap and body "sleeves"
I am still hoping to hear from Kate about the wording of the instruction sheet . . . do you have any comment about that ? ?
Thanks again, Kevin.
There were some errors in my understanding . . . I have been delving into these issues and much is clarified now . . . almost all.
The instructions have some shortcomings, as is often the case, but I think I have worked my way out of most of those now.
I think I have the confidence and experience to "see it through".
Your pictures did help, after I realized that they showed all parts required to go into the blank of choice and make a complete pen.
NJturner
Member
One of the best things about this site is there is always someone nearby to lend a hand when needed.....I have benefitted tremendously over the years from the voices here!
Stay well!
Kevin
Stay well!
Kevin
KateHarrow
Member
Hey Mal im really inconsistent about checking this forum so sorry for just seeing all this but I actually have a YouTube video on these pens. It's so difficult to convey some of the nuances through written instructionsThanks again, Kevin.
There were some errors in my understanding . . . I have been delving into these issues and much is clarified now . . . almost all.
The instructions have some shortcomings, as is often the case, but I think I have worked my way out of most of those now.
I think I have the confidence and experience to "see it through".
Your pictures did help, after I realized that they showed all parts required to go into the blank of choice and make a complete pen.
NJturner
Member
Ok....time for me to set something straight - when your wrong, your wrong - so admit it and move on. So here goes. I bought both the Apollo and the Artemis pen kits from Bullseye Turning. As I said previously, these are very nice kits. However, don't be a dummy like me and just download one set of instructions from the website and try and build both kits. The Artemis has a bigger nib then the Apollo. Using the Artemis instructions for drilling the Apollo will give you the sloppy fit I encountered - because ITS THE WRONG SIZE!! The Apollo instructions clearly call out a 23/64 drill for the third bore in the body. Fits perfect with a tiny bit of room for the epoxy. If you GOOF like I did, and you bore the same hole with the 13/32 bit called out for the Artemis, you will end up with a really sloppy fit (duh) because the Apollo section is smaller due to the smaller nib ( 3/64's larger hole).Thanks again, Kevin.
There were some errors in my understanding . . . I have been delving into these issues and much is clarified now . . . almost all.
The instructions have some shortcomings, as is often the case, but I think I have worked my way out of most of those now.
I think I have the confidence and experience to "see it through".
Your pictures did help, after I realized that they showed all parts required to go into the blank of choice and make a complete pen.
So after ripping my whole lathe apart, recalibration it, cleaning it, ruining a really nice blank in the process - I figured out the issue was human error. I guess I needed more coffee....lol.
The kits LOOK similar. The instructions are similar. But that one fine detail between the two is critical. Oh well......you have been warned!
Hey but look you have a clean re calibrated lathe. Don't worry you're not the only one that has ever made a mistake like that.Ok....time for me to set something straight - when your wrong, your wrong - so admit it and move on. So here goes. I bought both the Apollo and the Artemis pen kits from Bullseye Turning. As I said previously, these are very nice kits. However, don't be a dummy like me and just download one set of instructions from the website and try and build both kits. The Artemis has a bigger nib then the Apollo. Using the Artemis instructions for drilling the Apollo will give you the sloppy fit I encountered - because ITS THE WRONG SIZE!! The Apollo instructions clearly call out a 23/64 drill for the third bore in the body. Fits perfect with a tiny bit of room for the epoxy. If you GOOF like I did, and you bore the same hole with the 13/32 bit called out for the Artemis, you will end up with a really sloppy fit (duh) because the Apollo section is smaller due to the smaller nib ( 3/64's larger hole).
So after ripping my whole lathe apart, recalibration it, cleaning it, ruining a really nice blank in the process - I figured out the issue was human error. I guess I needed more coffee....lol.
The kits LOOK similar. The instructions are similar. But that one fine detail between the two is critical. Oh well......you have been warned!
KateHarrow
Member
Sorry you found out the hard way! I couldn't for the life of me figure out why you had such a sloppy fit. At least your lathe is clean lolOk....time for me to set something straight - when your wrong, your wrong - so admit it and move on. So here goes. I bought both the Apollo and the Artemis pen kits from Bullseye Turning. As I said previously, these are very nice kits. However, don't be a dummy like me and just download one set of instructions from the website and try and build both kits. The Artemis has a bigger nib then the Apollo. Using the Artemis instructions for drilling the Apollo will give you the sloppy fit I encountered - because ITS THE WRONG SIZE!! The Apollo instructions clearly call out a 23/64 drill for the third bore in the body. Fits perfect with a tiny bit of room for the epoxy. If you GOOF like I did, and you bore the same hole with the 13/32 bit called out for the Artemis, you will end up with a really sloppy fit (duh) because the Apollo section is smaller due to the smaller nib ( 3/64's larger hole).
So after ripping my whole lathe apart, recalibration it, cleaning it, ruining a really nice blank in the process - I figured out the issue was human error. I guess I needed more coffee....lol.
The kits LOOK similar. The instructions are similar. But that one fine detail between the two is critical. Oh well......you have been warned!
NJturner
Member
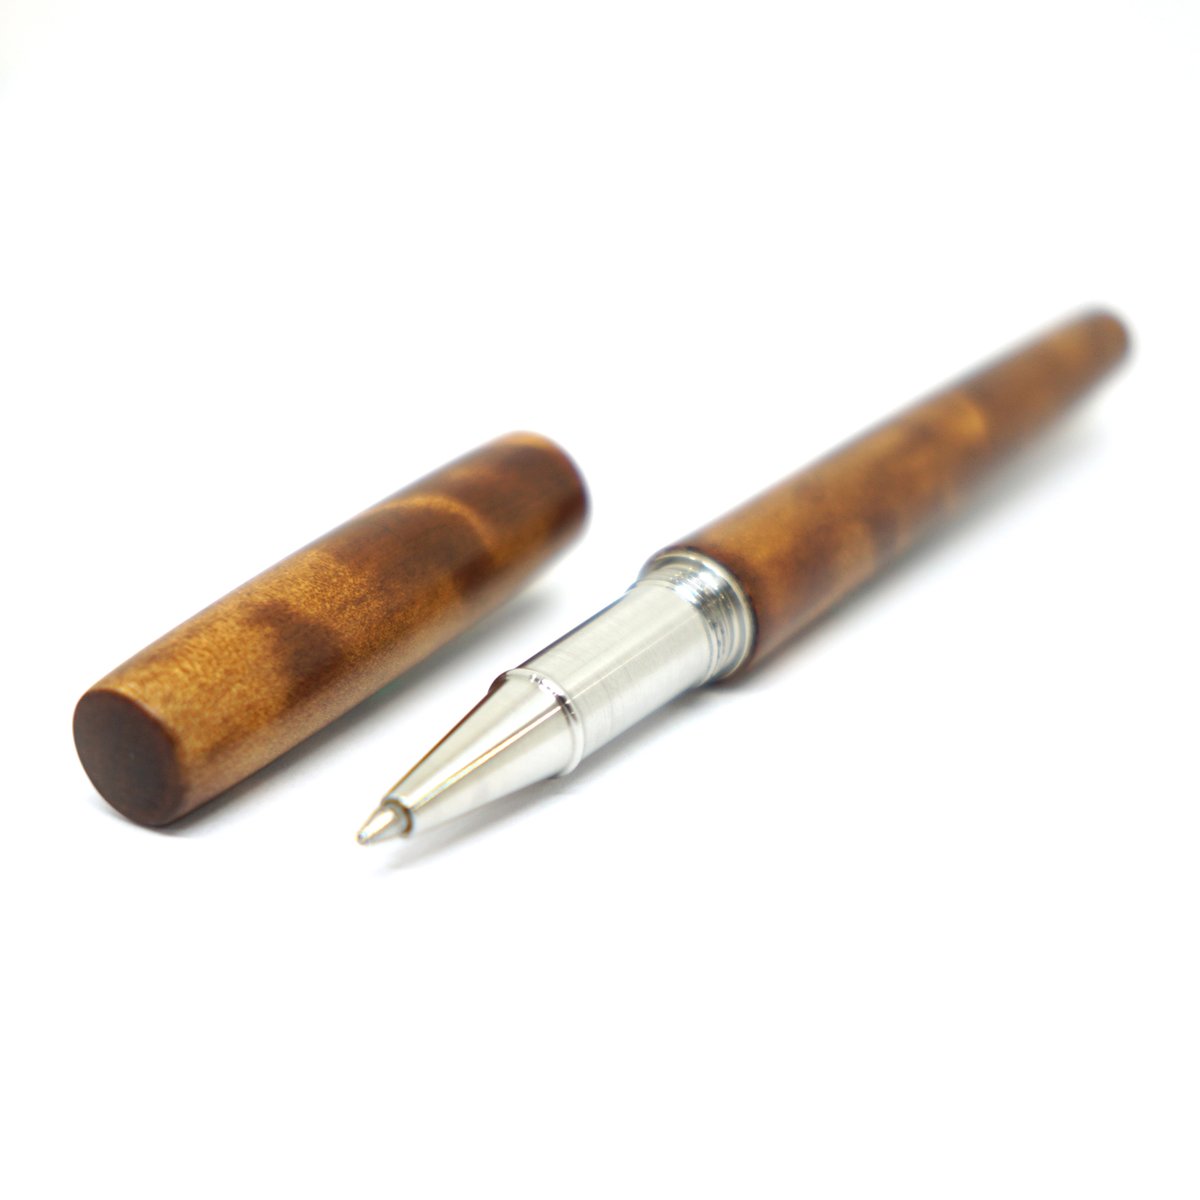
To end the saga of my creation of an Apollo fountain pen, thought I would post one of the pics here as well as the others in the show area. It's Bocote Wood on a Brass Apollo fountain. Finish is Glu Boost. I am pretty pleased with this as my first attempt at this kit. I have a couple more of them that I am going to try doing some customizations to the kit, but wanted to do this one straight out of the baggy.....

Jim15
Member
That's a beauty.
Signed-In Members Don't See This Ad
NJturner
Member
Thanks Ken & Jim!Very nice, the wood you chose goes very well with the brass hardware.
I wasn't sure about using the bocote with the pen because the color was good, but matching the lines and coloring of the grain between the cap and body is always a large challenge. These kits do not have triple start threads on the cap/body connection - they are single start, so the match became much simpler!
Kevin