Wood Butcher
Local Chapter Leader
A couple of weeks ago there was a thread about problems with this material. The thread prompted me to write the following method I have developed.
WB
Inlace, Love It or Hate It
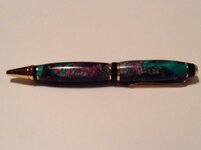
Of all the materials we use to create our form of art, Inlace/Acrylester has caused more tension than almost any other. The dilemma is that the stuff is beautiful when turned and finished; it provides colors and patterns we can't get anywhere else but man, it is a testy product and will try your patience. I have made pens for 25 years plus and have blown up probably 30% of the Inlace I have used, until recently that is. I've read the comments on IAP and have received calls, emails and text messages from folks who attend the demos I do at the local woodworking store and those who have taken a class on Penmaking from me and a lot of the calls come down to, "What do I do to prevent the Inlace blanks from exploding just as I'm finishing the last cut?"
I absolutely understand that we all have a favorite way to turn this material and any method that doesn't end in cursing and throwing things works. This tutorial is just my method and it works for me. If you glean anything beneficial from reading it, that's all I hope for.
1st opportunity to cause it to blow up:
Make it round: What has helped me is to drill a small dimple in one end of the blank and mount the "relatively square" other end in the 4 jaw chuck. Do not crank the chuck jaws down like you would lug nuts; you can crack the blank and not know it. Install a 60 deg. live (rotating) center in the tail stock end and bring up the tail stock up to stabilize the blank, turn on the lathe and turn it fast, I run close to 3000rpm. Use your tool of choice, mine is the ¾" roughing gouge, to turn just ¾ of the exposed blank to round. A note: if your tools aren't sharp either sharpen them correctly or go watch TV. Carbide insert tools work well with Inlace/Acrylester and don't require the sharpening. (see notes at the end of this tutorial) Keep in mind that carbide cutters will never be as sharp as well maintained high speed steel tools but the edge will last longer. The three secrets to machining this wonderful material are high speed, sharp tools and light cuts, always.
2nd opportunity to blow it up:
Remove the live center and install the drill chuck in the tail stock with the correct bit for the kit being used. I have had poor results with brad point bits in Inlace, I prefer a sharp 118 degree jobbers length bit. I mark the drill bit with a Sharpie at a place at least ½" longer that the longest tube from the kit. I will drill all the way to the mark or a little beyond for reasons to yet be explained. Use the pecking method to drill, drill 1/8" to ¼" deep and withdraw the bit and repeat. For the drilling process the lathe is set at around 400 to 500 rpm and no water or coolant please. If the drill bit feels hot when touched stop and cool the drilled hole and the drill bit. I use a restaurant style catsup squeeze bottle to cool the drilled hole. Just puff air into the hole and it cools pretty quickly. The bit can be cooled real fast if you drape a damp paper towel over it for a few seconds. Hint: there is always some play in the tail stock when drilling so grab the drill chuck and twist it one way or the other to take up the slack and hold it there while you drill. I lock the tail stock to the lathe bed and slightly loosen the tail stock crank. This gives me more control than shoving the bit by hand and keeps me from rushing the drilling process. When you reach the Sharpie mark it's time to part off the drilled piece of the blank. I use a Capt'n Eddie style homemade parting tool that is 1/16" thick, less material lost. First, square the end of the drilled blank that is in the chuck. Use the parting tool or skew. Part the blank off slightly longer than the brass tube and lay it aside. Using the same technique drill the other half of the blank (it is still mounted in the chuck and aligned with the drill bit and, there's already part of a hole drilled and waiting) but DO NOT drill all the way through, not even a little. After drilling – not all the way through, remember - reverse the blank piece in the chuck, not too tight, and turn it to round. Finally, part off the second piece of the blank until the drilled hole is exposed, if you have a normal blank it should be plenty long.
It's a good practice to reverse paint the drilled hole when turning ALL plastic blanks and after brushing out the dust. I have found Rustoleum gloss spray enamel works well with the thick CA I use to install the tubes. Just a quick blast of paint in each end of the drilled hole will do it. Let the paint dry over night.
Scuff up the brass tubes with sandpaper, plug the tube with Playdough or jewelers wax (get the wax from IndyPenDance) and glue the tubes in the blank flush with the squared end of the drilled hole where you parted it off. I sometimes paint the sanded tubes too, kinda like wearing a belt and suspenders, can't be too safe. I use CA but epoxy or whatever adhesive you prefer will work. When the glue has setup chuck a blank section in the 4 jaw chuck and part off the end until it's flush with the tube, little bit at a time please, don't remove any brass tube material. Repeat with the other piece of blank. Don't even think of using the barrel trimmer to square the ends, guaranteed destruction 87.6% of the time.
3rd opportunity to blow it up:
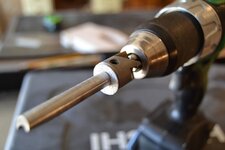
Mount one part of the blank for turning between centers or on the mandrel with bushings and crank the lathe to 3000rpm. Tool's sharp right? Light cuts and get the piece turned down to about 1/16" from final size and stop. Remove the blank from the lathe and square the end to the brass tube. I use the barrel trimmer cutter mounted on the trimmer shaft but in reverse, the cutters are facing back not forward. I place a 1" round, or square, piece of 220 PSA (pressure sensitive adhesive) sandpaper with a ¼" hole in
the center on the flat end of the trimmer to square the blank. Pictures below.
If you have a better way to square, now's the time to use it but again, DO NOT use the barrel trimmer as a cutter; failure is almost guaranteed if you do. I chuck the trimmer in a hand held drill and quickly square up the piece on both ends. Here's why I do this; if the Inlace extends just a small amount beyond the tube and you install the 60 deg. live center in the end or assemble with a press, you will crack or chip the end. The 60 deg. live center should contact the brass tube only.
Remount the part and turn to the finished size. Slowly, carefully and take really little bites, no fast cutting here. Yeah, this takes a little more time but not as much as starting over.
For the shine of your life, here's a method for you. Sand with 320 sandpaper, stop the lathe and sand the length of the blank to remove the radial scratch marks. Wiping with a clean rag to remove the sanding dust from the blank between grit changes will slow the loading of the sandpaper or Micro Mesh; follow the stop and sand operation through the 3200 grade then just sand and WIPE. The final ultra polish is done with Novus Plastic Polish or white auto polish compound.
Last opportunity to blow it up:
When pressing together be very certain the parts line up straight or the thin plastic will break. If the parts are too tight use a dowel and sandpaper to "enlarge" the brass tubes on the ends.
I've talked with the manufacturer of Inlace and he assures me there are no air bubbles in the blanks. He said that if one uses a scraping cut, as is frequently done with the carbide tools, it will appear to have bubbles when in fact the scraping approach causes the problem. Rotate the carbide cutter to 30 or 45 degrees and use as a shearing cut and see what it does. I know the guy pretty well and trust him to know his product but this sounded like hooey to me. I tried several tests and, I hate to admit it, but he seems to be right. Try it for yourselves, cut with a sharp skew but not as a scraper, in a shearing/slicing approach. Then try a spindle gouge again cutting, not scraping and see what happens. Now try the same technique with a roughing gouge.
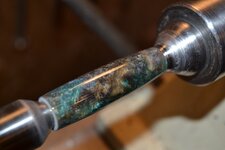
Crushed Mud, Molten Metal, Ocean Mist, Abalone, Gold Coast, all of the almost 70 colors and patterns make learning the process worth the time.
Thanks for your time.
Wood Butcher, Bill Bettag
06/12/2014
WB
Inlace, Love It or Hate It
Of all the materials we use to create our form of art, Inlace/Acrylester has caused more tension than almost any other. The dilemma is that the stuff is beautiful when turned and finished; it provides colors and patterns we can't get anywhere else but man, it is a testy product and will try your patience. I have made pens for 25 years plus and have blown up probably 30% of the Inlace I have used, until recently that is. I've read the comments on IAP and have received calls, emails and text messages from folks who attend the demos I do at the local woodworking store and those who have taken a class on Penmaking from me and a lot of the calls come down to, "What do I do to prevent the Inlace blanks from exploding just as I'm finishing the last cut?"
I absolutely understand that we all have a favorite way to turn this material and any method that doesn't end in cursing and throwing things works. This tutorial is just my method and it works for me. If you glean anything beneficial from reading it, that's all I hope for.
1st opportunity to cause it to blow up:
Make it round: What has helped me is to drill a small dimple in one end of the blank and mount the "relatively square" other end in the 4 jaw chuck. Do not crank the chuck jaws down like you would lug nuts; you can crack the blank and not know it. Install a 60 deg. live (rotating) center in the tail stock end and bring up the tail stock up to stabilize the blank, turn on the lathe and turn it fast, I run close to 3000rpm. Use your tool of choice, mine is the ¾" roughing gouge, to turn just ¾ of the exposed blank to round. A note: if your tools aren't sharp either sharpen them correctly or go watch TV. Carbide insert tools work well with Inlace/Acrylester and don't require the sharpening. (see notes at the end of this tutorial) Keep in mind that carbide cutters will never be as sharp as well maintained high speed steel tools but the edge will last longer. The three secrets to machining this wonderful material are high speed, sharp tools and light cuts, always.
2nd opportunity to blow it up:
Remove the live center and install the drill chuck in the tail stock with the correct bit for the kit being used. I have had poor results with brad point bits in Inlace, I prefer a sharp 118 degree jobbers length bit. I mark the drill bit with a Sharpie at a place at least ½" longer that the longest tube from the kit. I will drill all the way to the mark or a little beyond for reasons to yet be explained. Use the pecking method to drill, drill 1/8" to ¼" deep and withdraw the bit and repeat. For the drilling process the lathe is set at around 400 to 500 rpm and no water or coolant please. If the drill bit feels hot when touched stop and cool the drilled hole and the drill bit. I use a restaurant style catsup squeeze bottle to cool the drilled hole. Just puff air into the hole and it cools pretty quickly. The bit can be cooled real fast if you drape a damp paper towel over it for a few seconds. Hint: there is always some play in the tail stock when drilling so grab the drill chuck and twist it one way or the other to take up the slack and hold it there while you drill. I lock the tail stock to the lathe bed and slightly loosen the tail stock crank. This gives me more control than shoving the bit by hand and keeps me from rushing the drilling process. When you reach the Sharpie mark it's time to part off the drilled piece of the blank. I use a Capt'n Eddie style homemade parting tool that is 1/16" thick, less material lost. First, square the end of the drilled blank that is in the chuck. Use the parting tool or skew. Part the blank off slightly longer than the brass tube and lay it aside. Using the same technique drill the other half of the blank (it is still mounted in the chuck and aligned with the drill bit and, there's already part of a hole drilled and waiting) but DO NOT drill all the way through, not even a little. After drilling – not all the way through, remember - reverse the blank piece in the chuck, not too tight, and turn it to round. Finally, part off the second piece of the blank until the drilled hole is exposed, if you have a normal blank it should be plenty long.
It's a good practice to reverse paint the drilled hole when turning ALL plastic blanks and after brushing out the dust. I have found Rustoleum gloss spray enamel works well with the thick CA I use to install the tubes. Just a quick blast of paint in each end of the drilled hole will do it. Let the paint dry over night.
Scuff up the brass tubes with sandpaper, plug the tube with Playdough or jewelers wax (get the wax from IndyPenDance) and glue the tubes in the blank flush with the squared end of the drilled hole where you parted it off. I sometimes paint the sanded tubes too, kinda like wearing a belt and suspenders, can't be too safe. I use CA but epoxy or whatever adhesive you prefer will work. When the glue has setup chuck a blank section in the 4 jaw chuck and part off the end until it's flush with the tube, little bit at a time please, don't remove any brass tube material. Repeat with the other piece of blank. Don't even think of using the barrel trimmer to square the ends, guaranteed destruction 87.6% of the time.
3rd opportunity to blow it up:
Mount one part of the blank for turning between centers or on the mandrel with bushings and crank the lathe to 3000rpm. Tool's sharp right? Light cuts and get the piece turned down to about 1/16" from final size and stop. Remove the blank from the lathe and square the end to the brass tube. I use the barrel trimmer cutter mounted on the trimmer shaft but in reverse, the cutters are facing back not forward. I place a 1" round, or square, piece of 220 PSA (pressure sensitive adhesive) sandpaper with a ¼" hole in
the center on the flat end of the trimmer to square the blank. Pictures below.
If you have a better way to square, now's the time to use it but again, DO NOT use the barrel trimmer as a cutter; failure is almost guaranteed if you do. I chuck the trimmer in a hand held drill and quickly square up the piece on both ends. Here's why I do this; if the Inlace extends just a small amount beyond the tube and you install the 60 deg. live center in the end or assemble with a press, you will crack or chip the end. The 60 deg. live center should contact the brass tube only.
Remount the part and turn to the finished size. Slowly, carefully and take really little bites, no fast cutting here. Yeah, this takes a little more time but not as much as starting over.
For the shine of your life, here's a method for you. Sand with 320 sandpaper, stop the lathe and sand the length of the blank to remove the radial scratch marks. Wiping with a clean rag to remove the sanding dust from the blank between grit changes will slow the loading of the sandpaper or Micro Mesh; follow the stop and sand operation through the 3200 grade then just sand and WIPE. The final ultra polish is done with Novus Plastic Polish or white auto polish compound.
Last opportunity to blow it up:
When pressing together be very certain the parts line up straight or the thin plastic will break. If the parts are too tight use a dowel and sandpaper to "enlarge" the brass tubes on the ends.
I've talked with the manufacturer of Inlace and he assures me there are no air bubbles in the blanks. He said that if one uses a scraping cut, as is frequently done with the carbide tools, it will appear to have bubbles when in fact the scraping approach causes the problem. Rotate the carbide cutter to 30 or 45 degrees and use as a shearing cut and see what it does. I know the guy pretty well and trust him to know his product but this sounded like hooey to me. I tried several tests and, I hate to admit it, but he seems to be right. Try it for yourselves, cut with a sharp skew but not as a scraper, in a shearing/slicing approach. Then try a spindle gouge again cutting, not scraping and see what happens. Now try the same technique with a roughing gouge.
Crushed Mud, Molten Metal, Ocean Mist, Abalone, Gold Coast, all of the almost 70 colors and patterns make learning the process worth the time.
Thanks for your time.
Wood Butcher, Bill Bettag
06/12/2014